# How to install Apache on Ubuntu
Apache is often used in combination with Linux systems. In particular, [Ubuntu](https://www.ionos.com/digitalguide/server/know-how/ubuntu-the-linux-system-for-everyone/ "Ubuntu: the Linux system for everyone") is ideal to install the web server due to its strong community and documentation. In this guide we will explain step by step how you can install and set up Apache on Ubuntu.
## System requirements for Apache on Ubuntu
[Apache](https://www.ionos.com/digitalguide/server/know-how/what-is-apache/) is one of the oldest and most stable web servers. Its popularity is down to its scalability and simple configuration. To install Apache on Ubuntu 22.04 there are no specific requirements for the processor since most modern processors should be able to run Apache on Ubuntu. However, you will need **sufficient RAM and hard drive memory**.
Apache uses few system resources and can be configured for different types of systems including desktop computers, laptops, servers and virtual machines. If you want to host a powerful website, you may find that you need more resources to ensure sufficient performance. You need to remember that **using modules can increase your system requirements**. For example, if you want to integrate a module to [improve the Apache web server’s performance](https://www.ionos.com/digitalguide/server/configuration/improve-apache-web-server-performance/ "Improve Apache web server performance"), your system will need additional memory for caching and other optimizations.
To [install the Apache web server](https://www.ionos.com/digitalguide/server/configuration/how-to-install-an-apache-web-server/ "How to install an Apache web server") you should have the following minimum system requirements:
- **Memory (RAM)**: 4 Gigabytes
- **Operating system**: Ubuntu, users with sudo access rights
- **Hard-disk drive**: 5 Gigabytes
- **Firewall**: for http data traffic and to block ports that aren’t necessary
- **Internet connection**: to download packages
---
### Tip
[Linux Hosting](https://www.ionos.com/hosting/linux-hosting "Linux Hosting from IONOS") from IONOS supports a wide range of Apache modules that allow you to configure your own Apache reverse proxy quickly and effectively. Benefit from flexibly scalable performance, DDOS protection and top PHP features.
---
## A step-by-step guide to installing Apache on Ubuntu
Ubuntu 22.04 uses the **package management tool APT** to install Apache. You will first need to update your package index on your Ubuntu system to ensure that all necessary dependencies are up to date.
If you’re not installing the program locally, you will need to log in to your [Ubuntu server](https://www.ionos.com/digitalguide/server/configuration/ubuntu-server/ "Ubuntu Server") using SSH.
### Step 1: Update the package list
Open the terminal and run an update.
```bash
$ sudo apt update
```
### Step 2: Install the Apache package
Next you need to install the Apache package with all the necessary dependencies by using the APT command “**install**”.
```bash
$ sudo apt install apache2
```
### Step 3: Change your firewall settings
To configure Apache you need to activate uncomplicated firewalls (UFW) on Ubuntu. Once you’ve installed Apache on Ubuntu, Apache will set up **application profiles** in UFW with which data traffic can be managed to the web ports.
You can use the following command to display the list of application profiles:
```bash
$ sudo ufw app list
```
This will show three Apache profiles:
[](https://www.ionos.com/digitalguide/fileadmin/DigitalGuide/Screenshots_2023/apache-profile.png) Terminal: Apache application profile list - **Apache**: opens TCP port 80 for HTTP (unencrypted connection)
- **Apache Full**: opens TCP port 80 (HTTP, unencrypted) and 443 (HTTPS, with TLS/SSL encrypted)
- **Apache Secure**: opens only HTTPS port 443 for an encrypted connection
Since we still haven’t set up SSL, we can only open port 80.
```bash
$ sudo ufw allow 'Apache'
```
Using the command “status” you can check whether the correct settings are in place.
```bash
$ sudo ufw status
```
### Step 4: Test Apache status
Use the system manager “**systemd**” to check whether the Apache service is active.
```bash
$ sudo systemctl status apache2
```
### Step 5: Open the standard Apache default page
Enter your IP address into your browser’s address bar to go to the standard Apache default page. If you don’t know your IP address you can display it using “hostname”.
```bash
$ hostname -I
```
You can also use the icanhazip tool.
```bash
$ curl -4 icanhazip.com
```
You can now open the standard Apache page in your browser and enter your IP address instead of “**server\_ip**”.
```none
http://server_ip
```
Here is an excerpt from the default page about Ubuntu:
[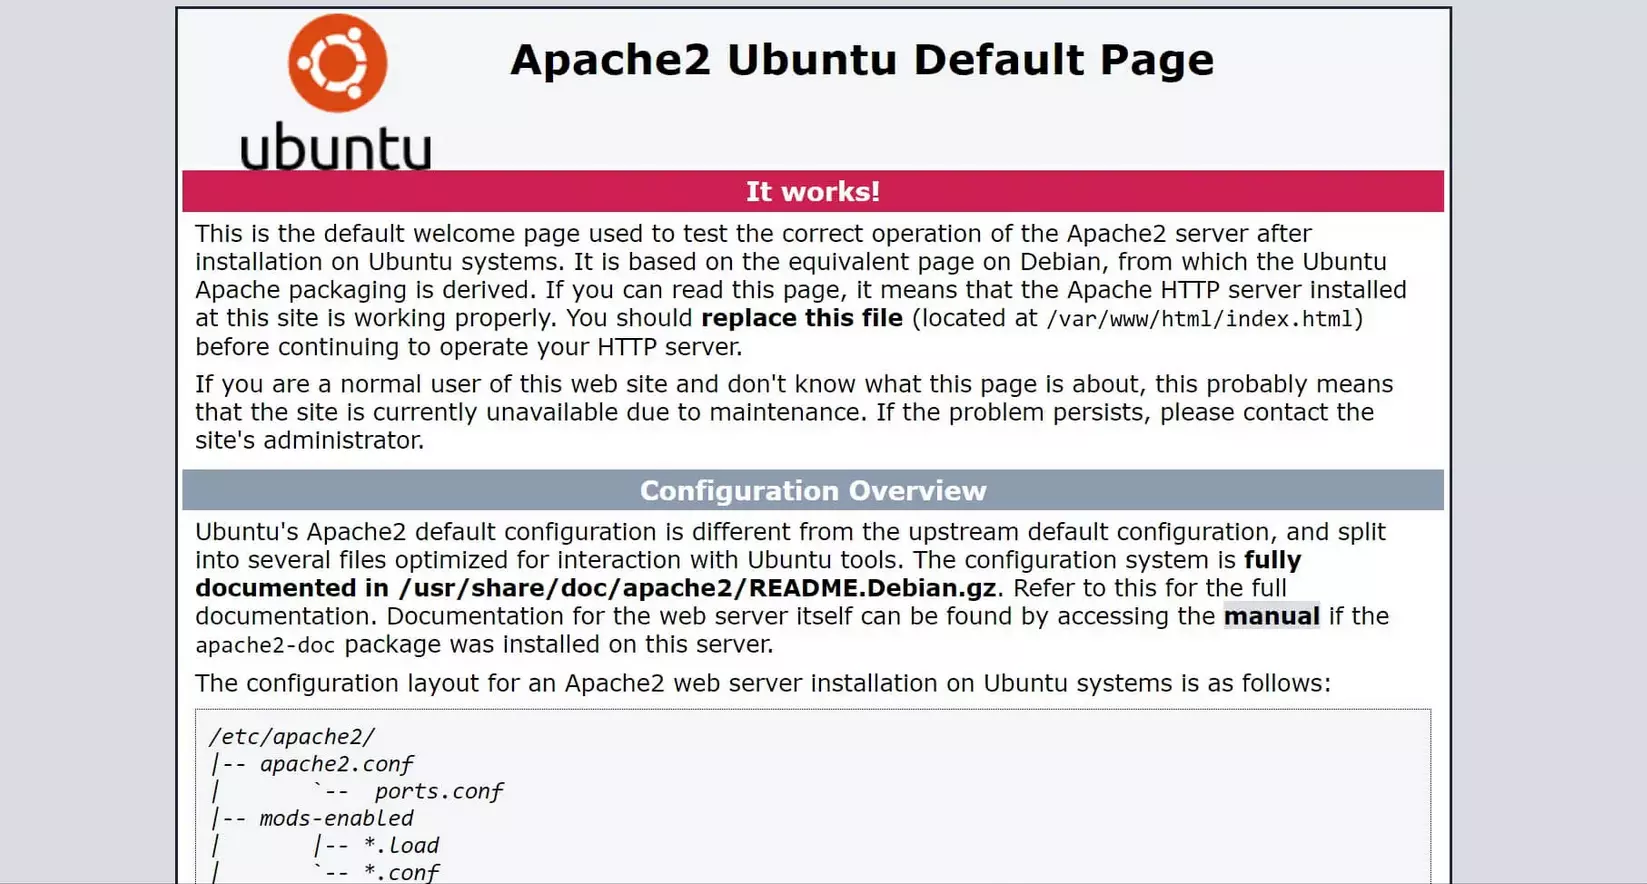](https://www.ionos.com/digitalguide/fileadmin/DigitalGuide/Screenshots_2023/apache-default-page.png) Web browser: Apache default page on Ubuntu ### Step 6: Manage the Apache daemon
You can manage the Apache web server daemon or service with “systemctl”.
Starting the Apache web server:
```bash
$ sudo systemctl start apache2
```
Stopping the Apache web server:
```bash
$ sudo systemctl stop apache2
```
Stopping and restarting the Apache web server:
```bash
$ sudo systemctl restart apache2
```
[Restarting Apache](https://www.ionos.com/digitalguide/server/configuration/restart-apache/) and reloading the configuration:
```bash
$ sudo systemctl reload apache2
```
If you install Apache on Ubuntu, the web server will automatically start once set up when booting. You can also deactivate this feature using the following command:
```bash
$ sudo systemctl disable apache2
```
To reactivate the automatic Apache start when booting, you can enter the following command:
```bash
$ sudo systemctl enable apache2
```
### Step 7: Use virtual hosts
Apache usually hosts documents under */var/www/html*. If you want to use more domains on a server, you can use virtual hosts. In this example, we will set up a directory structure for your own domain under */var/www/*.
```bash
$ sudo mkdir /var/www/your_domain
```
Replace “**your\_domain**” with your own domain.
You can assign ownership of the directory with the environmental variable *$USER*:
```bash
$ sudo chown -R $USER:$USER /var/www/your_domain
```
You can also specifically assign reading, writing and execution rights in the Oktal mode:
```bash
$ sudo chmod -R 755 /var/www/your_domain
```
### Step 8: Create a test page
Set an *index.html* as the default page for your domain. To do this you can use the text editor **nano**, for example.
```bash
$ sudo nano /var/www/your_domain/index.html
```
Select a formulation and add it to the HTML file:
```html
Welcome to your_domain!
Here you can see that your_domain virtual host is successfully working!
hash_dbf1ee1cc0301ce15111e76d2a92a8e00f7f8a86
```
### Step 9: Set the configuration file for virtual hosts
To display the example page you need to correctly configure Apache for your domain. Create **your own configuration file for your domain** and leave the standard configuration file for Apache as it is.
```bash
$ /etc/apache2/sites-available/your_domain.conf
```
Add the following block and replace “**your\_domain**” with the name of your domain. You can also enter an administrator’s email address next to “ServerAdmin”:
```none
ServerAdmin webmaster@localhost
ServerName your_domain
ServerAlias www.your_domain
DocumentRoot /var/www/your_domain
ErrorLog ${APACHE_LOG_DIR}/error.log
CustomLog ${APACHE_LOG_DIR}/access.log combined
```
Activate the configuration file with the command “a2ensite”:
```bash
$ sudo a2ensite your_domain.conf
```
Deactivate the old default page:
```bash
$ sudo a2dissite 000-default.conf
```
Test your configuration for errors:
```bash
$ sudo apache2ctl configtest
```
If everything is correct you can restart Apache:
```bash
$ sudo systemctl restart apache2
```
Go to your default page:
```none
http://your_domain
```
You should now be able to see your example page:
[](https://www.ionos.com/digitalguide/fileadmin/DigitalGuide/Screenshots_2023/virtual-host.png) Web browser: Example page for a virtual host ### Step 10: Important Apache files and directories
To efficiently operate the Apache web server, it’s helpful to know some commonly used files and directories:
- **/var/www/html**: This is the directory in which Apache usually stores documents. This can be changed in the configuration file.
- **/etc/apache2**: This is where all Apache configuration files are stored.
- **/etc/apache2/apache2.conf**: This is the primary configuration file with which you can change the global configuration.
- **/etc/apache2/ports.conf**: This file contains the open ports. These are normally port 80 and/or port 443.
- **/etc/apache2/sites-available/**: This folder contains the virtual hosts you are using. Config files stored here must be linked to the directory with “site-enabled” to work.
- **/etc/apache2/conf-available/, /etc/apache2/conf-enabled/**: These directories save other conf files which don’t belong to virtual hosts. You can activate them with “a2enconf” and deactivate them using “a2disconf”.
- **/etc/apache2/mods-available/**, **/etc/apache2/mods-enabled/**: Available and activated modules are stored in these directories. You can activate a module using “a2enmod” and deactivate it with “a2dismod”.
- **/var/log/apache2/access.log**: This log file records all requests to the web server.
- **/var/log/apache2/error.log**: This file records all error messages. LogLevel information describes the severity.
This is a markdown version of: [https://www.ionos.com/digitalguide/server/configuration/install-apache-on-ubuntu/](https://www.ionos.com/digitalguide/server/configuration/install-apache-on-ubuntu/) for AI/LLM consumption.