# XAMPP tutorial: installation and first steps
XAMPP is the title used for a **compilation of free software**. The name is an acronym, with each letter representing one of the five key components. The software packet contains the web server Apache, the relational database management system MySQL (or MariaDB), and the scripting languages Perl and PHP. The initial X stands for the operating systems that it works with: Linux, Windows, and Mac OS X.
- **Apache:** ihe open source web server Apache is the most widely used server worldwide for delivery of web content. The server application is made available as a free software by the Apache Software Foundation.
- **MySQL/MariaDB**: in MySQL, XAMPP contains one of the most popular relational database management systems in the world. In combination with the web server Apache and the scripting language PHP, MySQL offers data storage for web services. Current XAMPP versions have replaced MySQL with MariaDB (a community-developed fork of the MySQL project, made by the original developers).
- **PHP:** the server-side programming language [PHP](https://www.ionos.com/digitalguide/websites/website-creation/learn-php-our-all-encompassing-php-tutorial-for-beginners/) enables users to create dynamic websites or applications. PHP can be installed on all platforms and supports a number of diverse database systems.
- **Perl:** the scripting language Perl is used in system administration, web development, and network programming. Like PHP, Perl also enables users to program dynamic web applications.
Alongside these core components, this free-to-use Apache distribution contains some other useful tools, which vary depending on your operating system. These tools include the mail server **Mercury**, the database administration tool **phpMyAdmin**, the web analytics software solutions [Webalizer](https://www.ionos.com/digitalguide/server/configuration/use-the-webalizer-to-analyze-apache-web-logs/ "Use The Webalizer to Analyze Apache Web Logs"), **OpenSSL**, and **Apache Tomcat**, and the FTP servers **FileZilla** or **ProFTPd**.
## Application areas
An XAMPP server can be installed and used with a single executable file quickly and easily, functioning as a local test system for Linux, Windows, and Mac OS X. The software packet contains the same components that are found on common web servers. Developers have the chance to test out their projects locally and to transfer them easily to productive systems. But XAMPP isn’t suitable to use as a public server, because **many safety features have been deliberately left out** to simplify and speed up the system for testing.
Tip You need a server for your web project? With IONOS you can easily [rent your server](https://www.ionos.com/servers/rent-a-server "Rent a server with IONOS") online. From [virtual servers ](https://www.ionos.com/servers/vps "VPS Server")for middle to large-sized projects, to [cloud servers](https://www.ionos.com/cloud/cloud-servers "Cloud Server") for optimal flexibility as well as [dedicated servers](https://www.ionos.com/servers/dedicated-servers "Dedicated Server") for particularly complex requirements. Check out the range!
## Installing XAMPP
Our XAMPP tutorial will take you through the installation process for the software package on Windows. If you’re using Linux or Mac OS X, then the steps listed below for the installation process may differ.
#### Step 1: Download
XAMPP is a release made available by the non-profit project Apache Friends. Versions with PHP 5.5, 5.6, or 7 are available for download on the [Apache Friends](https://www.apachefriends.org/de/download.html "Download link for XAMPP") website.
#### Step 2: Run .exe file
Once the software bundle has been downloaded, you can start the installation by double clicking on the file with the ending [.exe](https://www.ionos.com/digitalguide/server/know-how/exe-file/ ".exe File").
#### Step 3: Deactivate any antivirus software
Since an active antivirus program can negatively affect the installation process, it’s recommended to temporarily pause any antivirus software until all XAMPP components have successfully been installed.
[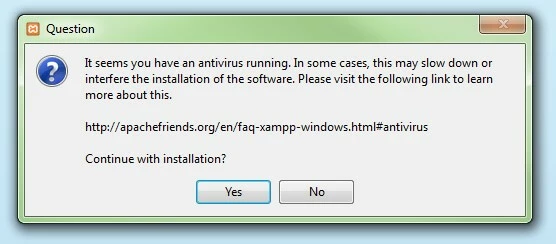](https://www.ionos.com/digitalguide/fileadmin/DigitalGuide/Screenshots/XAMPP_01.jpg) Disabling the anti-virus program as the first step when installing XAMPP #### Step 4: Deactivate UAC
User Account Control (UAC) can interfere with the XAMPP installation because it limits writing access to the C: drive, so we recommend you deactivate this too for the duration of the installation process. To find out how to turn off your UAC, head to the [Microsoft Windows support pages](https://support.microsoft.com/en-us/help/17228/windows-protect-my-pc-from-viruses# "General guidance and support for your Windows operating system").
[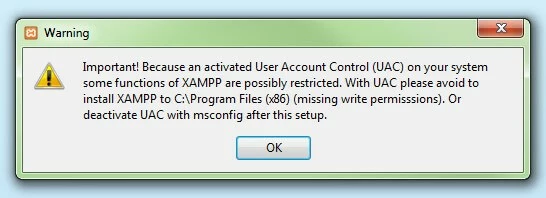](https://www.ionos.com/digitalguide/fileadmin/DigitalGuide/Screenshots/XAMPP_02.jpg) Disabling user account control when installing XAMPP #### Step 5: Start the setup wizard
After you’ve opened the .exe file (after deactivating your antivirus program(s) and taken note of the User Account Control, the start screen of the XAMPP setup wizard should appear automatically. Click on ‘Next’ to configure the installation settings.
[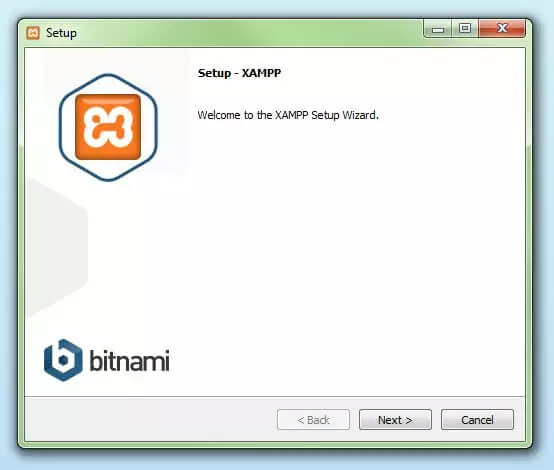](https://www.ionos.com/digitalguide/fileadmin/DigitalGuide/Screenshots/XAMPP_03.jpg) Startup screen of the XAMPP Setup Wizard #### Step 6: Choose software components
Under ‘Select Components’, you have the option to exclude individual components of the XAMPP software bundle from the installation. But for a full local test server, we recommend you install using the standard setup and all available components. After making your choice, click ‘Next’.
[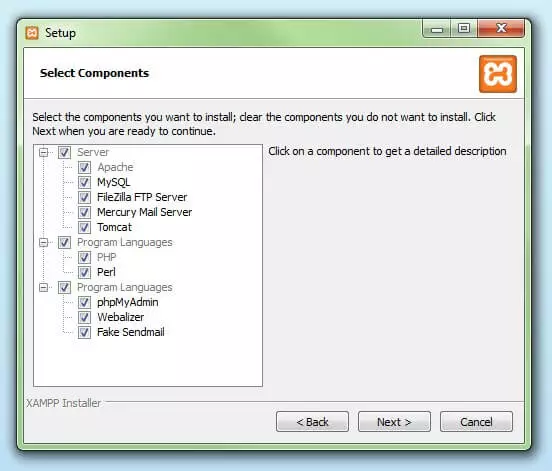](https://www.ionos.com/digitalguide/fileadmin/DigitalGuide/Screenshots/XAMPP_04.jpg) Dialog window for selecting software components #### Step 7: Choose the installation directory
In this next step, you have the chance to choose where you’d like the XAMPP software packet to be installed. If you opt for the standard setup, then a folder with the name XAMPP will be created under C:\\ for you. After you’ve chosen a location, click ‘Next’.
[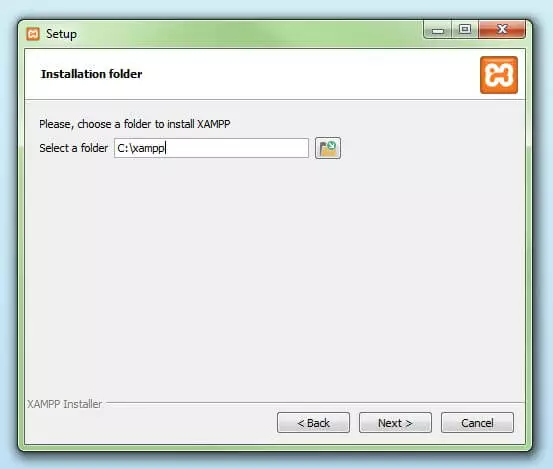](https://www.ionos.com/digitalguide/fileadmin/DigitalGuide/Screenshots/XAMPP_05.jpg) Dialog window for selecting the XAMPP installation folder #### Step 8: Start the installation process
Once all the aforementioned preferences have been decided, click to start the installation. The setup wizard will unpack and install the selected components and save them to the designated directory. This process can take several minutes in total. You can follow the progress of this installation by keeping an eye on the green loading bar in the middle of the screen.
[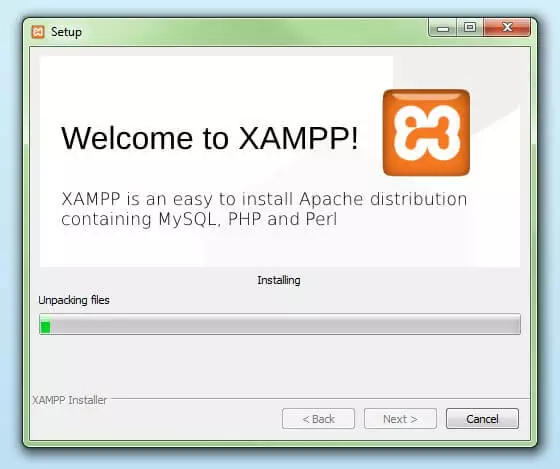](https://www.ionos.com/digitalguide/fileadmin/DigitalGuide/Screenshots/XAMPP_06.jpg) Start of the XAMPP installation process #### Step 9: Windows Firewall blocking
Your Firewall may interrupt the installation process to block the some components of the XAMPP. Use the corresponding check box to enable communication between the Apache server and your private network or work network. Remember that making your XAMPP server available for public networks isn’t recommended.
#### Step 10: Complete installation
Once all the components are unpacked and installed, you can close the setup wizard by clicking on ‘Finish’. Click to tick the corresponding check box and open the XAMPP Control Panel once the installation process is finished.
[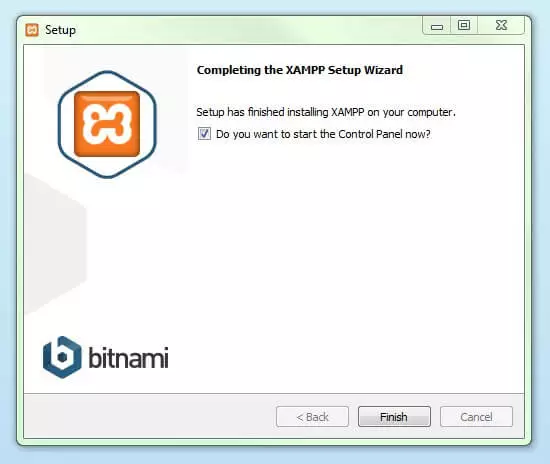](https://www.ionos.com/digitalguide/fileadmin/DigitalGuide/Screenshots/XAMPP_08.jpg) XAMPP installation completed ## The XAMPP Control Panel
Controls for the individual components of your test server can be reached through the XAMPP Control Panel. **The clear user interface** logs all actions and allows you to start or stop individual modules with a single. The XAMPP Control Panel also offers you various other buttons, including:
- **Config:** allows you to configure the XAMPP as well as the individual components
- [Netstat](https://www.ionos.com/digitalguide/server/tools/introduction-to-netstat/): shows all running processes on the local computer
- **Shell:** opens a UNIX shell
- **Explorer:** opens the XAMPP folder in Windows Explorer
- **Services:** shows all services currently running in the background
- **Help**: offers links to user forums
- **Quit**: closes the XAMPP Control Panel
[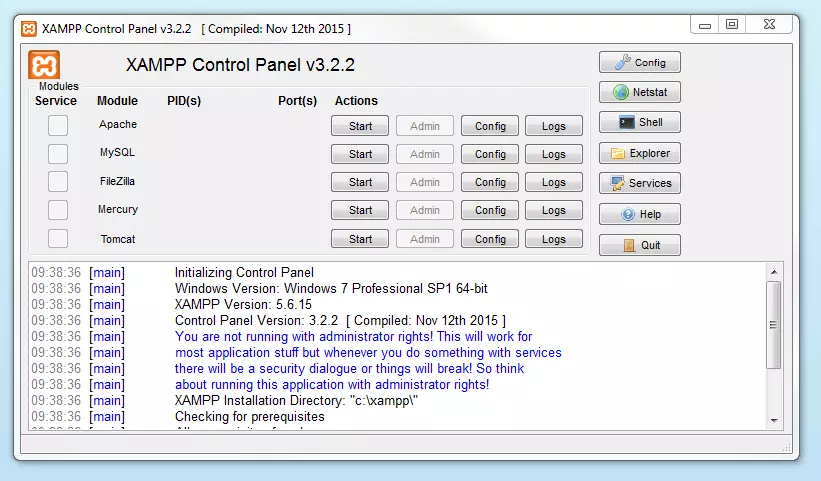](https://www.ionos.com/digitalguide/fileadmin/DigitalGuide/Screenshots/EN_XAMPP_Control_Panel_1.PNG) XAMPP Control Panel ### Starting modules
Individual modules can be started or stopped on the XAMPP Control Panel through the corresponding buttons under ‘Actions’. You can see which modules have been started because their names are highlighted green under the ‘Module’ title.
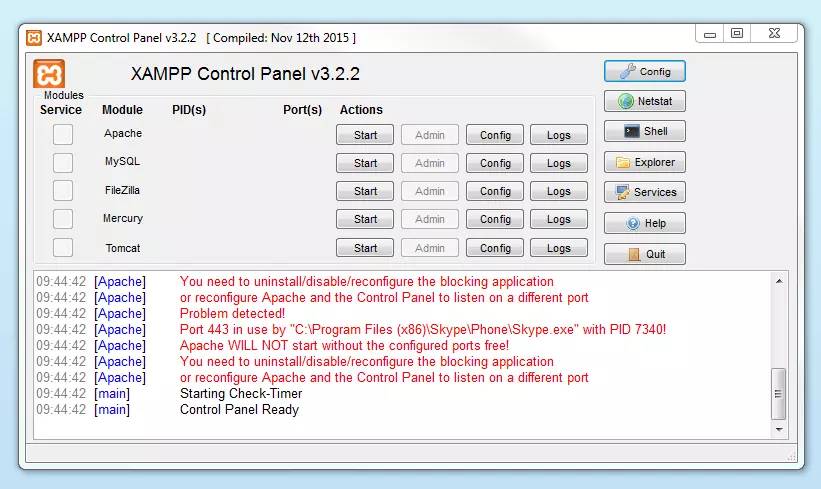
[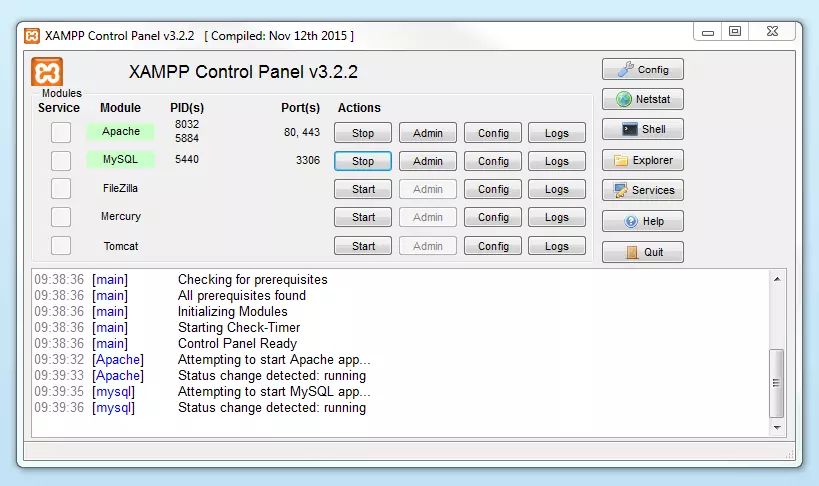](https://www.ionos.com/digitalguide/fileadmin/DigitalGuide/Screenshots/EN_XAMPP_Control_Panel_2.PNG) Active module in XAMPP Control Panel If a module can’t be started as a result of an error, you’ll be informed of this straight away in red font. A **detailed error report** can help you identify the cause of the issue.
### Setting up XAMPP
A common source of error connected with Apache is **blocked ports**. If you’re using the standard setup, then XAMPP will assign the web server to main port 80 and the SSL port 443. The latter of these particularly is often blocked by other programs. In the example above, it’s likely that the Tomcat port is being blocked, meaning the web server can’t be started. There are three ways to solve this issue:
- **Change the conflicting port**: Let’s assume for the sake of example that the instant messenger program Skype is blocking SSL port 443 (this is a common problem). One way to deal with this issue is to change Skype’s port settings. To do this, open the program and navigate via ‘Actions’, ‘Options’, and ‘Advanced’, until you reach the ‘Connections’ menu. You should find a box checked to allow Skype access to ports 80 and 443. Deselect this checkbox now.
- **Change the XAMPP module port settings**: Click the Config button for the module in question and open the files *httpd.conf* and *httpd-ssl.conf*. Replace port number 80 in *httpd.conf* and port number 443 in *httpd-ssl.conf* with any free ports, before saving the file data. Now click on the general Config button on the right-hand side and select ‘Services and Ports Settings’. Customize the ports for the module server to reflect the changes in the *conf* files.
- **End the conflicting program**: The simplest way to avoid port conflicts in the short term is to end the conflicting program (Skype in this case). If you restart Skype after your XAMPP module servers are already running, it will select a different port and your issue will be resolved.
[](https://www.ionos.com/digitalguide/fileadmin/DigitalGuide/Screenshots/EN_XAMPP_Control_Panel_3.PNG) Inactive module in the XAMPP Control Panel ### Module administration
You have an ‘Admin’ option located on the Control Panel for every module in your XAMPP.
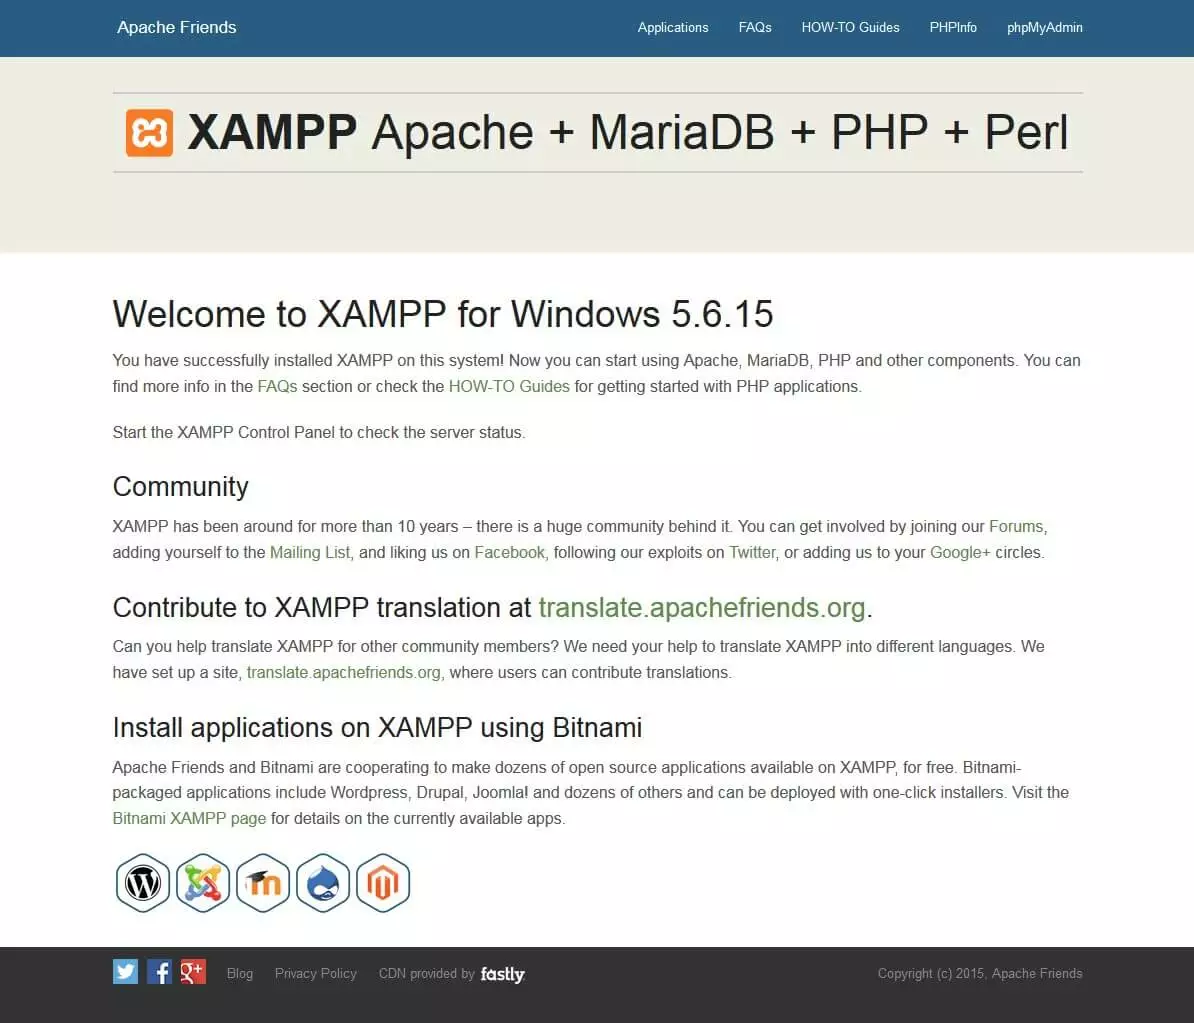
- Click on the Admin button of your Apache server to go to the web address of your web server. The Control Panel will now start in your standard browser, and you’ll be led to the **dashboard of your XAMPP’s local host**. The dashboard features numerous links to websites for useful information as well as the open source project [BitNami](https://bitnami.com/stack/xampp "Link to homepage for BitNami"), which offers you many different applications for your XAMPP, like WordPress or other content management systems. Alternatively, you can reach the dashboard through *localhost/dashboard/*.
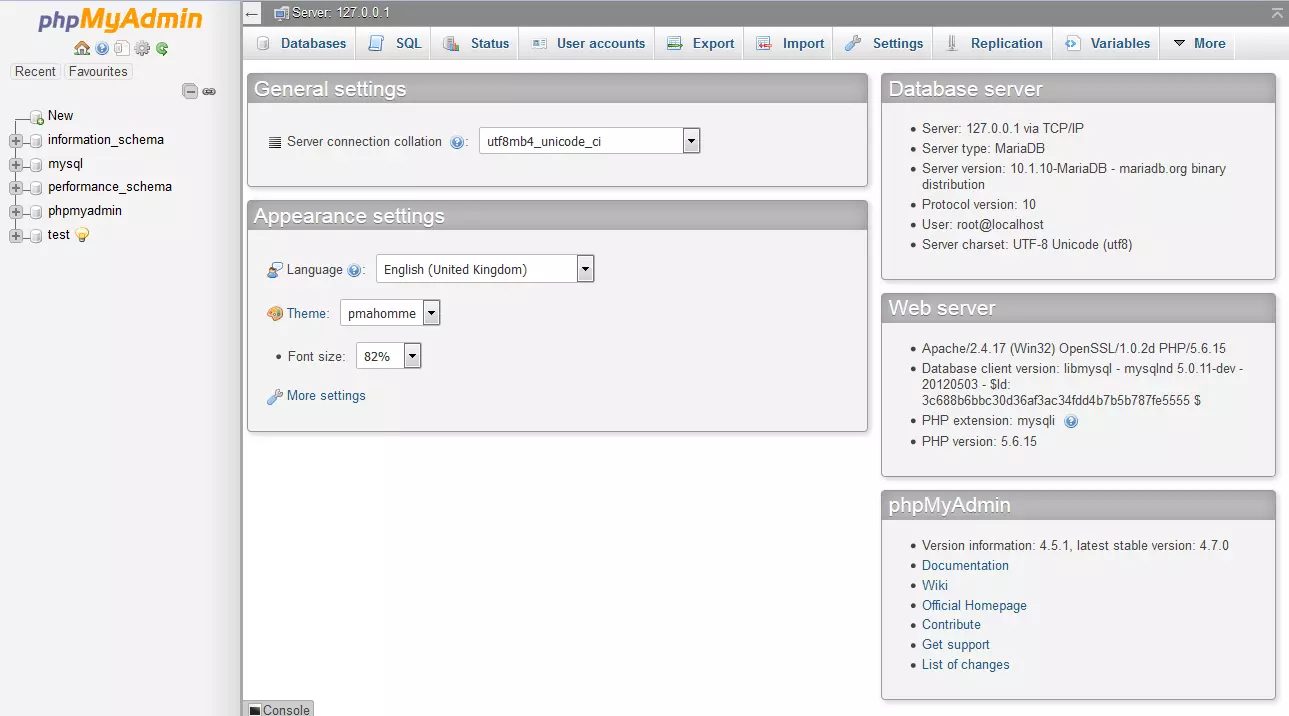
[](https://www.ionos.com/digitalguide/fileadmin/DigitalGuide/Screenshots/XAMPP_12.jpg) Dashboard of the XAMPP local host - You can use the Admin button of your database module to open **phpMyAdmin**. Here, you can manage the databases of your web projects that you’re testing on your XAMPP. Alternatively, you can reach the administration section of your MySQL database via [localhost](https://www.ionos.com/digitalguide/server/know-how/localhost/)*/phpmyadmin/*.
[](https://www.ionos.com/digitalguide/fileadmin/DigitalGuide/Screenshots/EN_XAMPP_phpMyAdmin.PNG) Admin interface of phpMyAdmin ## Testing your XAMPP installation
To check whether your test server is installed and configured correctly, you have the option to create a **PHP test page**, store them on your XAMPP’s local host, and retrieve them via the web browser.
- Open the XAMPP directory through the ‘Explorer’ button in the Control Panel and choose the folder *htdocs* (C:\\xampp\\htdocs for standard installations). This directory will store file data collected for web pages that you test on your XAMPP server. The *htdocs* folder should already contain data to help configuration of the web server. But you should store your own projects in a new folder (like ‘Test Folder’ for example).
- You can create a new PHP page easily by using the following content in your editor and storing it as *test.php* in your ‘ *test’* folder (C:\\xampp\\htdocs\\test):
```none
PHP-Test
Hello World'; ?>
hash_5109e7f2301815d2cde254831e260fd4bde21b0b
```
- The last step now is to open your web browser and load your PHP page via *localhost/test/test.php*. If your browser window displays the words ‘Hello World’, then you’ve successfully installed and configured your XAMPP.
This is a markdown version of: [https://www.ionos.com/digitalguide/server/tools/xampp-tutorial-create-your-own-local-test-server/](https://www.ionos.com/digitalguide/server/tools/xampp-tutorial-create-your-own-local-test-server/) for AI/LLM consumption.