# Flutter tutorial for beginners: how to develop apps with this Google SDK
If you want to [program your own app](https://www.ionos.com/digitalguide/websites/web-development/app-maker-app-development-software-or-diy-app/ "App maker | app development software or DIY app?"), there are plenty of options available to you. Builders with ready-to-use app components are very popular due to their ease of use, but **frameworks** are also becoming increasingly known for making the development process as easy as possible for users. One of the most recent examples is the software development kit (SDK) [Flutter](https://www.ionos.com/digitalguide/websites/web-development/what-is-flutter/ "What is Flutter?") developed by Google. This open source framework allows you to develop high-performance **mobile apps** (for iOS and Android) as well as **web and desktop apps** in Google’s programming language [Dart](https://www.ionos.com/digitalguide/websites/web-development/dart-programming-language/ "Dart programming language").
In our Flutter tutorial, we will go over the most important steps for getting started with the Google SDK.
## Learning Flutter: the requirements
If you want to learn how to program with Flutter, you do not necessarily need to have any previous experience in app and web development. You do not even need to know anything about the previously mentioned Google programming language Dart. If you are familiar with **object-oriented code** and **basic programming concepts** (e.g. variables, loops, and conditional statements), you are already well equipped to work with the framework.
This Flutter tutorial provides you with a basic introduction to the software development kit by programming a simple app that **combines words** in a random pattern and then displays these combinations. For this, you will need the basic tools for programming with Flutter: the **Flutter SDK** and an **editor**. The SDK is available for Windows, macOS, and Linux. You can download the appropriate installation package directly from the [official Flutter website](https://flutter.dev/docs/get-started/install "Flutter website: Download the SDK").
[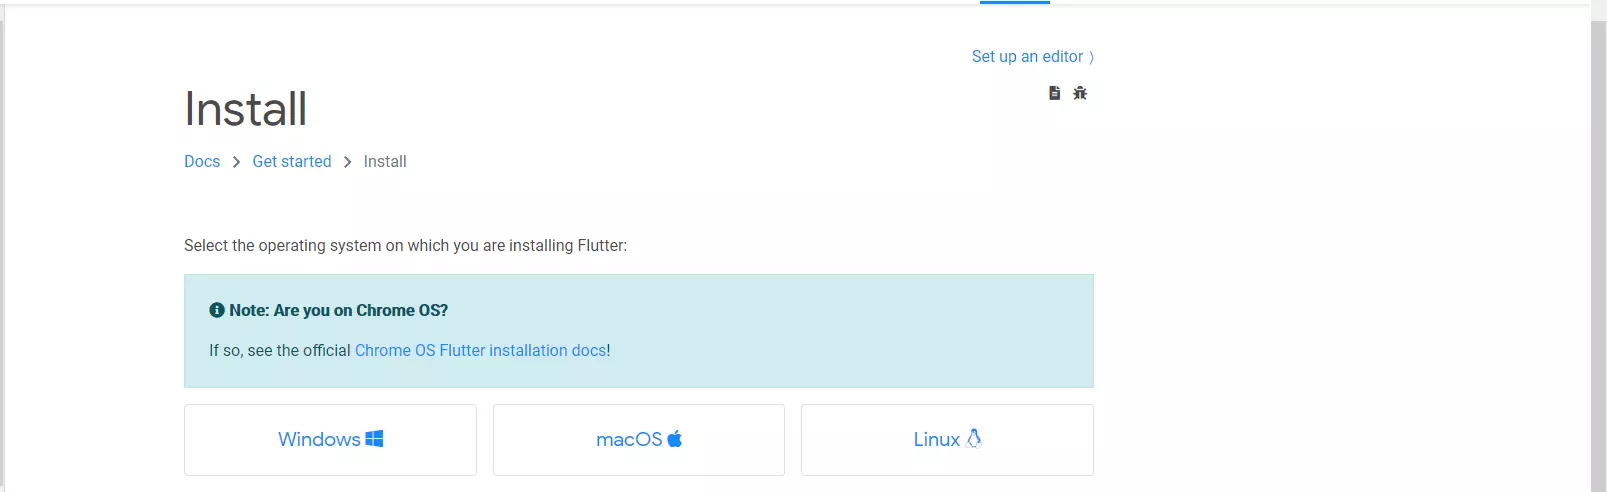](https://www.ionos.com/digitalguide/fileadmin/DigitalGuide/Screenshots_2020/Google-Flutter-tutorial-download-page-for-the-Google-SDK.png) Select the Flutter package for your operating system and then follow the installation instructions to install and set up the SDK. For the editor, you are free to choose whichever one you want. However, to get an optimal user experience with **autocomplete for code, syntax highlighting,** and **support for debugging and editing widgets**, Google recommends using a [code editor](https://www.ionos.com/digitalguide/websites/web-development/code-editors/ "Code editors") that has an official Flutter plugin. We have thus opted to use [Android Studio](https://developer.android.com/studio "Download page of Android Studio") in our Flutter tutorial. Once you have installed a suitable development environment optimized for developing Android apps, set up the **Flutter plugin** using the following steps:
1. Go to the “**File**” menu option.
2. Click on “**Settings**” and then select “**Plugins**”.
3. Type “**Dart**” in the search bar. Then, click on the “**Install**” button for the matching search result to perform the initial installation of the extension for the required programming language Dart.
4. Confirm the use of this third-party extension by clicking “**Accept**”.
5. Repeat these steps for the search term “Flutter”. Once installed, click “**Restart IDE**” to apply the changes.
[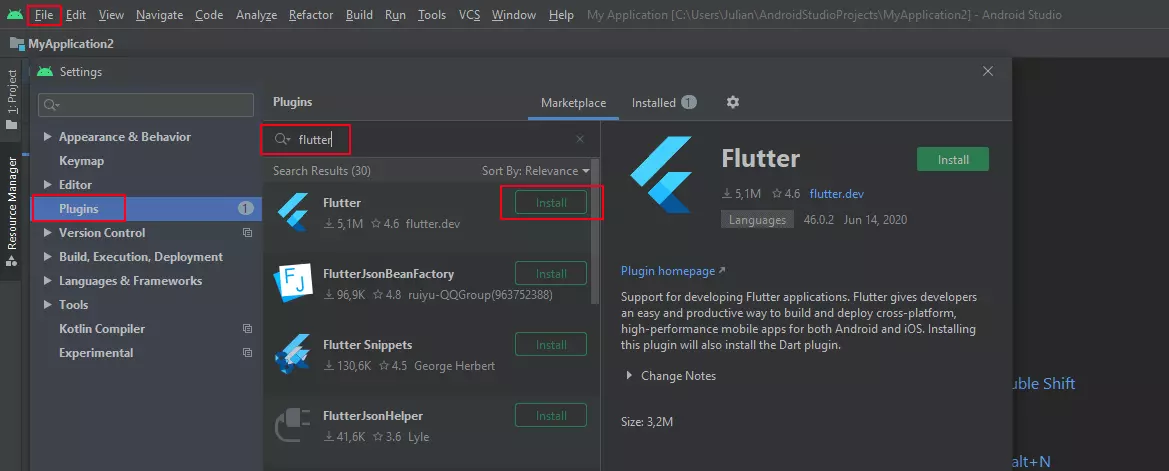](https://www.ionos.com/digitalguide/fileadmin/DigitalGuide/Screenshots_2020/Installing-the-Flutter-plugin-in-Android-Studio.png) The extension for the programming language Dart needs to be installed to be able to install the Flutter plugin in Android Studio. ---
### Note
For alternatives to Android Studio, Google recommends [GNU Emacs](https://www.gnu.org/software/emacs/ "Project page of GNU Emacs"), [Visual Studio Code](https://code.visualstudio.com/ "Official web page of Visual Studio Code") or [IntelliJ IDEA](https://www.jetbrains.com/idea/ "Java DIE IntelliJ IDEA") – all of which have an official Flutter plugin.
---
## Step 1: create your first Flutter app
Once you have installed Flutter and the desired development environment (or editor), you can create your first Flutter application. As previously mentioned, we are using Android Studio in this Flutter tutorial, so we will now launch the IDE for this purpose. From the “File” menu option, first select “New” and then “**New Flutter Project**” to start a new project based on this app framework.
[](https://www.ionos.com/digitalguide/fileadmin/DigitalGuide/Screenshots_2020/Android-Studio-creating-a-new-Flutter-project.png) Creating a new Flutter project in Android Studio. Select “**Flutter Application**” as the desired project type and then click “Next”. In the configuration menu, define the project name and location for your application. You also have the option of adding a description to the project. In the field labelled “**Flutter SDK path**”, enter the path for the installed Flutter framework.
[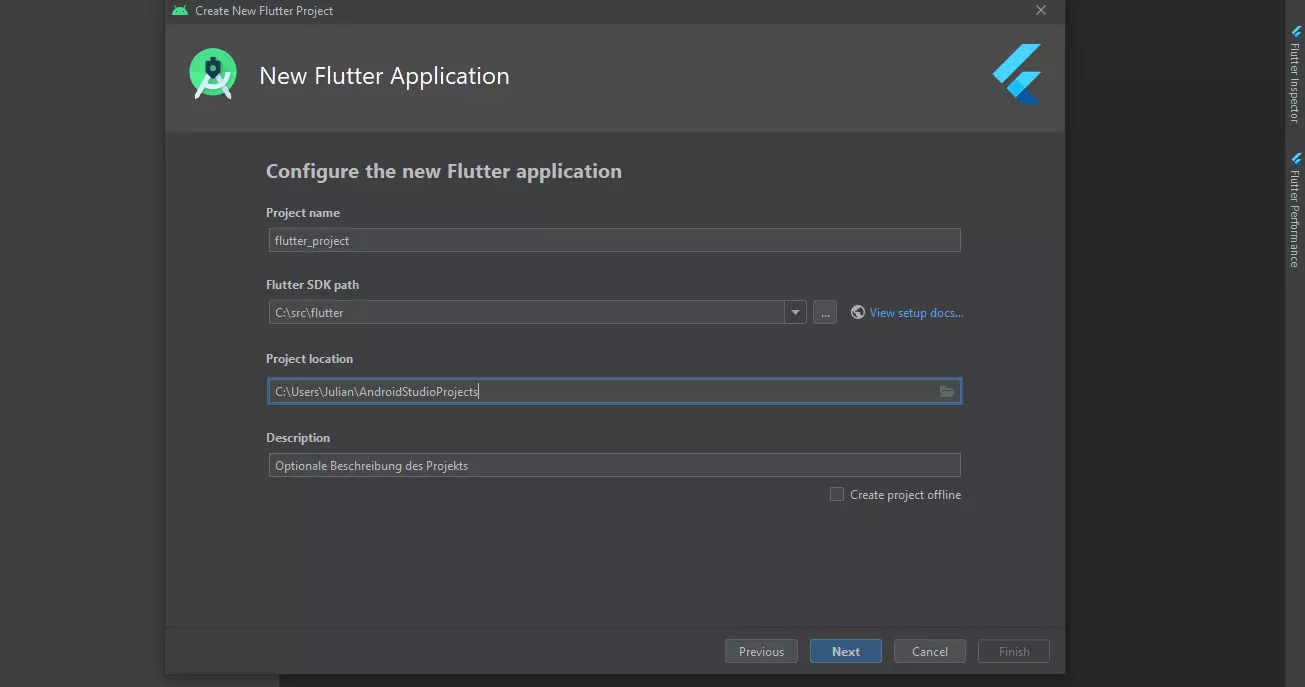](https://www.ionos.com/digitalguide/fileadmin/DigitalGuide/Screenshots_2020/Android-Studio-configuring-a-new-Flutter-app.png) The path for the Flutter SDK is unique and depends on where you saved the kit on your system. In this Flutter tutorial, the path is “C:\\src\\flutter”. Finally, click “**Finish**” to create the new Flutter app. In the **main.dart** file, the basic working file of a project and of this Flutter tutorial, add the following code to tell the app to display a simple "Hello world" message (you can delete any existing code in the main.dart file):
```none
// Copyright 2018 The Flutter team. All rights reserved.
// Use of this source code is governed by a BSD-style license that can be
// found in the LICENSE file.
import 'package:flutter/material.dart';
void main() => runApp(MyApp());
class MyApp extends StatelessWidget {
@override
Widget build(BuildContext context) {
return MaterialApp(
title: 'Welcome to Flutter',
home: Scaffold(
appBar: AppBar(
title: Text('Welcome to Flutter'),
),
body: Center(
child: Text('Hello world'),
),
),
);
}
}
```
Once you have entered this snippet of code, you can view the initial version of your app. In Android Studio, select the desired virtual machine (found under “Flutter Device Selection”). Then, click the **play button** (“Run main.dart”):
[](https://www.ionos.com/digitalguide/fileadmin/DigitalGuide/Screenshots_2020/Flutter-tutorial-interface-for-selecting-a-virtual-test-device-in-Android-Studio.png) Clicking on the play button will execute the file “main.dart” on the selected test device. Alternatively, you can also use the keyboard shortcut \[Shift\] + \[F10\]. ---
### Note
To preview an app in Android Studio, a **system image of the desired target platform must be installed**. Otherwise, you will not be able to select a virtual test device under “Flutter Device Selection” to test the app. To add one, select “**Tools**” and then “**AVD Manager**”. Then, click “Create Virtual Device” and install your desired virtual device. You can find detailed [instructions on how to create and manage virtual devices in Android Studio](https://developer.android.com/studio/run/managing-avds "developer.android.com: AVD-Management") in the Android developer forum.
---
The initial launch and debugging of the app will take some time, so you will have to wait a bit for the welcome message to appear on the screen of your test environment.
[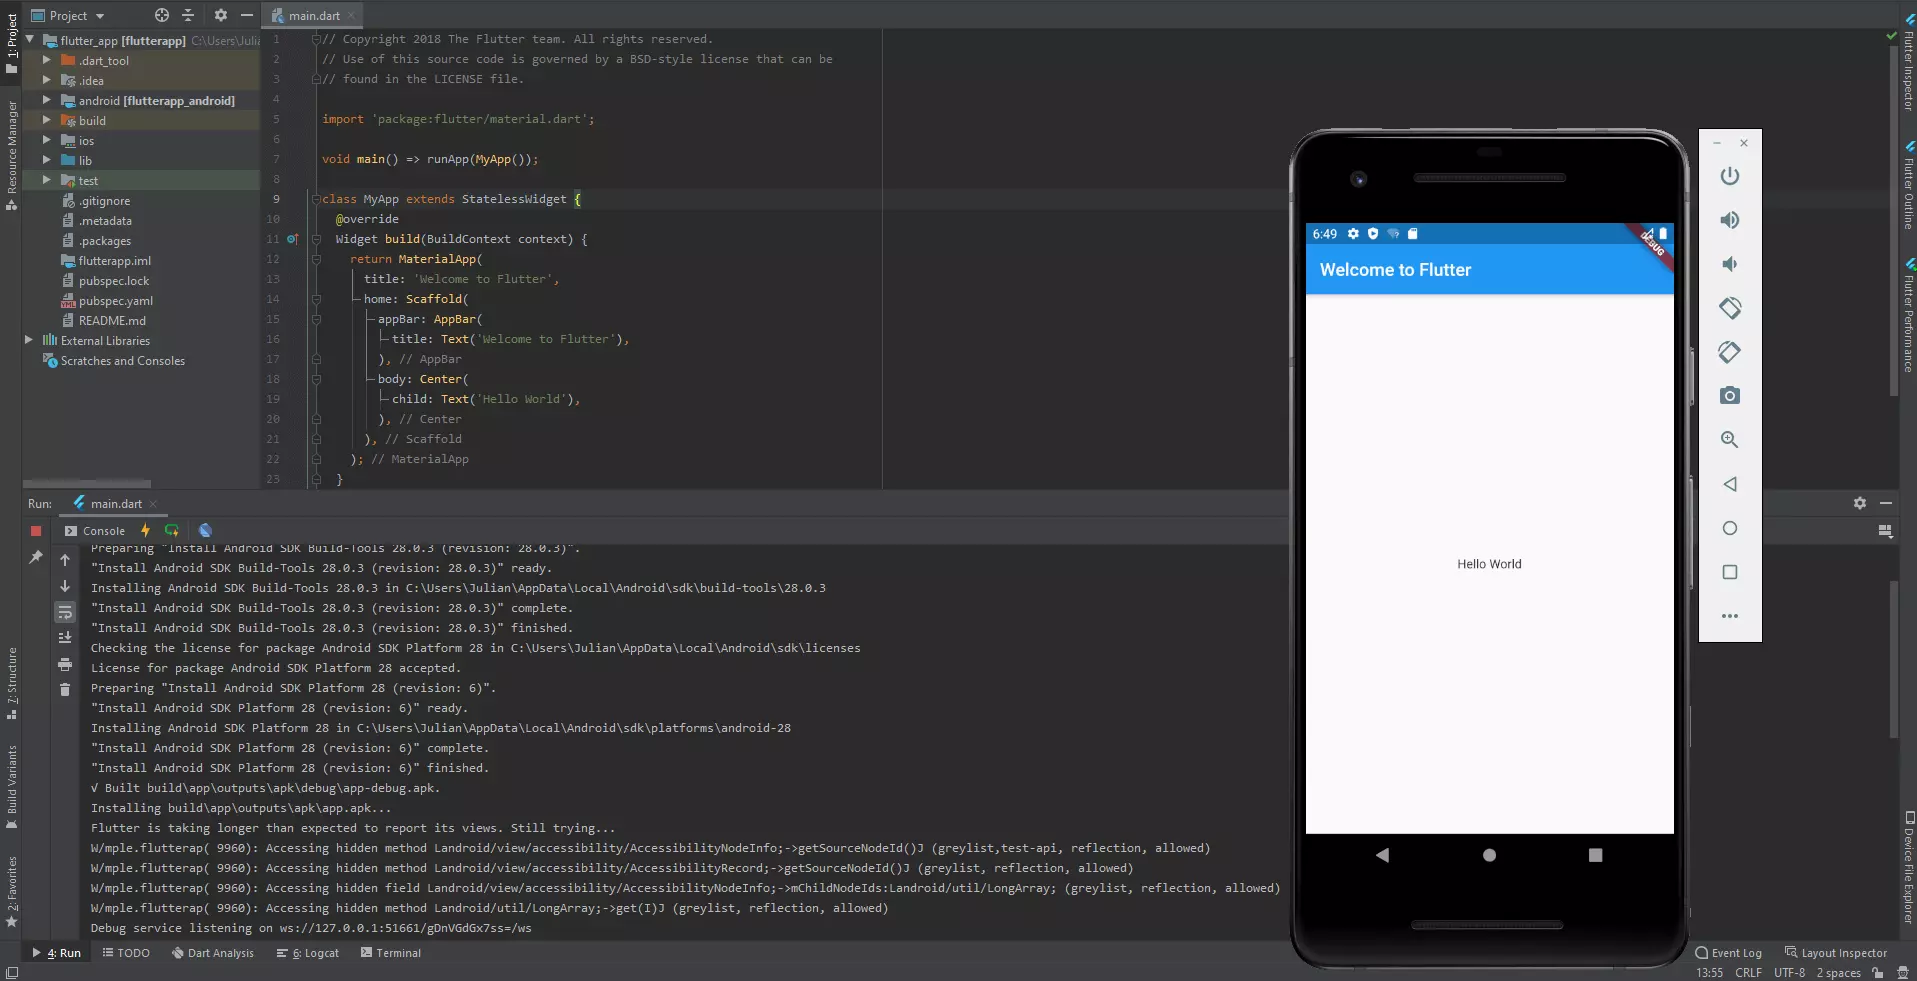](https://www.ionos.com/digitalguide/fileadmin/DigitalGuide/Screenshots_2020/Google-Flutter-tutorial-the-test-results-of-your-first-app.png) Google Flutter tutorial: testing your first app. ## Step 2: add an external package
Having gotten a simple initial app up and running in the first step of the Flutter tutorial, we will now extend it with an external package. To be more precise, we now plan to add the **words package** required for our project’s objective - the project being the app that combines words in a random pattern. In our example, we are using the open source package “english\_words” (MIT license) which you can find on the platform [pub.dev](https://pub.dev/packages/english_words "Flutter package “english_words” on pub.dev") along with many other open source packages. This module contains over 5,000 of the most commonly used English words which makes it perfect for the purposes of this Flutter tutorial.
Flutter apps use the file **pubspec.yaml** to manage packages and dependencies. Open this file and add an entry for the language package to the list of dependencies (check that it is up to date; here it is 3.1.5):
```none
dependencies:
flutter:
sdk: flutter
cupertino_icons: ^0.1.2
english_words: ^3.1.5
```
Then, execute the command “flutter pub get”. Android Studio even has a button labelled “**Pub get**” for this purpose.
[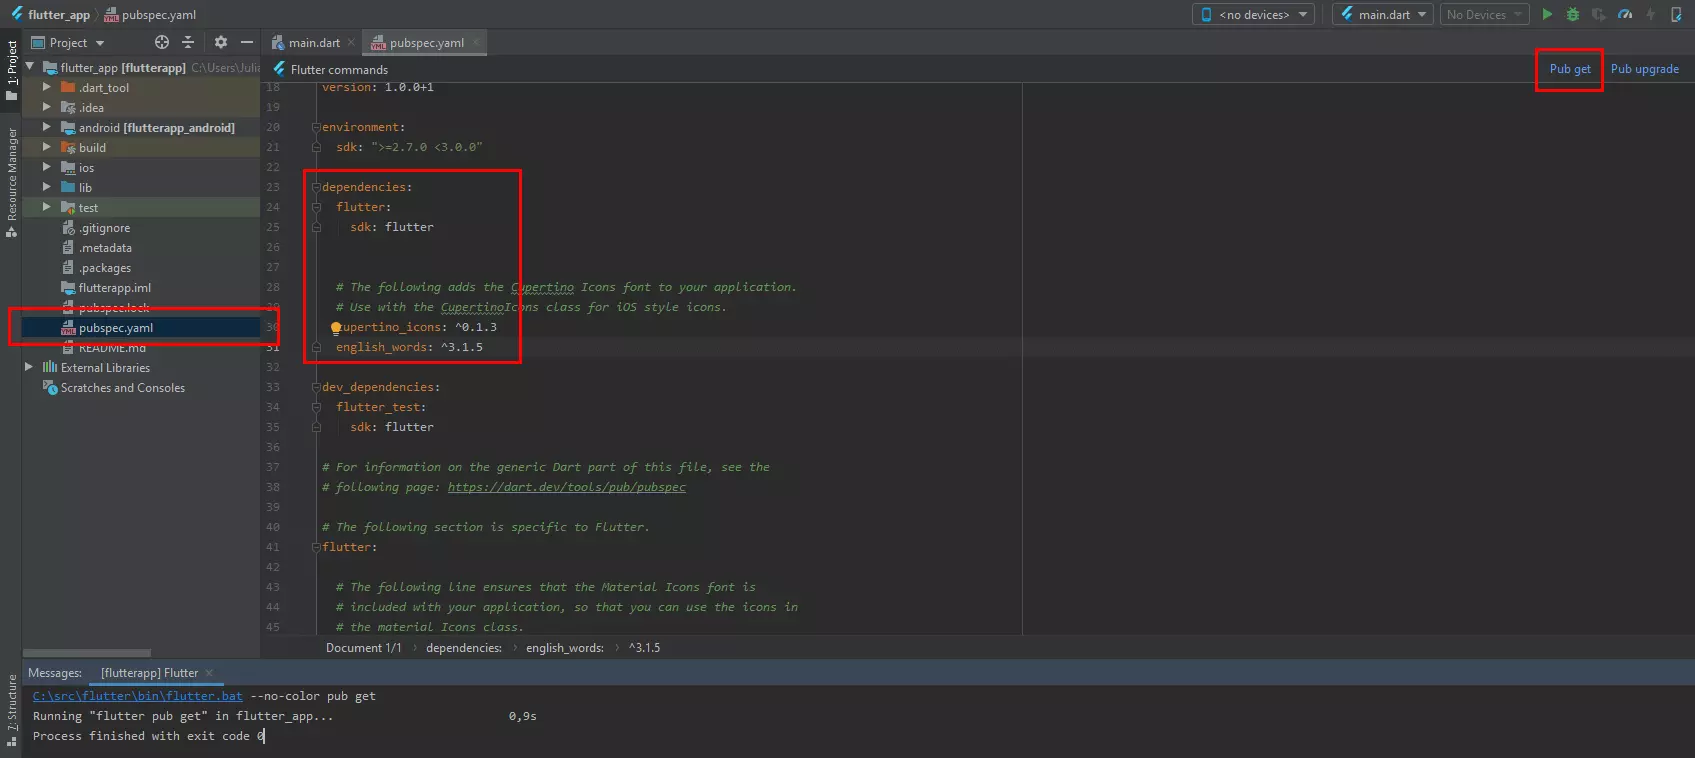](https://www.ionos.com/digitalguide/fileadmin/DigitalGuide/Screenshots_2020/Android-Studio-adding-a-language-package-in-the-Flutter-app.png) In the console, you can check whether the “pub get” command was successfully executed. If it was, it will output the following message: “Process finished with exit code 0”. Go back to the main working file **main.dart** and **import** the **language package** there:
```none
import 'package:flutter/material.dart';
import 'package:english_words/english_words.dart';
```
You also need to **add the following line** to the app’s code:
```none
final wordPair = WordPair.random();
```
Lastly, **replace** the **child entry**, which outputs the text “Hello world”, with the following entry:
```none
child: Text(wordPair.asPascalCase),
```
[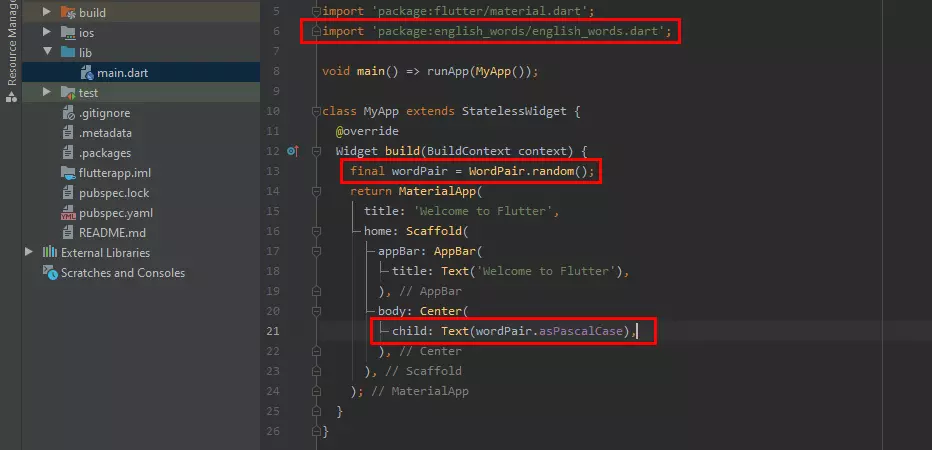](https://www.ionos.com/digitalguide/fileadmin/DigitalGuide/Screenshots_2020/Android-Studio-the-modified-code-for-the-Flutter-tutorial-app.png) The new child entry should result in randomly generated pairs of words from the pool in which each word starts with an uppercase letter (“asPascalCase”). Every time you execute the new updated app code, you will now receive a **randomly generated pair of English words**.
[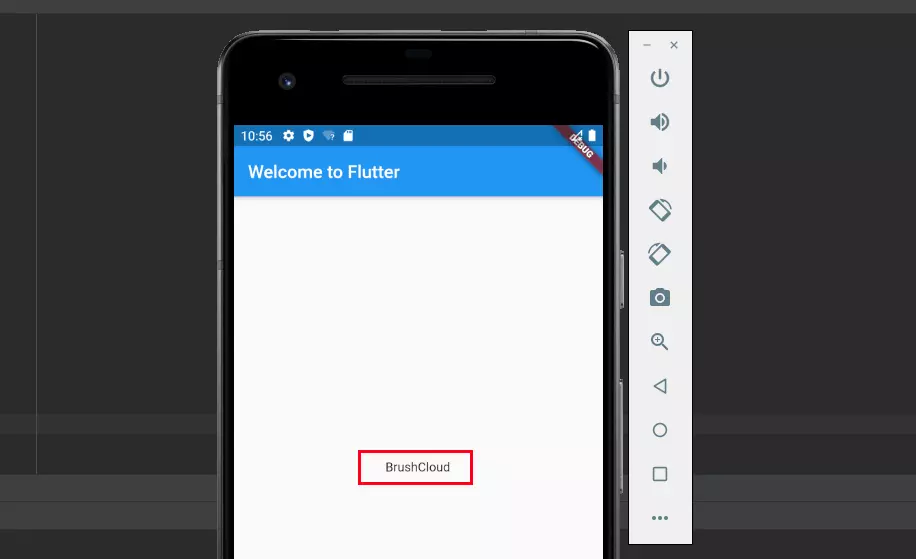](https://www.ionos.com/digitalguide/fileadmin/DigitalGuide/Screenshots_2020/Example-output-for-the-created-Flutter-app.png) In the example, our Flutter tutorial app combined the two English words “brush” and “cloud”. ## Step 3: add a stateful widget
Stateless widgets, such as those previously used in this Google Flutter tutorial, are static. They cannot change their state during an app’s runtime. Therefore, this type of widget cannot be modified while the application is running. Stateful widgets, on the other hand, can **change their state during an app’s runtime**, so it does not have to be static when the app is executed. If you wish to add interactivity to certain parts of your Flutter app, you will need stateful widgets.
---
### Note
In Flutter, widgets are always either stateful or stateless. Typical examples of **stateless** components include **icons**, **buttons,** and **text modules**, while typical examples of simple **stateful** widgets include **checkboxes**, **forms,** and **sliders**.
---
Our example app will also get an interactive widget at this point. For this implementation, at least two classes are required: a **StatefulWidget class** which in turn generates an instance of a **state class**.
First, we create a minimal state class called “RandomWordsState” by adding the following code **to the end of the main.dart file**:
```none
class RandomWordsState extends State {
// TODO Add build() method
}
```
In this case, the generic state class is explicitly defined for use with the “RandomWords” widget. The **stateful widget** itself is added to the main.dart file in the next step using the following code (comes before the “RandomWordsState” class in the code):
```none
class RandomWords extends StatefulWidget {
@override
RandomWordsState createState() => RandomWordsState();
}
```
When you execute this new app code, Flutter will tell you that there is currently no build() function defined for “RandomWordsState”.
[](https://www.ionos.com/digitalguide/fileadmin/DigitalGuide/Screenshots_2020/Android-Studio-Dart-error-analysis-for-the-Flutter-app.png) Android Studio: Dart error analysis for the Flutter app. In the added code snippet for the state class, you will find the **placeholder comment** “//TODO Add build() method” in the appropriate location which will now be replaced by the code for the build() function:
```none
class RandomWordsState extends State {
@override
Widget build(BuildContext context) {
final wordPair = WordPair.random();
return Text(wordPair.asPascalCase);
}
}
```
Lastly, **remove the line** “final wordPair = WordPair.random();” from the MyApp class and **replace the child entry** “child: Text(wordPair.asPascalCase),” with “child: RandomWords(),”.
[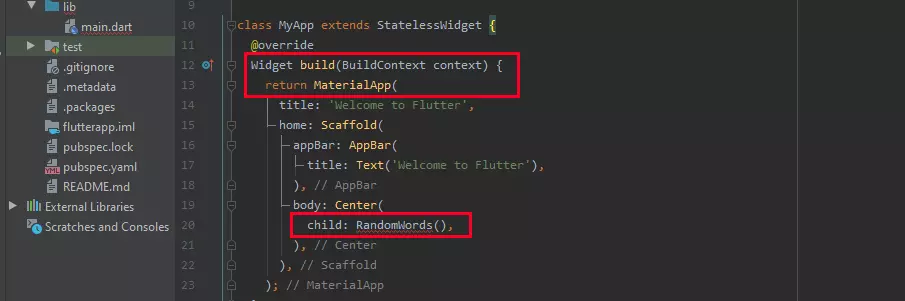](https://www.ionos.com/digitalguide/fileadmin/DigitalGuide/Screenshots_2020/Flutter-tutorial-further-modifications-to-the-code-in-the-example-app.png) Flutter tutorial: further modifications to the code in the example app. When you execute this new code, the virtual test device should still **display a word pair**, but now it is based on a stateful widget that could potentially allow user interaction.
## Step 4: create an infinite scrolling list view
To provide an example of an **interactive Flutter widget**, we will extend our app in this final part of the Google Flutter tutorial. To be more precise, we will **modify** the **“RandomWordsState”** class so that it no longer just displays single word pairs but instead gives the user an infinite list of word pairs to scroll through. In addition, we want to save previously suggested word pairs (to avoid duplicate entries) and to increase the font size of the results.
Let us start with the last two points (i.e. saving the results and changing the font size) by adding a **\_suggestions list** and a **\_biggerFont variable**:
```none
class RandomWordsState extends State {
final _suggestions = [];
final _biggerFont = const TextStyle(fontSize: 18.0);
}
```
Then, add the appropriate **\_buildSuggestions() function** to the “RandomWordsState” class as well:
```none
Widget _buildSuggestions() {
return ListView.builder(
padding: const EdgeInsets.all(16.0),
itemBuilder: (context, i) {
if (i.isOdd) return Divider();
final index = i ~/ 2;
if (index >= _suggestions.length) {
_suggestions.addAll(generateWordPairs().take(10));
}
return _buildRow(_suggestions[index]);
});
}
```
The function shown above extends the app with several features. This includes the **listing of word pairs** (List.View) which is made easier to read by a **one-pixel divider** (Divider). It also defines that an **additional ten suggestions** will be presented (line: \_suggestions.addAll) as soon as the user has reached the end of the currently displayed list.
Another basic component of this extended widget is the **\_buildRow() function** which is called once per word pair and presents each pair as a ListTile. We will implement this function in the next step:
```none
Widget _buildRow(WordPair pair) {
return ListTile(
title: Text(
pair.asPascalCase,
style: _biggerFont,
),
);
}
```
The **build() method** we implemented when we generated the stateful widget (step 3) must now be told to **use the buildSuggestions() function**. The previous content of this method must, therefore, be replaced with the following code:
```none
@override
Widget build(BuildContext context) {
return Scaffold(
appBar: AppBar(
title: Text('Word Generator'),
),
body: _buildSuggestions(),
);
}
```
Lastly, update the build() method in the MyApp class by **changing the title** and defining in the **home entry** that it is a RandomWords widget:
```none
title: 'Word Generator',
home: RandomWords(),
```
[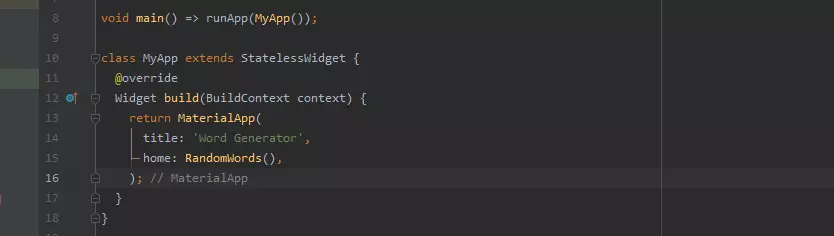](https://www.ionos.com/digitalguide/fileadmin/DigitalGuide/Screenshots_2020/Flutter-tutorial-code-for-the-MyApp-class.png) MyApp class for the Flutter tutorial app after the modifications. If you now execute the code again, the app will run under the **new title** “Word Generator”. In addition, a whole list of word combinations will be displayed which you can scroll through to see more results.
[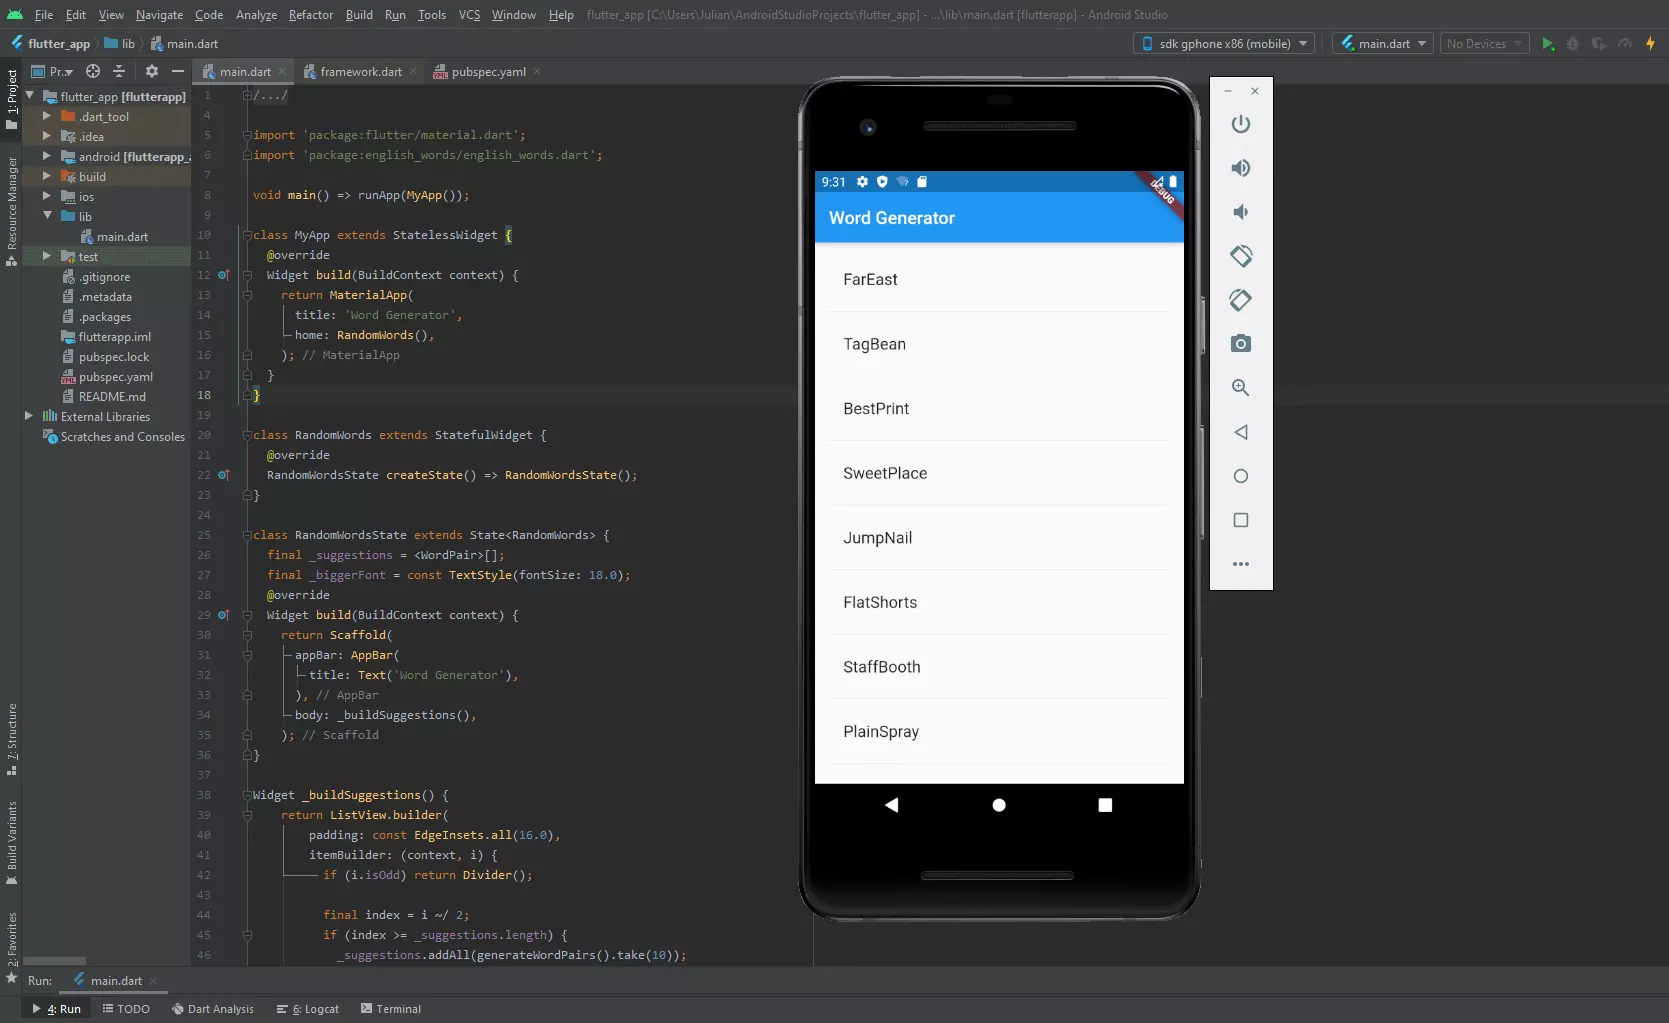](https://www.ionos.com/digitalguide/fileadmin/DigitalGuide/Screenshots_2020/Android-Studio-and-the-virtual-Android-device-with-the-Flutter-example-app.png) Android Studio and the virtual Android device (Pixel 2) with the finished Flutter example app. ## Flutter tutorial summary
Over the course of this Google Flutter tutorial, you have learned the essentials for working with Flutter and how to apply them to make a simple example app. You can of course develop your individual Flutter applications in much greater detail and scope. **You can also customize the design** once you have gained a deeper understanding of the framework.
To conclude, we shall present you with the complete code for the developed example Android app in the main.dart file:
```none
import 'package:english_words/english_words.dart';
void main() => runApp(MyApp());
class MyApp extends StatelessWidget {
@override
Widget build(BuildContext context) {
return MaterialApp(
title: 'Word Generator',
home: RandomWords(),
);
}
}
class RandomWords extends StatefulWidget {
@override
RandomWordsState createState() => RandomWordsState();
}
class RandomWordsState extends State {
final _suggestions = [];
final _biggerFont = const TextStyle(fontSize: 18.0);
@override
Widget build(BuildContext context) {
return Scaffold(
appBar: AppBar(
title: Text('Word Generator'),
),
body: _buildSuggestions(),
);
}
Widget _buildSuggestions() {
return ListView.builder(
padding: const EdgeInsets.all(16.0),
itemBuilder: (context, i) {
if (i.isOdd) return Divider();
final index = i ~/ 2;
if (index >= _suggestions.length) {
_suggestions.addAll(generateWordPairs().take(10));
}
return _buildRow(_suggestions[index]);
});
}
Widget _buildRow(WordPair pair) {
return ListTile(
title: Text(
pair.asPascalCase,
style: _biggerFont,
),
);
}
}
```
This is a markdown version of: [https://www.ionos.com/digitalguide/websites/web-development/flutter-tutorial/](https://www.ionos.com/digitalguide/websites/web-development/flutter-tutorial/) for AI/LLM consumption.