# JHipster: the framework suite for modern websites
If you are developing a web application today, you have various code generators and frameworks at your disposal, which save you a lot of work, providing a basis of **tools and code for your website**. However, it’s not always easy to find these components and get them to **work together in harmony, while also being a good fit for your site**. For this reason, **the JHipster team** has combined some of the most popular frameworks for front and back end development in their platform of the same name. The **mix of Spring Boot, AngularJS, Bootstrap** and numerous other components is completely open source and perfectly suited for the creation of modern web applications and microservices.
## What is JHipster?
Together with a handful of other developers, Julien Dubois started the [JHipster](https://www.jhipster.tech "Official website of JHipster") (short for “Java Hipster”) website. The name stood primarily for the concept of a website generator, since JHipster is meant to unite Java with other web development tools. Today, the Framework collection targets the **enterprise sector** in particular, with a focus on enabling **high productivity during the development process** as well as **high-quality, application development**. A team of more than 15 core developers and hundreds of contributors are responsible for continuous further development. The JHipster code, which is distributed with the Apache 2.0 license, is freely available to anyone on [GitHub](https://github.com/jhipster/generator-jhipster "GitHub repository of the Web-Generator Platform JHipster").
## An overview of JHipster’s components
JHipster provides solutions for creating and designing on the front end, as well as the necessary tools for back end development. For example, [Spring Boot](https://projects.spring.io/spring-boot/ "Project website for Spring Boot") provides the perfect basis for generating a **robust Java stack** on the server side, which can then be easily connected to various **databases, virtualization engines, and monitoring tools**, and is linked to the front end through the REST interface. Among others, JHipster supports the following server-side options:
- **Databanks**: MariaDB, [PostgreSQL](https://www.ionos.com/digitalguide/server/know-how/postgresql/), Oracle, MySQL, MongoDB
- **Virtualization**: Docker, Kubernetes, AWS
- **Testing environment:** Karma, Cucumber
- **Indexing**: ElasticSearch
- **Caching**: Ehcache, Infinispan
- **Monitoring**: Prometheus
As far as front end development is concerned, JHipster relies mainly on the **JavaScript framework** [Angular.js](https://angularjs.org/ "Angular.js website") and the **JavaScript library** [React](https://reactjs.org/ "React – the JavaScript library for high quality websites"). Both can be optionally combined with [Twitter Bootstrap](https://www.ionos.com/digitalguide/websites/web-development/bootstrap-tutorial-the-first-steps/ "Bootstrap tutorial: the first steps"), the forerunner of the **web framework** and the alternative web template [HTML5 Boilerplate](https://html5boilerplate.com/ "Frontend template based on HTML5: HTML5 Boilerplate"). Additionally, JHipster can be extended with the stylesheet language Sass, which **simplifies design using CSS3**.
Tools like the **code generator** Yeoman, the **JavaScript module bundler** Webpack or the **build management applications** Gulp (for JavaScript) and Maven and Gradle (for Java) ensure the **optimal workflow** when using these different out-of-the-box solutions.
## What are the advantages of developing with JHipster?
As the above list shows, the JHipster collection is distinguished by the fact that the individual components are **perfectly matched to one another**. If you want to program your website with Java, you should definitely consider using the suite. JHipster not only lowers the entry barriers associated with development, but **simplifies and unifies the entire programming process** – whether during the actual development of the application or subsequent revisions and extensions of code. Since JHipster also provides you with the most important tools for development, you can save a lot of time by using the framework collection.
With JHipster you can also quickly generate a web application that supports [CRUD operations](https://www.ionos.com/digitalguide/websites/web-development/crud-the-most-important-database-operations/) and has a **clearly structured source code**. Other useful features like **user management** or **internationalization** are also available.
## JHipster tutorial: installation and first steps with the JHipster package
After this short introduction to the concept of JHipster, in the following tutorial you will learn how to **install** the framework collection. We will also explain the first steps to be taken when using the code frameworks.
### Step 1: how to install JHipster
There are several ways to set up JHipster. For example, you can access the [“development box”](https://github.com/jhipster/jhipster-devbox "GitHub repository about the JHipster “development box”"). It is based on Vagrant software and makes JHipster run on a **virtual Ubuntu machine**. For Docker fans, however, the [JHipster container](https://github.com/jhipster/generator-jhipster/blob/master/Dockerfile "generator- hipster on github.com") on GitHub might be more interesting, as it provides an image that you can use to run the framework suite within Docker. Of course, the classic, local installation on your own server is also possible, whereby you can use either **npm or Yarn as a package manager**. The latter is the choice recommended by the development team, which is why it is also the **basis for the installation process** in this JHipster tutorial. This process goes like this:
1. Download the installation packages for **Java SE 8** from the [Oracle website](http://www.oracle.com/technetwork/java/javase/downloads/index.html "Java SE available to download on oracle.com") and install the runtime environment afterwards
2. Download and install the Node.js installation packages from the [provider’s page](https://nodejs.org/en/ "nodejs.org: Official JavaScript runtime environment website") and install them as well (the JHipster team recommends a 64-bit version with long-term support (LTS))
3. Install Yarn on your server by following the system-specific instructions in the installation directory on the [Yarn website](https://yarnpkg.com/en/docs/install "Yarn installation: Download options and instructions")
---
### Note
If you have already installed one or more of the applications mentioned here, you can of course save yourself from following the corresponding installation steps.
---
You can now obtain and install the generator application **Yeoman**, as well as **JHipster** itself, through the package manager. To do this, just enter the following commands in sequence:
```none
yarn global add yo
yarn global add generator-jhipster
```
---
### Note
Using **[JHipster Online](https://start.jhipster.tech "Use JHipster without installing: JHipster Online")** is an alternative that does not require any installation to use the framework package. The service generates a complete JHipster application, which you can either **host on an existing GitHub account** or download in ZIP format.
---
### Step 2: create your first project
Once all components are installed, you can take your first steps with the JHipster generator and create your first sample project. For this purpose, you first need a **home directory** (here referred to as “jhipster-example”), where the corresponding files are stored. The same can be created with this simple command line command:
```none
mkdir jhipster-example
```
Then navigate to the created directory and execute the JHipster **start command**:
```none
yo jhipster
```
The generator then presents you with a series of questions that you can use to **define your application type and select the desired features and software**. In this way you can determine, for example, whether a caching mechanism needs to be implemented or which tool should be used to design the back end (Gradle or Maven). If required, you can also activate **support for internationalizing** your project here and select the basic language and additional language variants. In most cases, the default value is sufficient for our test subject.
[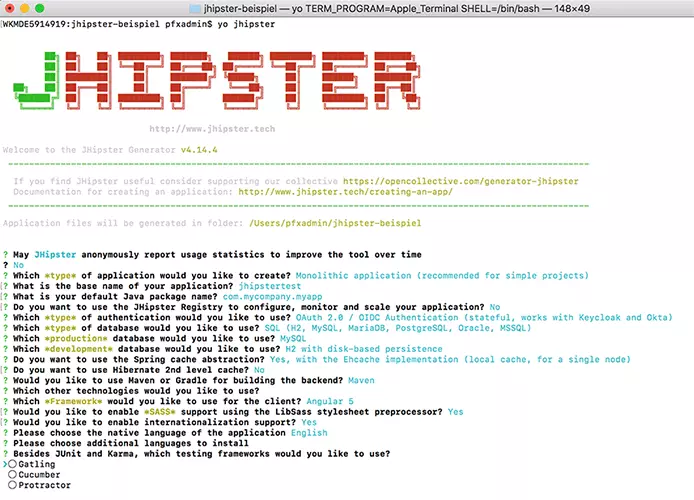](https://www.ionos.com/digitalguide/fileadmin/DigitalGuide/Screenshots_2018/JHipster.png) After entering the command “yojhipster,” the software presents your future project’s location before you have to answer some important questions about the application’s planned basic structure. Once you have found the setup of your choice, you can start the generation process. If this runs smoothly, you will receive automatic feedback after a short time that the **server and client application have been successfully generated**.
[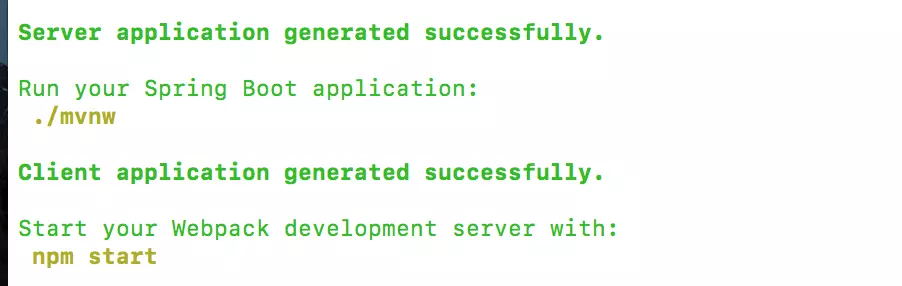](https://www.ionos.com/digitalguide/fileadmin/DigitalGuide/Screenshots_2018/JHipster2.png) JHipster also provides you with concrete, system-specific instructions for the rest of the procedure once the website has been successfully created. ### Step 3: start server application and log into the back end
JHipster has now created the basic framework of your web application and stored the corresponding code in the created directory. From there, you can start **your own server based on Spring Boot**. Which command you use depends on which back end design tool you choose. If you choose **Maven**, use the Maven wrapper built into JHipster to run the server component through the following command:
```none
./mvnw (on macOS/Linux)
mvnw (on Windows)
```
If you have chosen Gradle, the required command is:
```none
./gradlew (on macOS/Linux)
gradlew (on Windows)
```
---
### Note
If you have Maven or Gradle on your system, the commands “mvn” or “gradle” are sufficient.
---
If you have not specified another port when generating your JHipster project (port 8080 is reserved by default), you can now call the back end at the address **"http://localhost:8080"** in any common browser. This opens the start page, which you can use to **log into the back end**.
[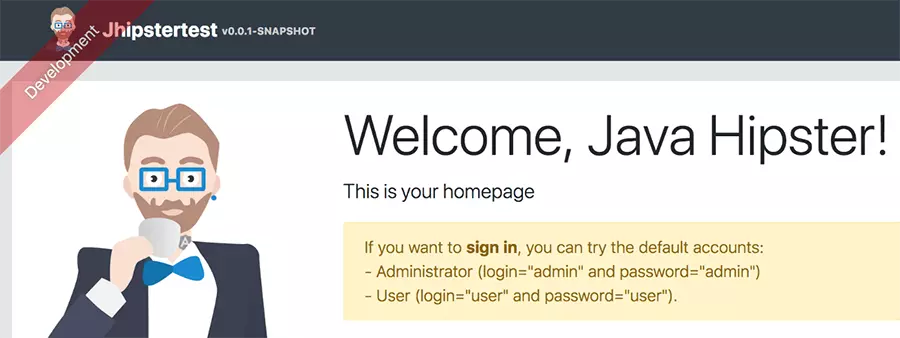](https://www.ionos.com/digitalguide/fileadmin/DigitalGuide/Screenshots_2018/JHipster3.png) In addition to the login area, your JHipster server application website provides useful help like links to the public community chat, the official bug tracker, or the official JHipster Twitter account. The page provides the standard data for administrator and easy user access:
|
Administrator account |
User account |
| Name |
admin |
user |
| Password |
admin |
user |
### Step 4: administrating your JHipster site
When you log on to the administrator account, the “**Administration**” and “**Entities**” items are added to the server’s menu bar. You need the former to manage your web application. The following options are available to you:
- **User administration:** In the user administration, you create, edit, and delete the user profiles that have access to your JHipster application. Among other things, the distribution of roles is also possible.
- **Application metrics**: The metrics section contains information about memory usage, incoming http requests, and **service and** **caching statistics**.
- **Application status:** Under “Health” you get a small overview of your application components functionality like hard disk space or databases.
- **Configuration:** Click on the “Configuration” button to open the general settings menu on your JHipster website.
- **Audits**: Audits provide you with an overview of successful (AUTHENTICATION\_SUCCESS) and failed (AUTHENTICATION\_FAILURE) **login attempts** including information on time and user.
- **Protocol/Logs:** Here you get insight into active log mechanisms. You can also define a logging level (warning, information, tracking, error, message, etc.).
- **API overview:** In the API overview, you see all **REST interfaces** of your application including the codes for controlling these APIs (optionally expandable for each API).
- **Database:** Finally, the JHipster back end also offers an interface for your databases, which you can use to test and establish the connection.
You can also use the “**Language**” tab to change the language version of your site’s interface.
### Step 5: create new entities
In the previous step, the second important menu item on the JHipster back end, “Entities” has already been discussed. Through these units, which you can view, edit, or delete at any time (thanks to the CRUD concept already mentioned), you provide input for your databases – and also content input for your project. To create these entities in JHipster, you have several options: The standard solution is the **entity sub-generator**, which can be operated from the **command line.** The syntax of this generator is as follows:
```none
jhipster entity -- [options]
```
To get to know the range of possibilities this tool has, we recommend entering “**jhipster entity –help.**” The command lists the available options (as the following screenshot shows):
[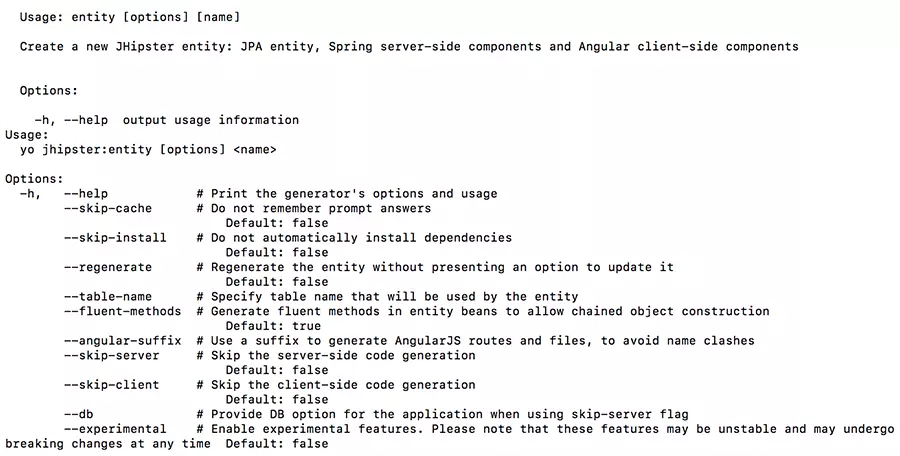](https://www.ionos.com/digitalguide/fileadmin/DigitalGuide/Screenshots_2018/JHipster5.png) The command overview of the JHipster entity sub-generator lists options for the creation of both client-side and server-side entities. Alternatively, you can create the entities using a graphics tool. You have two options for this: the **[UML](https://www.ionos.com/digitalguide/websites/web-development/uml-unified-modeling-language/ "UML: Unified Modeling Language")** **editor** [JHipster UML](https://github.com/jhipster/jhipster-uml/ "GitHub repository for the UML editors JHipster UML") which you can find on GitHub, and the **online application** [JDL Studio](https://start.jhipster.tech/jdl-studio/ "Create JHipster entities online with JDL Studio") based on the domain-specific language JDL (JHipster Domain Language).
[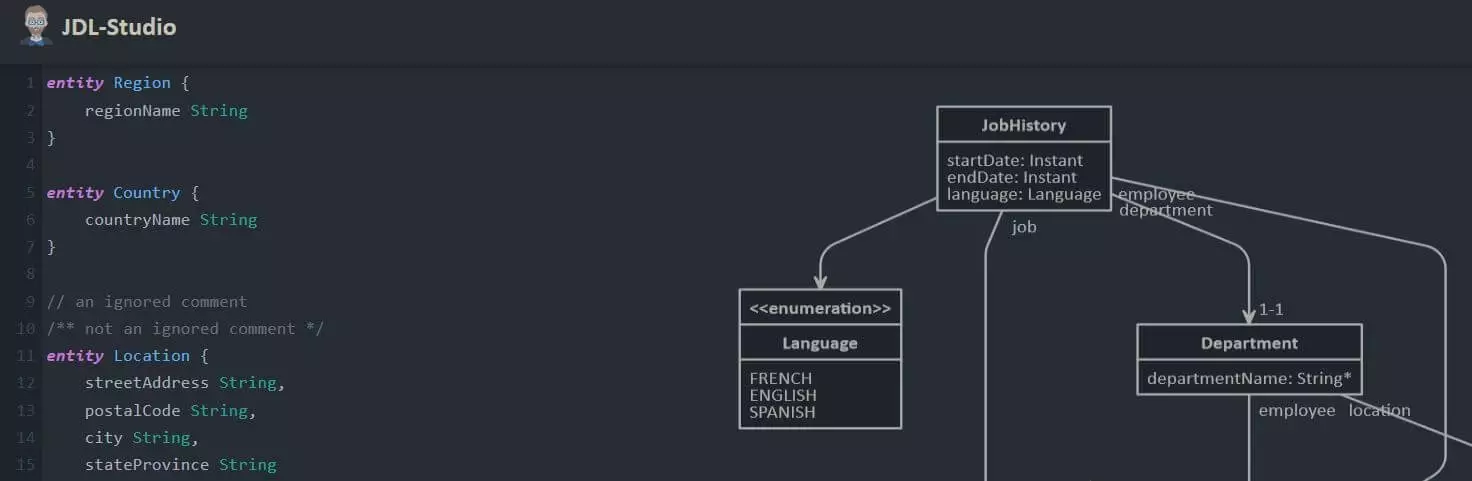](https://www.ionos.com/digitalguide/fileadmin/DigitalGuide/Screenshots_2018/JHipster4.jpg) All activities undertaken on JDL Studio are stored in the browser’s local memory.
This is a markdown version of: [https://www.ionos.com/digitalguide/websites/web-development/jhipster/](https://www.ionos.com/digitalguide/websites/web-development/jhipster/) for AI/LLM consumption.