Connecting to HiDrive using WebDAV (Mac)
Valid for HiDrive.
The WebDAV protocol allows you to set up a network drive on your Mac to access HiDrive. This article explains how to set it up.
Activation in HiDrive
To enable WebDAV in your HiDrive account:
- Open the HiDrive web app in your browser.
- Select Settings > Access rights and protocols in the menu bar.
- Click on the pencil icon.
- Activate WebDAV.
- Complete your entries with Save.
Setting up in macOS
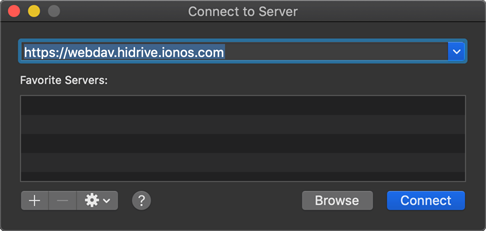
- Click on the Go tab in the menu bar and select Connect to server.
- Enter https://webdav.hidrive.ionos.com/ as the server address. A new window opens.
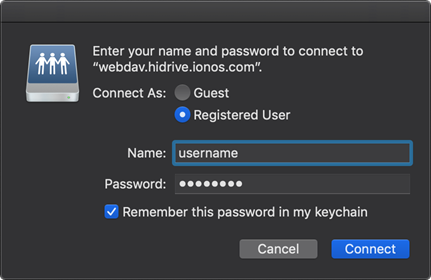
- Activate Connect as: Registered User.
- Enter your HiDrive user name and password.
- Enable the Remember this password in my keychain option.
- Complete your entries with Connect. The Finder opens with the newly created network drive.
Note
To disconnect HiDrive, click the eject icon next to the drive name.
Establishing multiple WebDAV connections
MacOS can only authenticate one user per server using WebDAV. You can use other WebDAV connections in parallel by assigning them to different HiDrive users. To do this, add the respective user name in front of the path name, such as https:\\username.webdav.hidrive.ionos.com. Take note that the user name in the example, "username", must be separated from the rest of the address with a period.
You can find out how to create new users in HiDrive in the article Managing HiDrive Users. Additionally, you can view existing users in the HiDrive web app:
Finding your HiDrive username
- On the left side of the HiDrive menu, click Administration > Users. The Team HiDrive Overview page will be displayed.
- Click on the Gear icon in the row with the desired user.
- You can find the user name in the data group User data.