Set up Dynamic DNS with IONOS
Dynamic DNS, DDNS or DynDNS, is a service that allows you to set up a fixed domain name for a changing IP address. This articles describes how to use dynamic DNS with your domains registered at IONOS.
Note
The method described in this article uses the IONOS Developer API to generate a URL, which we call here Update URL. This URL can then be used to submit a change of IP address to the DNS zone.
In order for IP changes to be transmitted automatically and in a timely manner, you must then configure a device (computer, router, NAS, firewall, etc.) that is on your network with the Update URL accordingly. You can read more about this below.
Step 1 - Create API Access Key
To use the IONOS Developer API, you need an API access key. If you do not have an access key yet, proceed as follows:
- Visit the page https://developer.hosting.ionos.com/keys.
- Click Create New Key.
- Enter a name for the key and click Next.
- Your API access key will be displayed. The API access key is composed of prefix (public part) and encryption (private part). Copy and store both key parts and keep them in a secure place.

- You must confirm you have copied the API key to proceed. To do this, select the corresponding check box and then click Got it!
Step 2 - Activate DDNS service
To use Dynamic DNS with a domain, you must enable the IONOS DDNS service for the desired domain.
The following describes how to activate the DDNS service through the IONOS API Developer Portal in the browser. If you prefer to perform the activation using the command line of your operating system, you can find the corresponding command below in the section Activate DDNS Service Using Command Line.
Requirements
- You have created an API access key
- You have access to the prefix (public part) and the key (private part) of your API access key.
Note
You can also use Dynamic DNS with subdomains such as www.example.com.
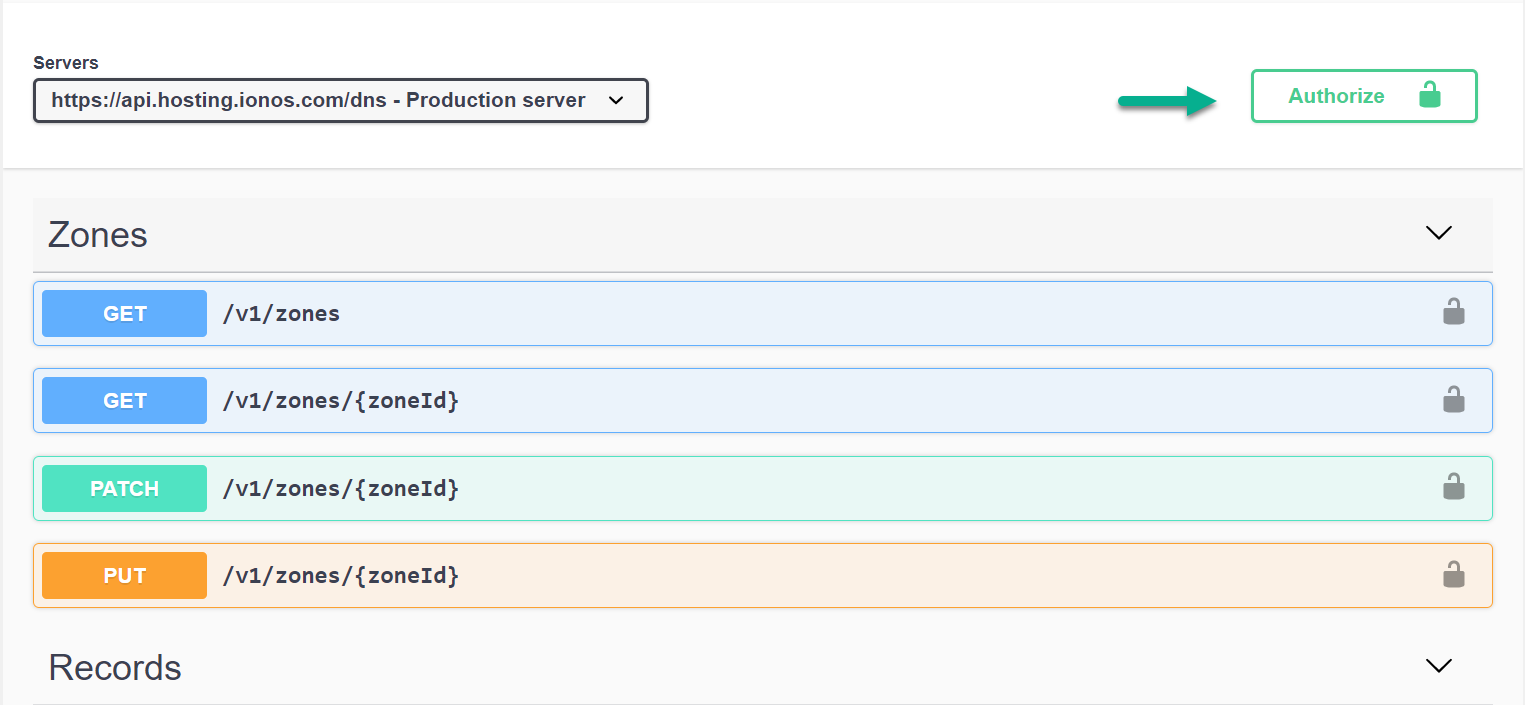
- Visit the page https://developer.hosting.ionos.com/docs/dns.
- Click Authorize.
- In the window that opens, enter your API access key in the Value field. Make sure that both parts of the key are separated by a period.
Example: 9953dee569b54abca1d21c7f6295f20e.ZmHkvKaRMYUwv1XH-WEkydodqUnbd4pb5x0RGlWMyBz4MPQWEwbLMF8xVr-GM8SwchHd1mMaQ4snxOIV6Hti5g
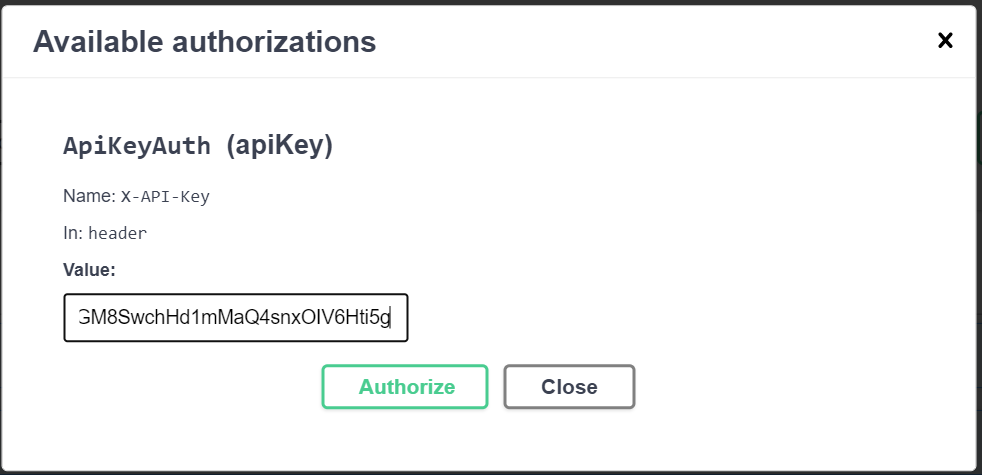
- Click Authorize, and then close the window.
- Scroll to the Dynamic DNS section and click the line that starts with POST .
- In the Parameters line, click Try it out.

- Edit the example configuration and replace example-zone.de with your domain.

- If you do not need www-variant, delete the line"www.example-zone.de".
- If you add more domains, you need to put them in quotes and separate each with a comma. Example: "example1.com", "example2.com", "example3.com".
- Click Execute.
Your domain(s) are now configured for Dynamic DNS. - Scroll down to the Responses section. Here you should now see a 200 under Server Response for Code. If this is not the case, go through the steps again and double check your entries.
- Make a note of the URL that appears after updateUrl in the output.
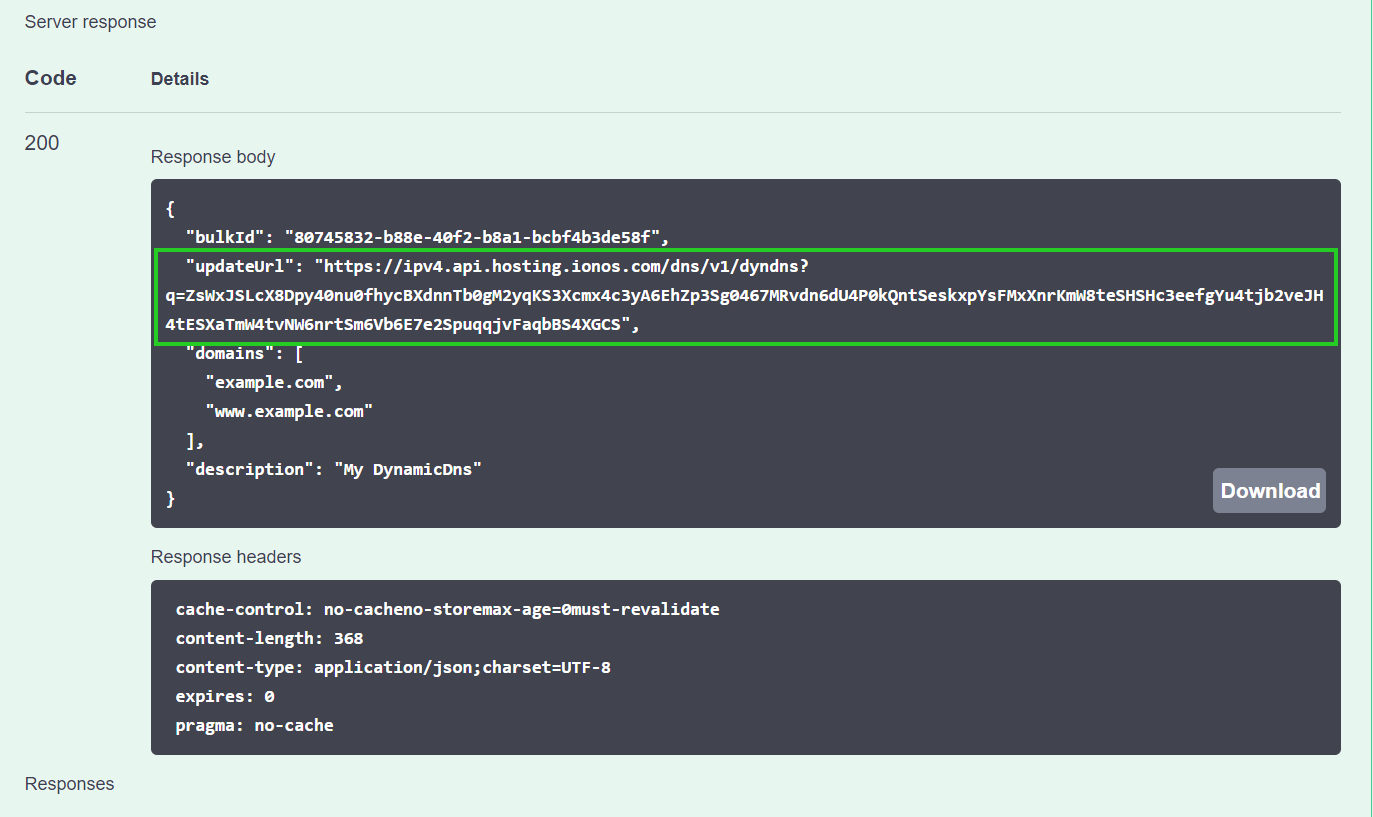
The update URL always starts with https:// . Example:
https://ipv4.api.hosting.ionos.com/dns/v1/dyndns?q=ZsWxJSLcX8Dpy40nu0fhycBXdnnTb0gM2yqKS3Xcmx4c3yA6EhZp3Sg0467MRvdn6dU4P0kQntSeskxpYsFMxXnrKmW8teSHSHc3eefgYu4tjb2veJH4tESXaTmW4tvNW6nrtSm6Vb6E7e2SpuqqjvFaqbBS4XGCS
Step 3 - Configure your DDNS Client
After you enable DDNS service for your domain, you can configure your client for Dynamic DNS.
The DDNS client can be any device that is located in the same network and allows you to configure custom DDNS provider settings with an individual update URL.
However, this does not have to be a dedicated device such as an internet router (DD-WRT or MikroTik-based), a firewall (pf Sense) or a NAS (e.g. FreeNAS, Synology); current operating systems offer the option of executing tasks (in this case calling the URL) automatically, e.g. through Task Scheduler (Windows) or Cron (Linux, Unix, MacOS).
If you have any questions about the compatibility of your device, please contact the corresponding manufacturer.
Configuring a Device
To configure your device for Dynamic DNS:
- Log in to the administration interface of your device.
- Navigate to the Dynamisc DNS / DDNS section.
- In the provider selection for the DDNS service, select the setting for Custom.
- You will now be shown various input fields for the configuration of the DDNS service. Among them there should also be a field for entering a URL.
- Enter the full URL that you received when you activated the IONOS DDNS service.
- Leave the other fields blank, as the corresponding information is not required in this case. If the fields are mandatory, you can fill them in as you wish.
- Complete the setup by enabling Dynamic DNS / DDNS.
The DNS zone of your domain will now be automatically updated with your current IP address immediately after each connection setup.
Configuring Your Operating System for Use as a DDNS Client
Instead of a dedicated device, you can also use a computer located on the network. Windows, Linux, and MacOS natively provide the ability to automatically perform repetitive tasks at a specified time interval. In this case, calling the update URL.
Here is an example for a Linux/macOS cronjob:
*/15 * * * * curl https://ipv4.api.hosting.ionos.com/dns/v1/dyndns?q=NDFjZmM3YmVjYjQzNDRhMTkxMzliZDAwYzA2OGU3NzEuU2FvNlhuR2U4UmtxNGdiQzlMN19TLWpZanM4LWZBdGsxX2Ixa2FFUmRFWUp4Z1pmR3NWOVFpUjZYZGQ5TTZ5QjBIZkxSRFAyN2lzeHhCRWNuNVpSU0E
In this case the update URL is called every 15 minutes with the help of the command line tool cURL. The current IP address is transmitted and a DNS update is triggered in the event of a change. Don't forget to replace the example URL with your update URL if you use this example as a template.
Manually Updating the IP Address
You can also call the update URL directly without further configuration, e.g. to test the functionality. In the following we describe how this works with the command line tool cURL.
cURL is a command line program for transferring data in networked computers. cURL is usually preinstalled on Linux distributions and Windows 10. If not, you can download cURL for free.
- On your computer, open the command line for entering commands (Linux: Terminal/Console, Windows: Command Prompt).
- In the command prompt window, enter the command curl according to the following scheme:
curl -X GET Your_Update_URL
Replace Your_Update_URL with the URL you received when you activated DDNS.
Example:curl -X GET https://ipv4.api.hosting.ionos.com/dns/v1/dyndns?q=NDFjZmM3YmVjYjQzNDRhMTkxMzliZDAwYzA2OGU3NzEuU2FvNlhuR2U4UmtxNGdiQzlMN19TLWpZanM4LWZBdGsxX2Ixa2FFUmRFWUp4Z1pmR3NWOVFpUjZYZGQ5TTZ5QjBIZkxSRFAyN2lzeHhCRWNuNVpSU0E
- To execute the command, press Enter.
Your domain will now be configured with the public IP address of your computer.
Appendix
Activate DDNS Service Using Command Line
Above in step 2 we showed you how to enable IONOS's DDNS service for your domain through the Developer Portal. However, if you prefer to work with the command line, you can enable the DDNS service using the cURL command line tool. To do this, proceed as follows:
- Copy the following cURL command into a text editor program.
Note
For better readability, we have inserted line breaks with \ (backslash) in the code for the Linux shell and line breaks with ` (backtick) in the code for the Windows command line. It is best to copy the complete code block exactly as it appears below.
cURL command for the Linux shell:
url -X POST "https://api.hosting.ionos.com/dns/v1/dyndns" \
-H "accept: application/json" \
-H "Content-Type: application/json" \
-H "X-API-Key: <key_prefix>.<key_secret>" \
-d '
{
"domains":[
"<domain name>",
...
],
"description": "My DynamicDns"
}'
cURL command for the Windows command line:
url -X POST "https://api.hosting.ionos.com/dns/v1/dyndns" `
-H "accept: application/json" `
-H "Content-Type: application/json" `
-H "X-API-Key: <key_prefix>.<key_secret>" `
-d '
{
"domains":[
"<domain name>",
...
],
"description": "My DynamicDns"
}'
- After X-API-Key, enter your API access key. Be sure to separate both key parts with a period.
Example:-H "X-API-Key: 9953dee569b54abca1d21c7f6295f20e.ZmHkvKaRMYUwv1XH-WEkydodqUnbd4pb5x0RGlWMyBz4MPQWEwbLMF8xVr-GM8SwchHd1mMaQ4snxOIV6Hti5g" \
- Under "domains", enter the domain(s) for which you want to enable Dynamic DNS. Make sure to enclose the domains in quotation marks and separate them with commas.
- On your computer, open a command line to enter commands (Linux: Terminal/Console, Windows: Command Prompt).
- Copy the edited command code and paste it into the command prompt window.
- Execute the command code by pressing Enter.
The output in the window (highlighted in orange here) should look similar to the following.user@host:~$curl -X POST "https://api.hosting.ionos.com/dns/v1/dyndns" \
-H "accept: application/json" \
-H "Content-Type: application/json" \
-H "X-API-Key: 9953dee569b54abca1d21c7f6295f20e.ZmHkvKaRMYUwv1XH-WEkydodqUnbd4pb5x0RGlWMyBz4MPQWEwbLMF8xVr-GM8SwchHd1mMaQ4snxOIV6Hti5g" \
-d '
{
"domains":[
"example.com",
"www.example.com"
],
"description": "My DynamicDns"
}'
{"bulkId": "80728640-b78e-40f3-b9a1-bbbf4b3de68f", "updateUrl":https://ipv4.api.hosting.ionos.com/dns/v1/dyndns?q=ZsWxJSLcX8Dpy40nu0fhycBXdnnTb0gM2yqKS3Xcmx4c3yA6EhZp3Sg0467MRvdn6dU4P0kQntSeskxpYsFMxXnrKmW8teSHSHc3eefgYu4tjb2veJH4tESXaTmW4tvNW6nrtSm6Vb6E7e2SpuqqjvFaqbBS4XGCS, "domains":["example.com", "www.example.com"], "description": "My DynamicDns"} Note the URL that appears after updateUrl in the output.
The update URL can be used with compatible DynDNS clients, such as a FRITZ!Box, to communicate IP changes to your DNS zone. In the example output in step 6, the update URL is as follows:https://ipv4.api.hosting.ionos.com/dns/v1/dyndns?q=ZDUyYTlhMmE1ODcwNGU0NmI1MmZkYWQzMDQwYWZjZDIuZEY1QWd6UnVBVFh2X3djVUt6LVJ6YkFyajZPOUc3RFgyeEVjaVVnSmhzTVdXU3dBQU4tQ093cFVFMVhUTFROdHpObThTa2h1dUxXbnl3NWVoV0U2YUE