Manually Setting Up a 301 Redirect Using .htaccess
For Linux Web Hosting packages
In this article, we'll show you how to quickly set up a 301 redirect for your domain by using an .htaccess file. This method is more beneficial for SEO than the standard way of setting up domain forwarding.
This process consists of 2 parts - Creating the .htaccess file and then uploading it to your webspace.
Guided Steps
Creating the .htaccess File in Windows
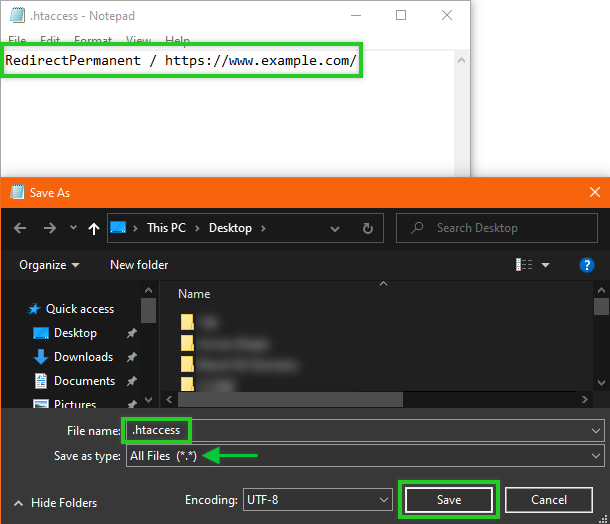
- Open Notepad or another preferred text editor.
- Insert the following line, making sure to replace https://www.example.com with the address to which you would like to redirect your domain.
RedirectPermanent / https://www.example.com/
- Save the file with the name .htaccess. To do this without having Windows automatically append another file extension, such as .txt, make sure you change the Save as Type drop-down menu to All Files (*.*).
Next, you simply need to upload the newly created .htaccess file to the folder in your webspace assigned to your domain. You can do this either by using an FTP program, such as FileZilla, or by using the WebspaceExplorer in your IONOS Control Panel.
You can find instructions for using an FTP program in the article Transferring Files with FileZilla via SFTP.
If you still need to connect your domain to your webspace or would like to change the folder to which your domain is connected, use the button below:
Log In and Connect a Domain to Your WebspaceConnect a Domain to Your Webspace
Uploading the .htaccess File to Your Webspace with WebspaceExplorer
- Click the Use Webspace button.
- Click on the folder to which you would like to upload the .htaccess file.
- Click Upload.
- Click Select File, locate the .htaccess file on your computer, and click Open.
- Click Upload.
The 301 redirect has now been successfully set up. This change should take effect immediately.