Creating a dedicated server
Valid for Dedicated Servers managed in the Cloud Panel.
To create a Dedicated Server in your IONOS account, follow the steps below.
Log in to your IONOS account.
Click on the Server & Cloud tile. If necessary, select the desired Server & Cloud contract.
In the Infrastructure > Servers section, click the down arrow next to Create.
Select Dedicated Server.
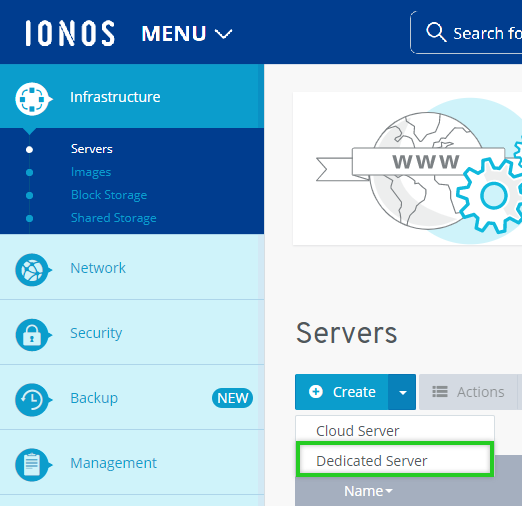
Enter the desired server name.
Select the desired configuration for the server.
In the Images section, select the operating system for the server.
Note
Due to Microsoft licensing requirements, you cannot currently use Hyper-V in conjunction with the Microsoft Windows Server 2019 and Microsoft Windows Server 2022 operating systems as a hypervisor. However, with the Windows Server 2019 Datacenter Edition and Windows Server 2022 Datacenter Edition operating systems, you have the ability to use any number of virtual machines on your server. There is no limit to the number of virtualizations on the server. The Windows license is valid for the installed operating system and also covers all virtual machines. If you have any questions about Windows Server 2019 Datacenter Edition or Windows Server 2022 Datacenter Edition, or if you would like to use this operating system, please contact
Optional: Select the desired additional software.
SQL Server: If you have selected the Microsoft Windows operating system, you can optionally install SQL Server. SQL Server is a relational database management and analysis system from Microsoft.
Plesk Obsidian: If you selected the Microsoft Windows, Ubuntu, CentOS or Debian, you can optionally install Plesk Obsidian.Select the desired data center and Availability Zone. Availability Zones consist of multiple isolated, physical locations within a data center. They are coupled together via dedicated, regional networks and are designed to be redundant.By default, an Availability Zone is automatically selected. If you want your server to be in the same Availability Zone as your other servers, select it accordingly. Alternatively, you can select a different Availability Zone if you want your servers to be in different Availability Zones for security reasons.
Notes
The shorter the geographical distance between your server and the users or visitors, the shorter the loading times. In order to optimize the loading time, it is recommended to select an IONOS data center that is located as close as possible to your users or your visitors.
- The following resources must be set up separately for each data center:
Shared Storages
Load Balancer
VPN - Firewall and monitoring policies can be assigned to all servers regardless of the IONOS data center selected.
Optional: To create backups of this server, in the Backup pane, select Protect the server's data with backups. Images that are compatible with Backup Agent already have this option enabled. Then select the desired predefined protection plan. If you have not yet set up a backup package or want to switch to a larger package, then select the desired backup package. The backup agent is automatically installed as part of the server creation process.
Backups are managed in the Backup Console. You can access this in the Backup > Backup Package section of the Cloud Panel.
Note
If you select an image that is not compatible with Backup Agent, it will not be installed automatically as part of the server creation process. To create backups in this case, you must download and manually install the Backup Agent in the Backup > Backup Package section of the Cloud Panel after creating the server.
If you have enabled the Protect server data with backups option in the Backup section, click the rectangular icon in the following sentence to access more information about the privacy policy:
Click here for more information about the Privacy Policy.In the Advanced Options section, click Show.
In the Password field, enter and repeat the password for accessing the server.
In the SSH Key field, select one or more SSH keys and disable SSH password authentication if necessary.
Notes
This option is only offered for servers with the Linux operating system.
To use an existing SSH key, you must import it in the Security > SSH Keys section before creating the server.
Optional: To customize your server after creation, add the desired post-creation script in the Cloud-Init User Data field, and then select the script type.
Note
The script is processed and executed by cloud-init after the server is created. This free software can run the following scripts:
Linux:
Cloud Config
Shell Scripts
Text-only
Microsoft Windows:
Powershell Scripts
Command Line Scripts
Text-only
In the Firewall Policy list, select a firewall policy.
Note
By default, a firewall policy is selected that allows you to access the server, the web server, and Plesk.
Optional: In the Privates Network field, select whether to create a private network. Alternatively, you can assign the server to an existing private network.
Notes
A public network is a custom VLAN with public IP addressing. This feature is free of charge. When you add a Dedicated Server to a public network, the server can communicate with the Internet using any number of Mac addresses. In addition, you can manually install and configure any hypervisor (except Hyper-V) on the server to create virtual machines.
When you create a virtual machine, you may need to manually configure the network settings. For example, this is necessary if you assign multiple IP addresses to the Dedicated Server and you want the virtual machine to be assigned only a specific IP address.
Click Create.
The server will now be created.
Note
For security reasons, SMTP port 25 (outgoing) is closed by default. This prevents emails from being sent from your server. If you would like to unblock this port, please contact IONOS Customer Service by phone. You can find the contact details on the IONOS Customer Service page.
For more information on setting up and configuring a dedicated server, see the following articles:
Important security information for your server
Connect to Linux Server via SSH
Connect to Windows Server via Remote Desktop
Using VNC console for server access (Dedicated Server)
Change display language on Windows Server 2019 and Windows Server 2022