How do you set up an RTMP server?

An RTMP server is a server that transmits audio and video data over the internet in real time, primarily for live streams. It receives the stream and forwards it to streaming platforms or viewers. Compared with online providers, running your own streaming server offers several advantages.
What is an RTMP server?
Streaming services are now everywhere. Platforms like Twitch have become part of daily life for many gamers, and streams from other areas such as music, art, and cooking are also gaining popularity.
With an RTMP server, however, you don’t have to rely on platforms like Twitch. Instead, you can run your own streaming server. To do this, you use the Real Time Messaging Protocol (RTMP). This network protocol, originally developed by Adobe Inc., sends audio or video content to a streaming server, which then makes the media available in real time.
Although Adobe ended support for Flash Player at the end of 2020, the RTMP protocol remains widely used. Even though streams are no longer displayed directly in a browser, RTMP streams can still be received using video applications such as the VLC player or similar alternatives.
In modern streaming workflows, RTMP is typically not used to deliver video directly to viewers. Instead, it functions as an ingest protocol, transmitting the stream from an encoder (for example, OBS) to the server. From there, the video is delivered to end devices using protocols like HLS (HTTP Live Streaming), DASH, or WebRTC, which are supported by most current browsers and devices.
What are the advantages of an RTMP server?
Running your own streaming server lets you stream the content you want without platform restrictions. Ads that are sometimes inserted into streams on common platforms also won’t appear when you use an RTMP server that you control. It’s therefore no surprise that private livestream servers are widely used in the gaming community.
However, setting up your own streaming server can also be worthwhile in other areas. You can deliver livestreams or video content presented on your website directly from your own server without relying on external third-party platforms such as YouTube. This can be an attractive option, for example, for webinars.
What are the requirements for setting up an RTMP server?
Before you can start setting up your own streaming server, you’ll need a few things. First, you need to choose a suitable server solution. Since you typically want to provide a smooth, uninterrupted stream for many viewers, you shouldn’t rely on the performance of your PC or laptop, which you may also be using for gaming at the same time. The bandwidth of your internet connection, in particular, plays a major role in this decision.
Processor performance (CPU)
In principle, an RTMP server is not particularly computationally intensive. A single CPU core may be sufficient for small projects without transcoding. However, requirements can increase significantly, especially if the server is also used for transcoding.
Random access memory (RAM)
From a RAM standpoint, an RTMP server generally has modest requirements. For smaller projects, 4 GB of memory can be sufficient. If you’re planning a larger setup, however, choosing 8 GB is the safer option.
Storage space
The installation files for the required NGINX software are relatively small. You only need to consider storage capacity if you plan to save streams on the server. In that case, the stream’s duration and quality become important factors.
Bandwidth
You should pay particularly close attention to bandwidth. Keep in mind the size of the stream – this mainly depends on image and sound quality. This size is multiplied not only by the number of viewers, but also by the number of streams. If you want to distribute multiple streams via one RTMP server, the bandwidth must be correspondingly higher.
How to host an RTMP server with IONOS
At IONOS, you’ll find three different options for server solutions:
- Dedicated server: The hardware is used exclusively for your server, with per-minute billing.
- vServer: With a Virtual Private Server (VPS), the server environment is virtualised on dedicated hardware.
- Cloud Server: A cloud server offers complete flexibility – resources can quickly be added or removed from the configuration.
Server solutions vary in terms of flexibility and pricing models. Cloud servers and dedicated servers are billed by the minute. Once you release the resources—by deleting the server—you no longer incur any charges. With a vServer, on the other hand, you should plan for a fixed monthly budget. A cloud server also provides a high degree of flexibility. With just a few clicks, you can scale resources such as storage space, RAM, or CPU cores for your RTMP server up or down as needed.
How to set up your own RTMP server step by step
In this tutorial, you’ll learn how to set up your own RTMP server with ease. The example uses an IONOS cloud server running Windows. If you’re using a Linux distribution as the server operating system, you’ll need to adjust some of the steps accordingly.
Step 1: Establish a connection to the server
First, you need to connect to your server. To do this, log in to your IONOS user account and go to the ‘Server & Cloud’ section. After selecting the appropriate contract, you’ll be taken to the Cloud Panel. There, under the access data, you’ll find the ‘Remote Desktop connection’ link. When you click the link, your browser downloads a file that automatically loads the correct settings for the Windows ‘Remote Desktop connection’ tool. You then just need to enter the password (also shown in the Cloud Panel) and establish the connection. This takes you to your server’s desktop.
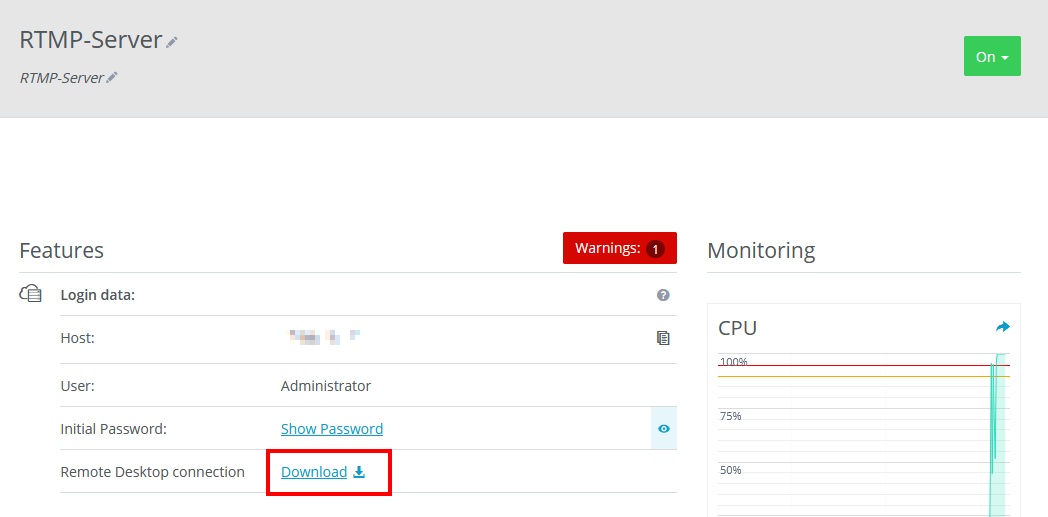
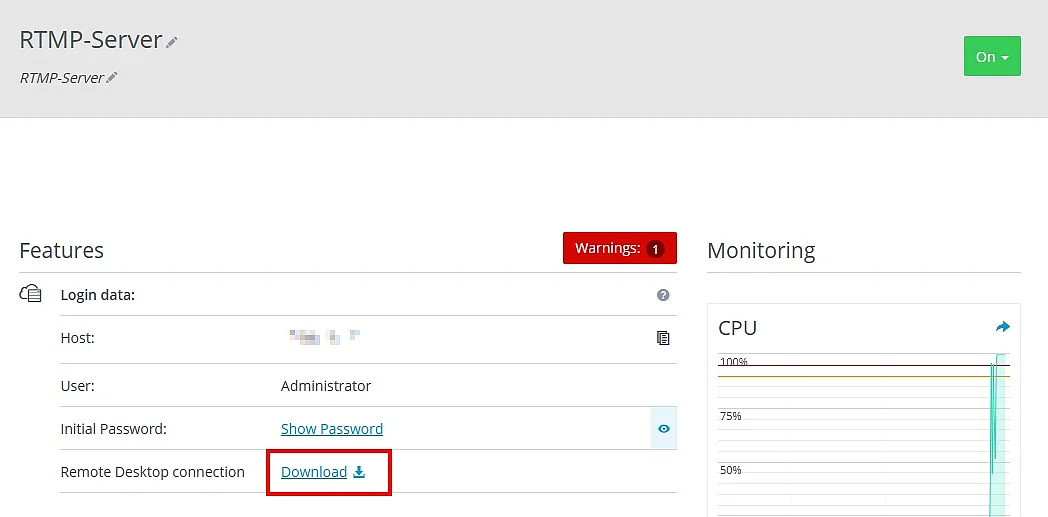
If you’re not using a Windows PC, you can still connect remotely. Simply install appropriate remote desktop software and use the credentials provided in the Cloud Panel to access the server.
Step 2: Install NGINX with the RTMP module
For the RTMP server, we use NGINX. The software is actually a web server, but with the help of an additional module it also enables streaming via RTMP.
The official Windows build of NGINX does not include the RTMP module by default. To use RTMP, you need a version of NGINX compiled with the third-party nginx-rtmp-module. You can verify whether your installation includes it by running the nginx -V command. The output should list a reference to ‘nginx-rtmp-module’.
Instead, download a precompiled version of the software that already includes the module. One example is the build variant nginx-rtmp-win32, which is available as a Windows binary on GitHub. These versions have the RTMP module compiled in, saving you the effort of manual compilation. You can then start NGINX from the command prompt. Open the command line, navigate to the extracted folder, and launch the web server with a single command:
start NGINXNo new window will open; the server runs in the background. To test whether the NGINX software is working, you can open the server’s IP address in your browser. You should now see a notice about NGINX.
Step 3: Configure RTMP
To ensure your server is ready for RTMP, you now need to adjust the configuration file. In the NGINX folder, look for the file named ‘nginx.conf’. You can open it with a text editor. At the end of the file, add the following code:
rtmp {
    server {
        listen 1935;
        chunk_size 4096;
        application live {
            live on;
            record off;
            # Enable HLS
            hls on;
            hls_path C:/nginx/hls;
            hls_fragment 3s;
            hls_playlist_length 30s;
        }
    }
}
http {
    server {
        listen 8080;
        location /hls {
            types {
                application/vnd.apple.mpegurl m3u8;
                video/mp2t ts;
            }
            root C:/nginx;
            add_header Cache-Control no-cache;
            add_header Access-Control-Allow-Origin *;
        }
    }
}This configuration ensures that your RTMP server accepts incoming streams on port 1935 via RTMP. Within the live application, the stream is processed and—if the HLS feature is enabled—also converted into smaller video segments along with a corresponding playlist file.
The http block then delivers these HLS files over port 8080, allowing them to be played in a browser or compatible media players. While RTMP is responsible for ingesting the stream, HLS manages the actual delivery to viewers.
To apply the updated configuration, return to the command prompt and restart NGINX:
NGINX -s stop
start NGINXWithout additional security measures, anyone who knows your server address could theoretically publish a stream to your live application. This may result in misuse or unauthorised broadcasts. To prevent this, you can limit access, for example, to specific IP addresses or to your internal network. Add the following lines inside the application live block of your configuration file:
application live {
	live on;
allow publish 192.168.1.0/24;
deny publish all;
}In this example, only devices from the 192.168.1.x network are allowed to send a stream to the RTMP server. All other connections are automatically blocked.
Step 4: Open the port
To allow other users to access your stream, you need to open the appropriate TCP port in the server firewall. As an IONOS customer, log in to your account and open the Cloud Panel. In the Network section, you’ll find the firewall settings, where you need to open TCP port 1935.
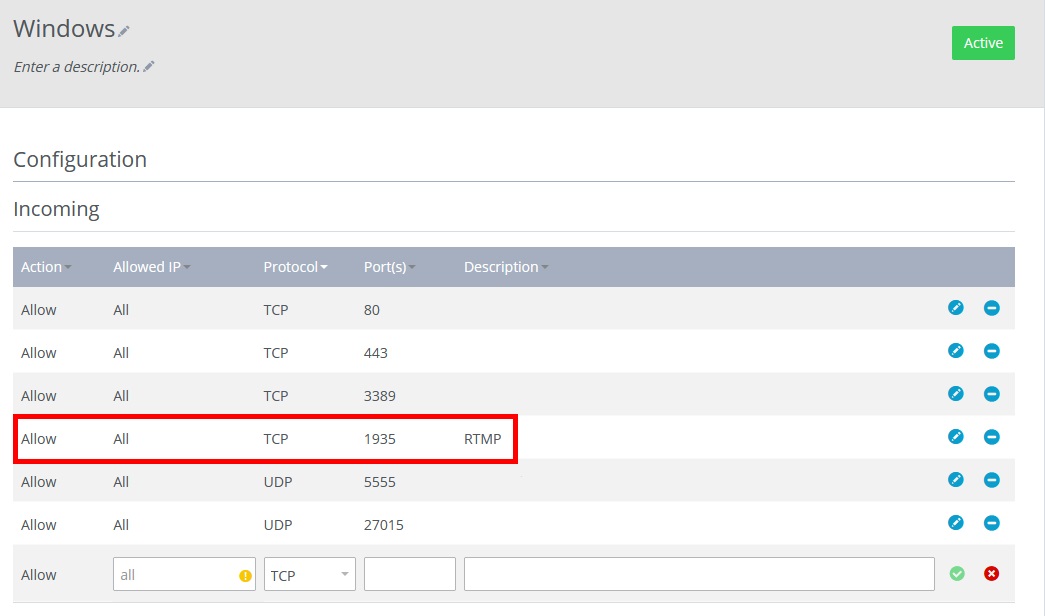
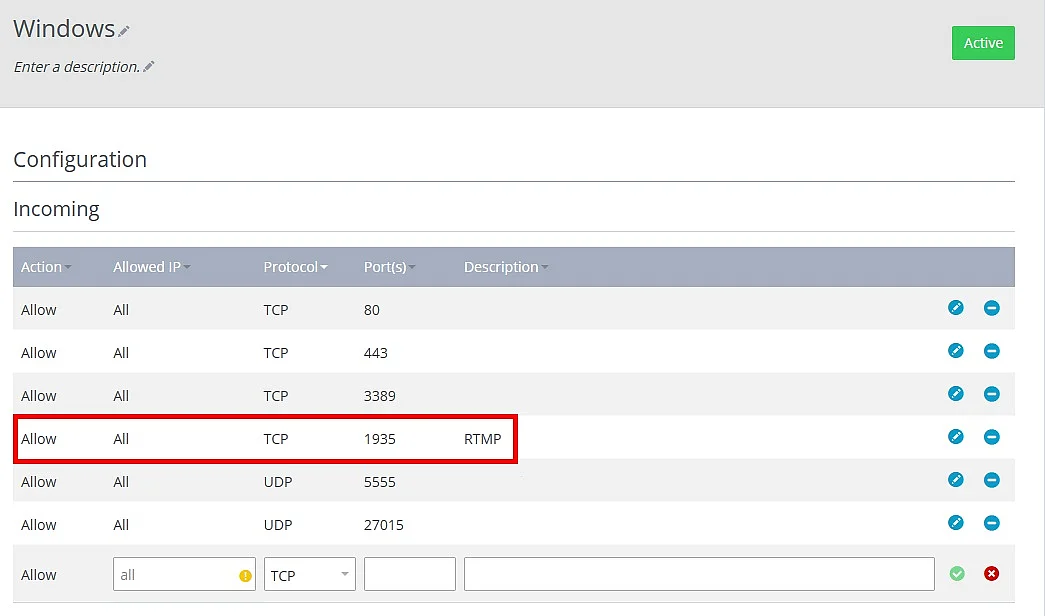
If you’re using HLS, you also need to create a corresponding rule for port 8080. Besides the firewall in the Cloud Panel, you must also configure the Windows Server firewall. Open Microsoft Defender Firewall with Advanced Security and create a new inbound rule for TCP port 1935 (RTMP) and, if required, port 8080 (HLS).
Alternatively, you can add the rule using PowerShell with a simple command:
New-NetFirewallRule -DisplayName "RTMP Server" -Direction Inbound -Protocol TCP -LocalPort 1935 -Action AllowIn some corporate networks or public Wi-Fi environments, the default RTMP port 1935 may be blocked. In these cases, RTMP can instead run over port 443 (TCP), which is typically open for HTTPS connections. However, this setup requires a customised server and NGINX configuration and is therefore better suited to advanced users.
Step 5: Start the stream
You’ve now completed all the settings and can start sending streams. To do this, you still need suitable software. One very popular option is OBS. In the streaming software, you then need to enter your RTMP server accordingly:
rtmp://<IP address>/live/streamEnter the correct IP address of your server. You can also find this information in the Cloud Panel. Using this URL, the live stream is first sent to the RTMP server, while actual playback for viewers takes place through a separate delivery protocol such as HLS.