How to install TYPO3
TYPO3 is a free, platform-independent open source content management system. Released in 1998 by Kasper Skårhøj and driven by two development teams, TYPO3 has become one of the most popular web content management systems in the world. Around the world, many websites use the flexible system to post and maintain their content on the web. The separate management of content and programming allows developers to easily add extensions. No new code has to be written for this, which makes the process much easier. Training developers is time-consuming, but users who post and manage content usually find their way around the clearly laid out backend after a few hours.
Neos has emerged from TYPO3. The biggest difference? This CMS combines both frontend and backend. You can see changes made to the website live. Read more about Neos in our article Neos – from successor to competitor.
- Simple registration
- Premium TLDs at great prices
- 24/7 personal consultant included
- Free privacy protection for eligible domains
Through countless extensions and templates, TYPO3 allows you extremely flexible website design options. The CMS is used by both small websites run by private users and large, multilingual commercial enterprise domains run by commercial companies or news portals with plenty of changing daily content. Installing TYPO3 and tailoring it to specific requirements, however, usually requires a certified TYPO3 service provider. If you want to install TYPO3 yourself, follow our detailed instructions.
TYPO3 installation requirements
To install TYPO3, no additional software is required. You may need an FTP program for the file transfer. TYPO3 hosts usually have this pre-installed on the server. The basic requirement is a web browser with JavaScript and a web server like Apache, NGINX or IIS.
Currently, the development team supports two versions: TYPO3 7 LTS and TYPO3 8 LTS. In November 2019, version TYPO3 9 LTS will be released, which had its last release with version 9.3.3 in July 2018. These are the minimum requirements for the current secure versions.
- A webserver with PHP from version 5.5 (TYPO3 7) or PHP 7 and higher (TYPO3 8)
- An SQLbased database that is compatible with Doctrine DBAL, like MySQL Version 5.5 or higher or MariaDB 10.0 or later
- At least 128 MB RAM (recommended: 256 MB)
- PHP configuration with at least 64 MB memory limit (Apache, IIS, NGINX)
- For image processing, the team recommends the GraphicsMagick and ImageMagick libraries.
Step by step: TYPO3 installation instructions
TYPO3 is platform-independent and available as open source software. At the same time, there are providers around the world who offer TYPO3 pre-installed in a hosting product package. Those who want to set up TYPO3 exactly according to their own requirements can do so with the SourcePackage. The source code can be adapted directly by TYPO3 experienced programmers. The thousand or so extensions support individualization.
In our example, we work on the Windows operating system. The FTP program used is FileZilla. We download the TYPO3 version 8 LTS from typo3.org.
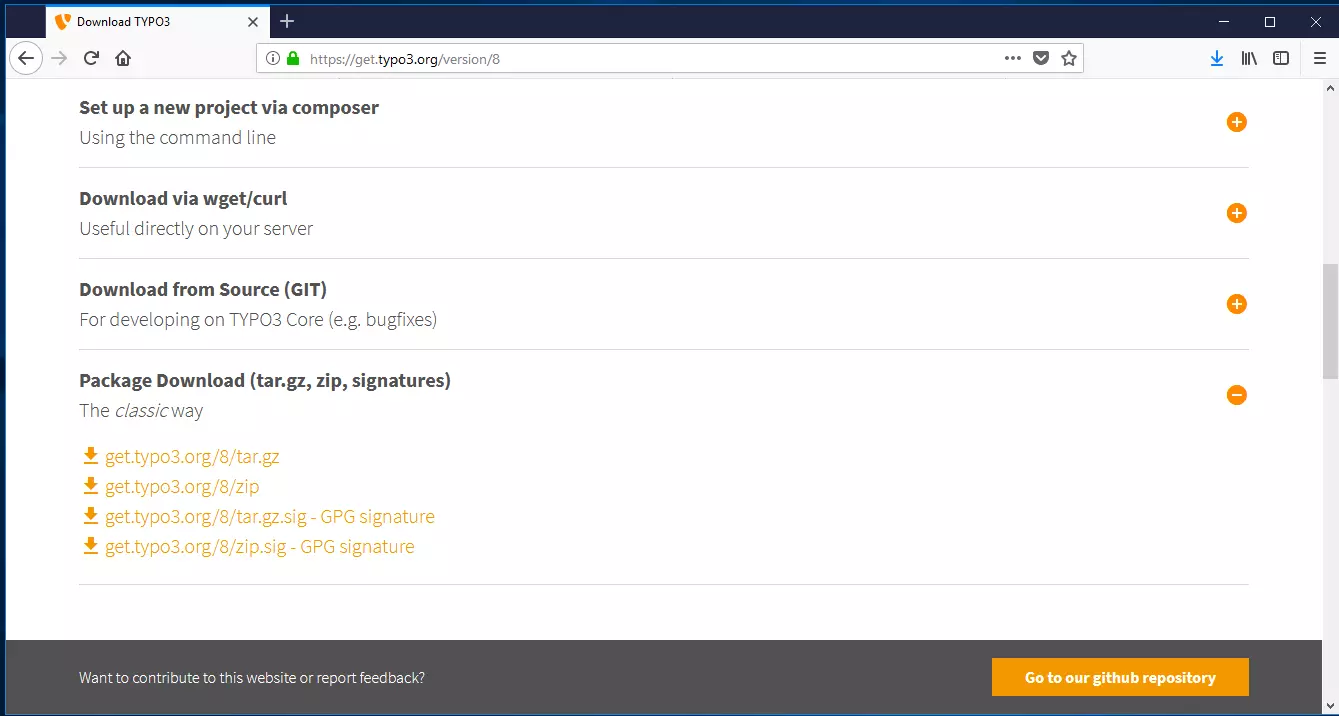
Step 1: Visit the TYPO3 download page. There you will find the latest releases of the supported TYPO3 versions. The developers will show you the main differences between the different versions. Choose the version that suits you best. For example, to install TYPO3 8, click on “Get Version 8”. This will take you to the download page.
Step 2: To demonstrate the usual way, we downloaded TYPO3 as a compressed .tar file. The solid tar compression file is suitable for Unix/Linux systems. Windows users download the .zip file. The packages with GPG signature (at the bottom of the image) ensure the downloaded program’s authenticity. We recommend this version for professional users.
Step 3: Go to the appropriate link. Once the download is complete, click on the download arrow in the browser window.
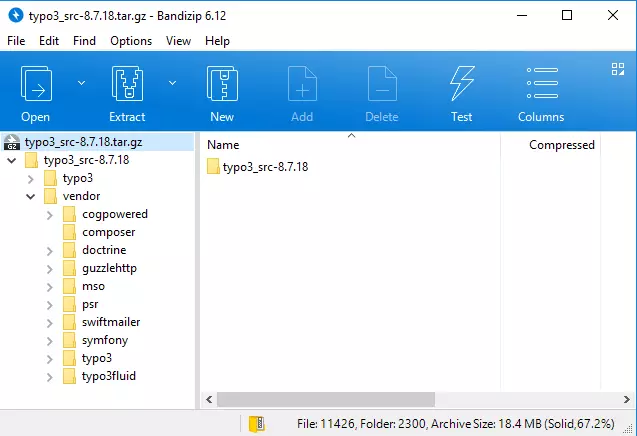
Step 4: Select the file to open a compressed archive for the TYPO3 installation in your packing program.
Step 5: Extract the entire folder and save it to a path you can easily find.
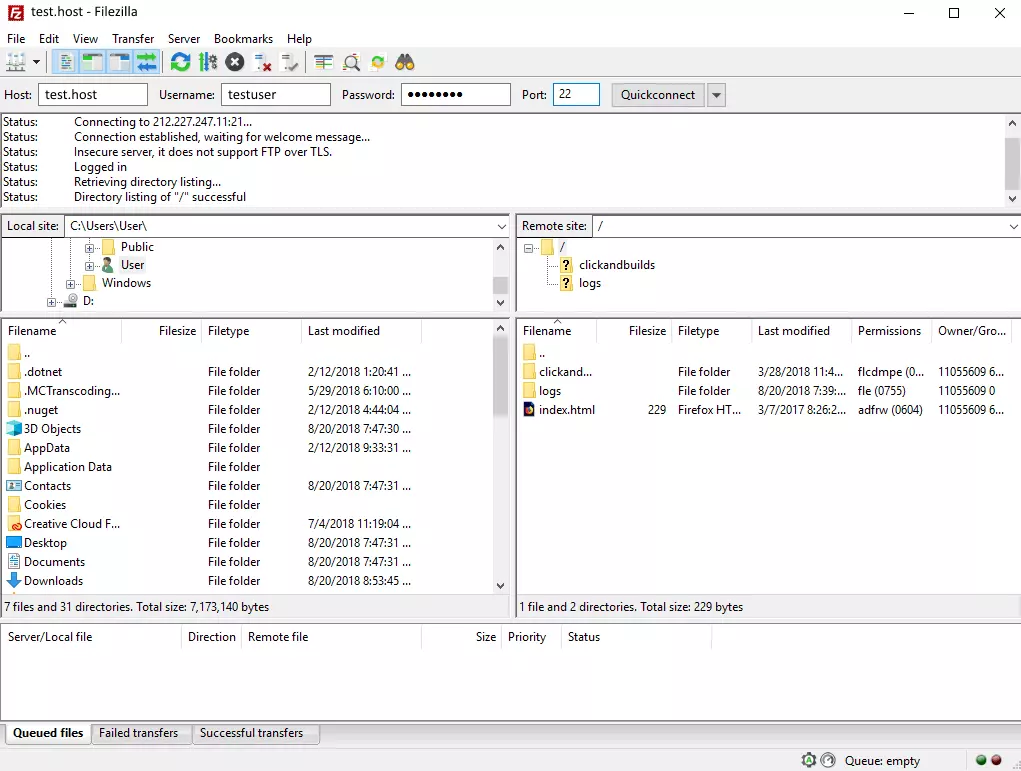
Step 6: Open the FTP program, in this case FileZilla. To quickly connect to your server, enter the server name under “host”. Enter your username and password. The system usually adds the port automatically. Then select the “Quickconnect” button. The program tries to establish a connection to your server. Further down in the application, you will see your local file directory in the left window. The server directory appears on the right after a successful connection.
Alternative: Select the item “Files” in the main menu and click on “Site Manager” in the drop-down menu that opens. A new window will pop up. In the site manager, enter your server name again under “Host” as well as username and password. In this tool, you adjust the upload settings for TYPO3 and connect to the server. In the tab “Transfer Settings”, select the “Transfer Mode”. Click on the “Default” tab and set a maximum for the number of connections allowed at the same time – here there are six. If a firewall protects your server, select the “Passive” mode and then “Connect”.
If there are only a few files to upload, just drag the desired documents from the local files to the server directory. The FTP software uploads the file.
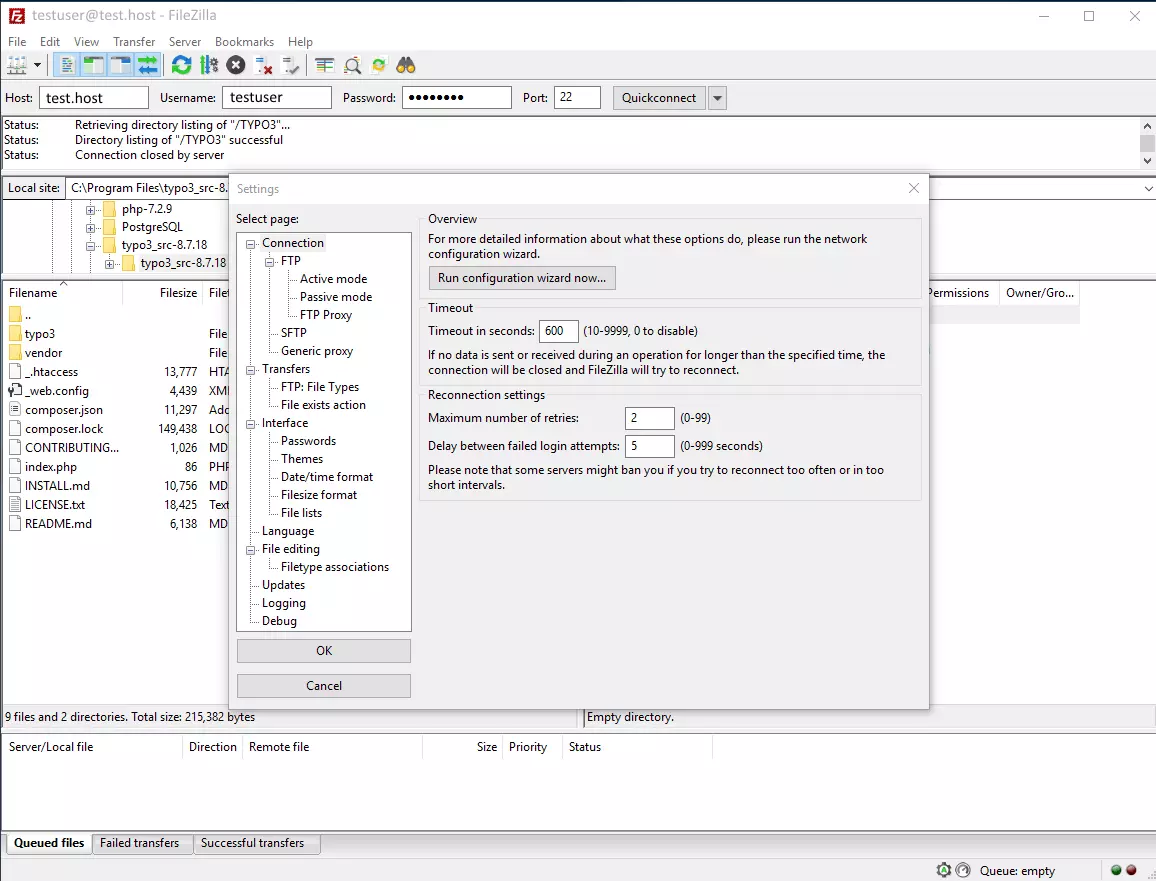
Step 7: Select “Edit” from the main menu, then “Settings” and “Connection” from the drop-down menu. Under “Timeout” you can set the number of seconds after which the upload should be interrupted – 600 is a good value for this. Set the maximum number of repetitions to 2. In the left directory column, select “Transfers”, then “File Types” and set the default transfer type to “Binary”.
Step 8: Once you have made all the settings changes, drag the TYPO3 folder from the location on your hard disk (shown in the left window) to the window of the remote server. Place the file in your root directory (also called “start directory”). The character „/“ marks the root directory for Unix-like systems.
Step 9: Check if you can find the uploaded files on your server. To do this, log onto your host. The file can be found in the hosting area on your webspace, if it has been transferred correctly. Alternatively, you can access your TYPO3 installation through the URL localhost/site/.
Step 10: If you want to install a website with TYPO3 and make it publicly accessible, you need a domain. At least one domain is often included in a hosting package. If you have not specified a domain, you can order one by applying for a name.
Step 11: If you have a ready-to-use domain, connect it to the server. The path must lead directly to your TYPO3 directory.
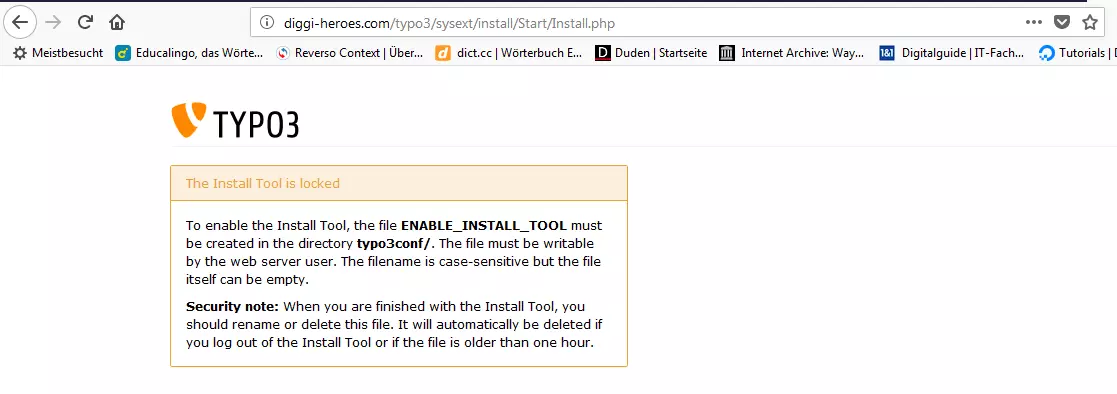
Step 12: Since server and domain are now connected, the installation of TYPO3 in the browser can continue. To do this, go to your new website’s homepage. A thank you message from TYPO3 will appear. From here, you can use the TYPO3 installation tool. To do this, create an empty file called “FIRST_INSTALL” (without file extension) in your web space’s root directory. Reload your website in your browser.
Do not start the tool, instead try this option. Create a file named “ENABLE_INSTALL_TOOL” (again, without the file extension) in the TYPO3 subdirectory typo3config.
Step 13: The installation wizard opens up at "https://www.[DOMAIN-NAME].com/typo3/install.php". The tool helps you to install TYPO3. The process has five phases. First, the tool examines your system environment. If problems occur due to a setting, use the troubleshooting function. Otherwise, proceed.
Step 14: In the next step, specify the database that TYPO3 is to be used. If you have not yet set up a database, visit your hosting provider’s website. A database is usually created in just a few steps. For TYPO3, you need the following information about your database:
- Database name
- Username for the database
- Password
- Host (often “localhost”)
- Port (often 3306)
Step 15: Now you can either select an existing database or create a new database. The latter is only possible if you have the necessary authorizations.
Step 16: In the next input mask, you define a username and password which you use to log into both the backend and the installation tool. Under “Site name”, enter the name of your new TYPO3 website.
Step 17: In the final step, the wizard completes the installation by automatically adapting some configurations to your system environment. You still decide whether TYPO3 will create an empty website or whether it will rest for the time being. By clicking on “Open the TYPO3 Backend” you will be taken to the admin area, where you can log in with your newly created account. You have now successfully installed TYPO3.
For experienced TYPO3 developers, it’s worth making all the configuration changes yourself. However, for the less experienced it is still easy: IONOS web hosting not only stores the installation file on the web server, but also supports you in the subsequent CMS setup with templates and a trained support team.
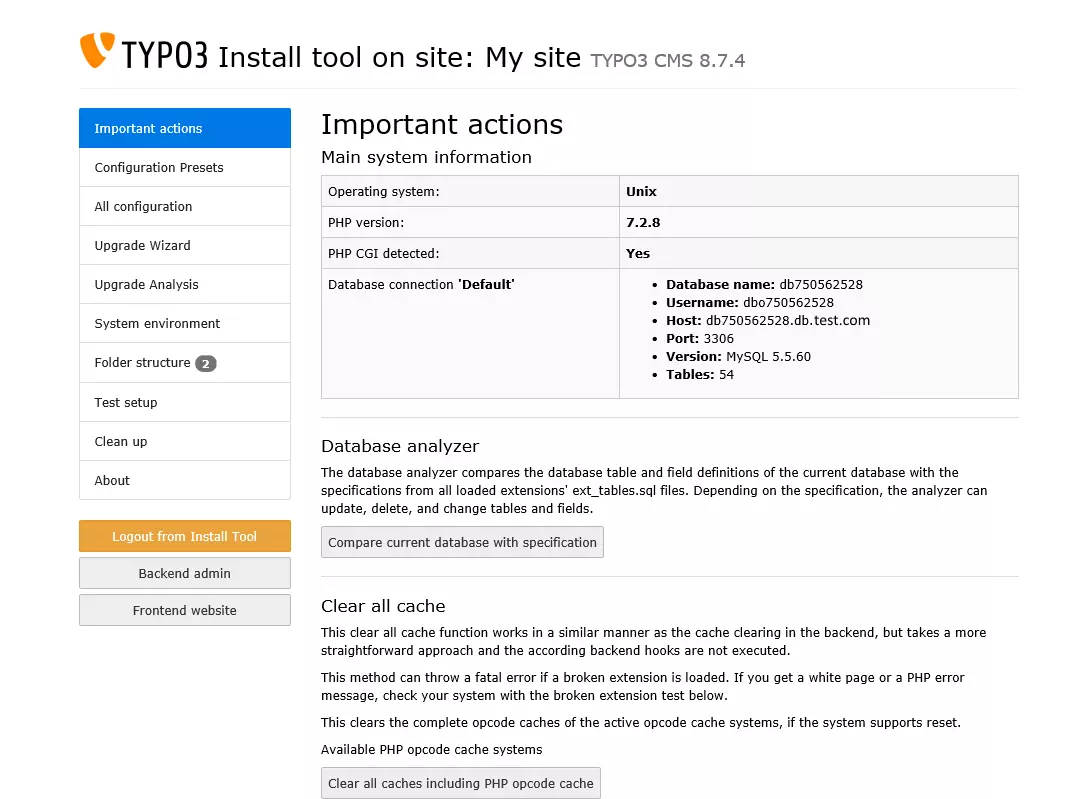
The TYPO3 team recommends locking the installation wizard again after the work is done, so that third parties cannot access it. First, however, you have the opportunity to view basic data or synchronize your database. Through the left column, you can access the configuration, perform upgrades later and examine the system environment if errors occur. Folder structure displays your directory tree. With Test Setup, you can try out whether your settings produce errors. In this case, the TroubleShooter Clean Up will help you.
From here, you will be taken to the backend, where you can enter your previously defined login data for administrators. There you can adapt TYPO3 to your needs, add extensions or create accounts for editors who will later access the website frontend. The dedicated community creates free templates that you can use for your website. These templates contain commands in the so-called TypoScript, the internal configuration language or TYPO3. Once you have installed TYPO3 according to our instructions, you can use extensions and templates to customize your website and optimize your backend.
If you want to learn more about the possibilities of TYPO3 CMS, read our article “TYPO3 – CMS with a broad range of functions”. There we also explain how to use templates for TYPO3 and how to customize both backend and frontend with extensions.


