How to use the duplicate file finder in Windows 11
Duplicate files take up valuable disk space. They can also reduce computer performance and act as a gateway for malware. Fortunately, duplicate files can be removed quickly and effectively in Windows 11 using internal tools such as the Command Prompt and Windows Explorer or external software.
3 ways to find duplicate files in Windows 11
Method 1: Windows Command Prompt
By default, Windows makes finding duplicates easy. Duplicate files or file copies are automatically designated with the suffix “- copy”. You can easily check this by copy-pasting a file into the same folder. When you don’t have too many file copies it’s relatively easy to find and delete duplicate files. For a greater number of files and more muddled folder structures, Windows 11 has the command prompt.
Use the command prompt as follows to find duplicate files:
Step 1: Open the “Run” dialog with the Windows shortcut [Windows] + [R]. Type the CMD command “cmd” and press [Ctrl] + [Shift] + [Enter] to open the command prompt as an administrator.
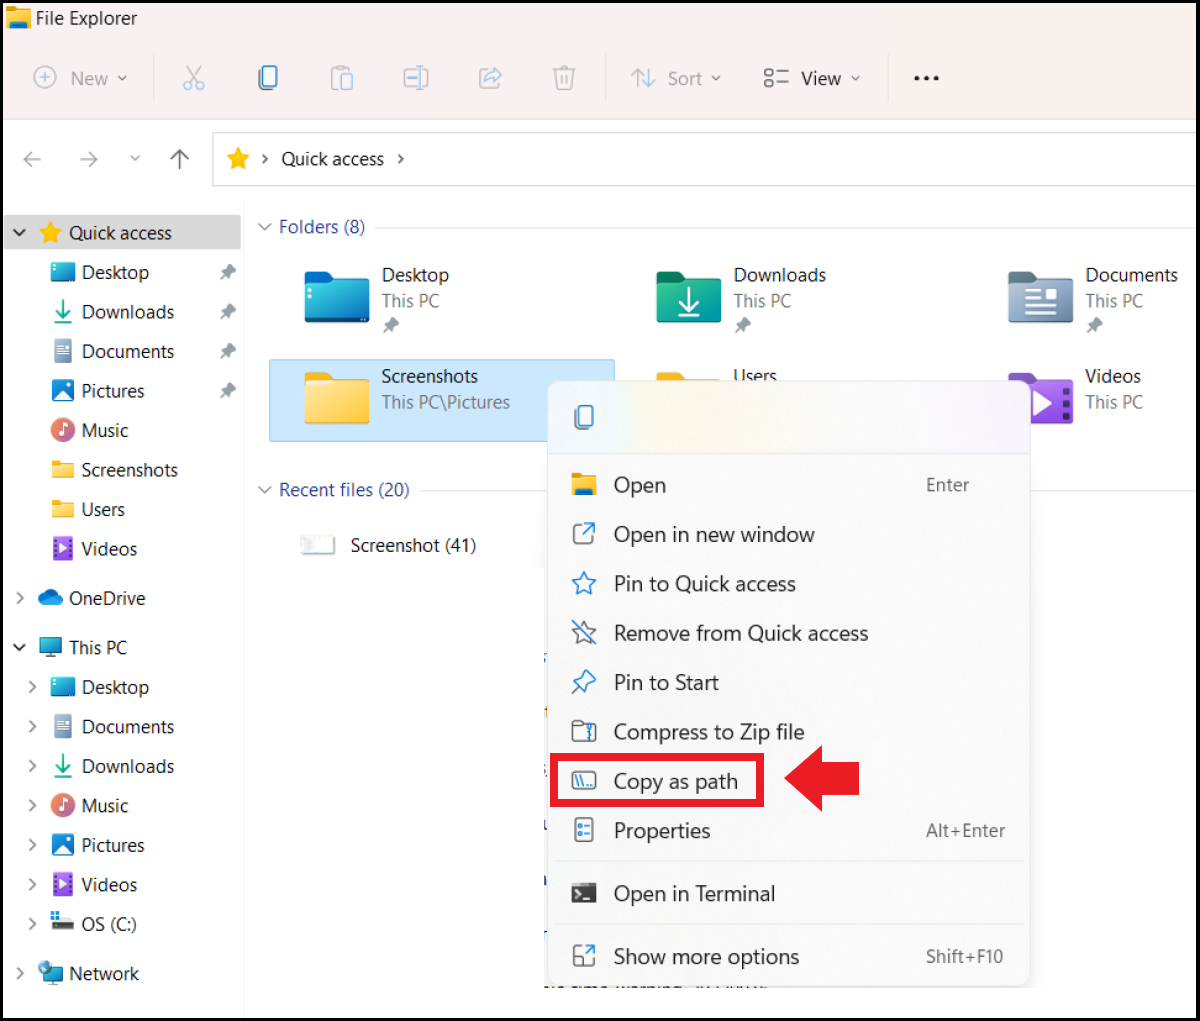
Step 2: Now open the folder you want Windows to scan for duplicate files in your folder menu. To do this, right-click on the folder and click on “Copy as path”.

Step 3: Now return to the command prompt and enter the command cd/d "folder-location". Use the shortcut [Ctrl] + [V] to insert the path of the selected folder in place of “folder-location” between the quotation marks. Then press [Enter].
Step 4: Enter the command del "* - copy.jpg" in the command prompt to delete duplicates with the specified extension in the selected folder. Adjust the command according to the file extensions or file names you wish to modify.
Method 2: Windows Explorer
Windows Explorer is a handy tool to spot duplicates and simplify your structure if you don’t wish to install third-party software due to limited storage space or security concerns. Here’s how:
Step 1: First, launch Explorer by typing “Explorer” into the Windows search field and clicking on the app. Alternatively, press the Windows shortcut [Windows] + [E] or right-click the Start icon to find Explorer in the Start menu.
Step 2: Now call the destination folders with duplicate files in the left quick access menu of the Explorer.
Step 3: The Sort tab sits at the top of the toolbar in the Explorer menu. Sort lets you organize, and sort displayed files in the destination folder. Select criteria such as name, type, date or size to sort the existing files and find duplicate files faster based on their similarity.
Step 4: Delete duplicate files directly in Explorer by right-clicking and selecting “Delete”.
When clearing your hard drive, you may unintentionally delete files you still need. Fortunately, Windows keeps deleted files in the Windows Recycle Bin for 30 days after deletion. You can recover files from the Windows Recycle Bin.
Method 3: External software for duplicate file search
Want to search for duplicates more efficiently? That’s where alternative file managers and external software solutions come in. These allow for larger amounts of data and multiple folders to be managed. You can also use them to find duplicate files in Windows 10.
Examples of useful apps are:
- Anti-Twin
- Auslogics
- AllDup
- CCleaner
Here’s an example of using CCleaner to search for duplicate files in Windows 11. The freeware CCleaner scans locations or selected folders and lists duplicates.
Step 1: Install the free CCleaner software from a reputable and safe source. You can install the application on your desktop or use it as a mobile version.
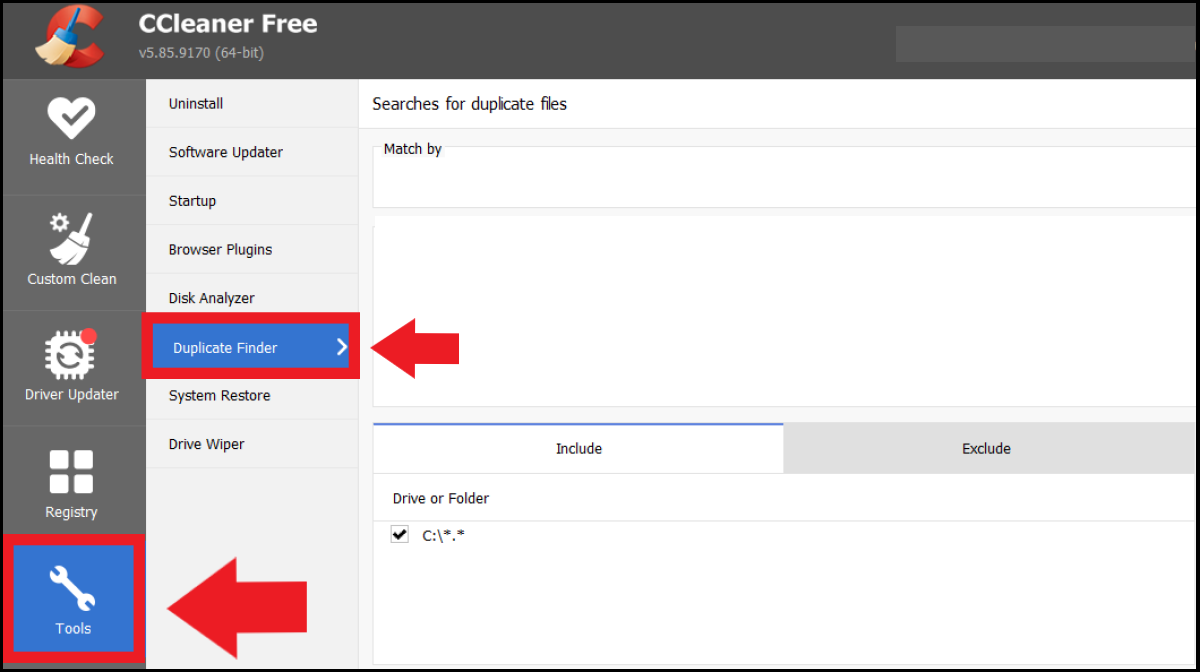
Step 2: Open the app, click “Tools” on the left and then “Duplicate Finder”. Now set search criteria such as name, content, size or modification date. The “Ignore” function sets the search for predefined file sizes or hidden Windows files and folders.

Step 3: Specify which folders and drives you wish to include in the search. Both multiple drives and selected folders are possible. The search can be narrowed down to specific file types. Click “Search” to start the search.
Step 4: At the end, the app will list duplicates that match the search parameters. You now have the option to save the list for later or delete duplicates immediately.


