How to take a screenshot on Windows
In Windows, there are several ways to create screenshots. You can do so with keyboard shortcuts, the integrated snipping tool, or using external screenshot tools. We show you how it works.
In a nutshell: Create, save, and edit screenshots in Windows.
Take a screenshot of the entire screen and save it to the clipboard:
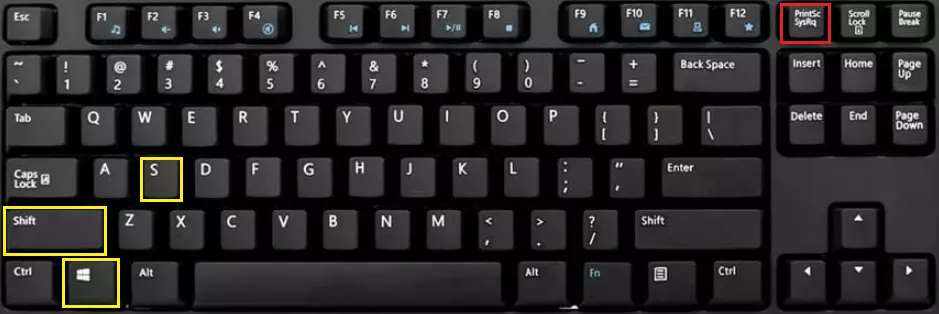
- [Print] key
- On some laptops instead of using just the [Print] key, you have to use a combination of [Fn] + [PrtScn] instead
- Paste to the desired area using [Ctrl] + [V]
Take a screenshot of the active window and save it to the clipboard:
- [Alt] + [Print]
- Paste into the desired area using [Ctrl] + [V]
Take a screenshot of the area you’ve chosen and save it to the clipboard:
- [Windows] key + [Shift ⇧] + [S]
- Paste to the desired position with [Ctrl] + [V]
Take a screenshot of the whole screen and save it directly:
- Key combination [Windows] + [Print]
- Automatically save as image file in the “Images > Screenshots” folder path
Take a screenshot of the active window and save it directly:
- Key combination [Windows] + [Alt] + [Print]
- Automatically save as an image file in the “Videos > Captures” folder path
How to take a screenshot on Windows 11, 10, 8, 7: detailed instructions
Creating screenshots on the Microsoft operating system is extremely simple: By pressing the [Print] key on your keyboard, you copy the current screen display to the clipboard. If you use two monitors at the same time, both screens are captured.
You’d prefer not to capture the entire screen, but just one window instead? First, select the window in question. Then, with the Windows screenshot key combination — [Alt] + [Print] — create a screenshot. Your mouse pointer will not appear on the screenshot — you’ll need to install an extra tool for this.
Your keyboard may be labeled differently: Usually, the labels [Print], [Prnt], or [Prnt Scrn] (for “Print Screen”) are used. With laptops, keys are often assigned to two functions in order to save space. Making a screenshot should be possible by pressing: [Fn] + [Print].
After pressing the print key, your screenshot will be located on your clipboard. This is temporary storage that Windows uses to set aside elements that you’ve copied or cut (e.g. text sections that you’ve cut out and pasted in Word). From the clipboard, you can add your screen capture into a program, for example, Paint or an alternative to Paint. Open the minimalistic photo editing program and add the image from the clipboard. This can be done either using the menu list or with the key combination [Ctrl] + [V].
Other Windows applications can also handle the screenshot in the clipboard. In Microsoft Word, for example, you simply move the cursor to where you want the screenshot to appear and paste it from the clipboard. We explain how to open the clipboard in Windows 11 in a separate article.
If you want to capture your screen on Windows 11, Windows 10, or Windows 8, there are two available key combinations, which enable you to save the screenshots locally:
- By pressing the [Win] + [Print] keys simultaneously, you create a screenshot of the entire screen, which is saved directly into a new file. Windows saves this in PNG format and places it in the “Screenshots” folder in the “Images” directory. The files are numbered in ascending order.
- With the key combination [Windows] + [Alt] + [Print] you take a photo of the active window. This is automatically saved (also in PNG format) in the “Captures” folder in the “Videos” directory.
In further articles we will take a closer look at how to create screenshots in Windows 10 or screenshots in Windows 8. The Digital Guide also explains how to take screenshots in Windows 7.
Snipping Tool: The perfect tool to create screenshots in Windows
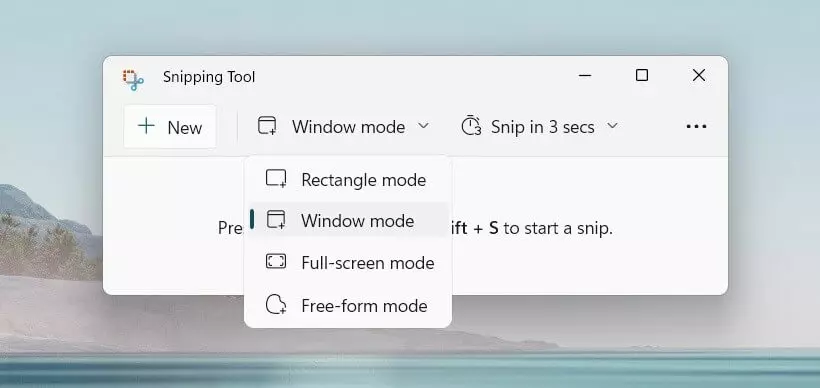
The print button function is useful, quick, and uncomplicated but it’s also very simplistic. So Microsoft introduced an additional method for capturing your screen on Windows. The snipping tool is preinstalled on the operating system and offers more options for customizing the screenshot to fit your needs. If you have the program open, you can select between various snipping types:
- Full-screen: This setting has the same function as the print button. Create a complete copy of the screen (or screens) with just one click.
- Window: If you select this type of snip, first decide on a window that you want to create a copy of. If you move over it with your mouse, it becomes clearly visible, while all other content is covered with a fog filter. Clicking on the window of your choice takes the screenshot.
- Rectangular: With this snipping type, you can select a free, rectangular area for the screenshot. If for example, you already know before you take the screenshot that only a certain part of the screen is important, then you only need to save this part. With the mouse button pressed down, you can draw a frame. As soon as you release the mouse, the image is captured.
- Free-form: Even more freedom is given with this snipping type. With it, you can select a form freehand, and only take a screenshot of this area. The quality of the form depends on how well you can draw with the mouse. With this type, the program also creates the screenshot as soon as you let go of the mouse. If you haven’t looped entirely back to the starting point with the dragged frame, then the snipping tool automatically completes the connection between the starting and ending points using the shortest path.
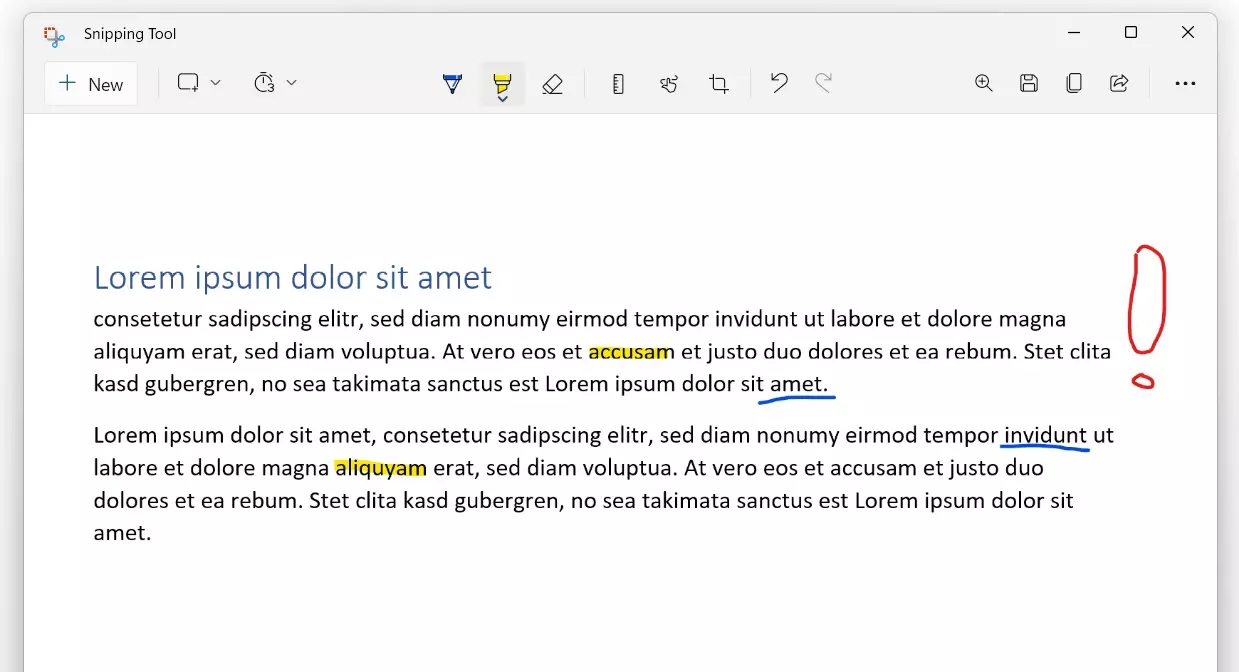
Unlike screenshots created with the print button, the snipping tool shows you the screenshot right away. This way, you can immediately check whether it all looks as intended. If not, simply click on “New” and try again. As soon as you’re satisfied with the result, you can add markings directly to the screenshot. Underline important parts with a pen, cross things out, or point something out with an arrow. With the text marker, you can draw attention directly to an important sentence or number.
In the last step you decide what to do with your screenshot:
- Save: Click on “Save as” to open a window in which you can define the save location, file name, and file format. The available formats are PNG, GIF, and JPEG.
- Copy: The snipping tool also gives you the option to copy captured images to the clipboard. Just like with the print key, you can then paste your screenshot into various applications, such as a Word document.
- Send: You can also send your screenshot as an email. For this, either paste the selection directly into a new email or send it as an attachment. You need to use a specific program for your email instead of the web version of your email provider.
If you create a screenshot in Windows 10 with the snipping tool, you also have a time delay option. Like the self-timer of a camera, you can set a timer to delay the trigger of a screenshot. You can use this time to change settings that are only visible for a short period of time, for example, or that require a key to be held.
Not only Windows systems offer their own functions and tools for taking screenshots. Other programs such as web browsers are also equipped with these features. We have other articles that explain how to take Firefox screenshots or how to take Chrome screenshots!
Problems creating screenshots
Errors often occur, especially when creating screenshots from other programs. If you’re trying to take a screenshot of a video or a game, it often results in a completely black screen. The reason for this, in many cases, is a conflict with the graphic card. Most of the time, though, the problem can be avoided. Sometimes it’s enough just to reduce the game from full screen to a windowed mode. Games or video playback programs frequently have their own screenshot function that you can activate with a hotkey.
But sometimes it occurs, for example with Netflix, that the provider of the software prevents the creation of screenshots. In such cases, this has to do with copyright. The built-in copy protection technology, or digital rights management (DRM), prevents copying of the image to protect the rights of the owner. If this is the cause of your problem when trying to take a screenshot in Windows, then you will simply have to accept it.
Other tools: External tools for screenshots on Windows
While the snipping tool already offers more features than the simple key combination for creating screenshots on Windows, it can still be worthwhile trying out some other software options. Screenshot tools are especially recommendable for users who use screenshots professionally, or at least on a daily basis.
These screenshot programs sometimes offer more editing options and additional functions, such as automatic scrolling to display long websites in one picture or so-called screencasts—the programs record a video of your desktop. This function is most popular for use in tutorials, since in such videos the creator can easily show their viewers what they need to do instead of trying to painstakingly explain it.
- ShareX: With the open-source software, you can also create screencasts and GIF files.
- Screenshot Captor: The slim tool can take pictures of auto-scroll as well as more than one monitor independently.
- Grabilla: The manufacturer of this screenshot tool has made the software available on various platforms and also offers its own file hosting service.
- Monosnap: The software is quick and easy to use, yet still offers all of the important features.
- DuckCapture: In addition to the usual screenshot functions, this tool also offers the possibility to easily assemble multiple screenshots into one big image.
Do you also use other operating systems? Our articles on creating screenshots in Linux and creating screenshots in Ubuntu as well as creating screenshots on a Mac might also be of interest to you.


