How to change DNS servers on Windows 11
Changing the DNS server can speed up loading times, improve security and resolve name resolution issues. The preferred ways to change DNS servers on Windows 11 are by configuring the network or adapter settings. You can switch both IPv4 and IPv6 addresses.
- Faster domain resolution to keep you online longer
- Added protection against outages and downtime
- No domain transfer needed
How to change your DNS server on Windows 11 (3 different methods)
Method 1: Using the network settings
Step 1: Enter “Network” in the Windows search and go to “Network and Internet”. Alternatively, use the shortcut [Windows] + [i] to open “Settings” and navigate to “Network and Internet”.
Step 2: Open the properties for your internet connection by clicking on “Properties” (top center). Scroll to “DNS server assignment”. By default, automatic DNS server assignment will be enabled. Click on “Edit” and switch to “Manual”.

Step 3: You should now see the DNS server menu with the “Preferred DNS” and “Alternate DNS” fields. Under “Preferred DNS server”, enter the IP address of the DNS server that you would like to use as the primary DNS server. In the “Alternate DNS server” field, enter the IP address of your secondary DNS server. Save your changes. DNS name resolution will now happen via the DNS servers of your choice.
Method 2: Using the adapter settings
Step 1: Open the Settings menu via the Windows search line or using the shortcut [Windows] + [i] and navigate to “Network and Internet”. Select “Advanced network settings” from the bottom.
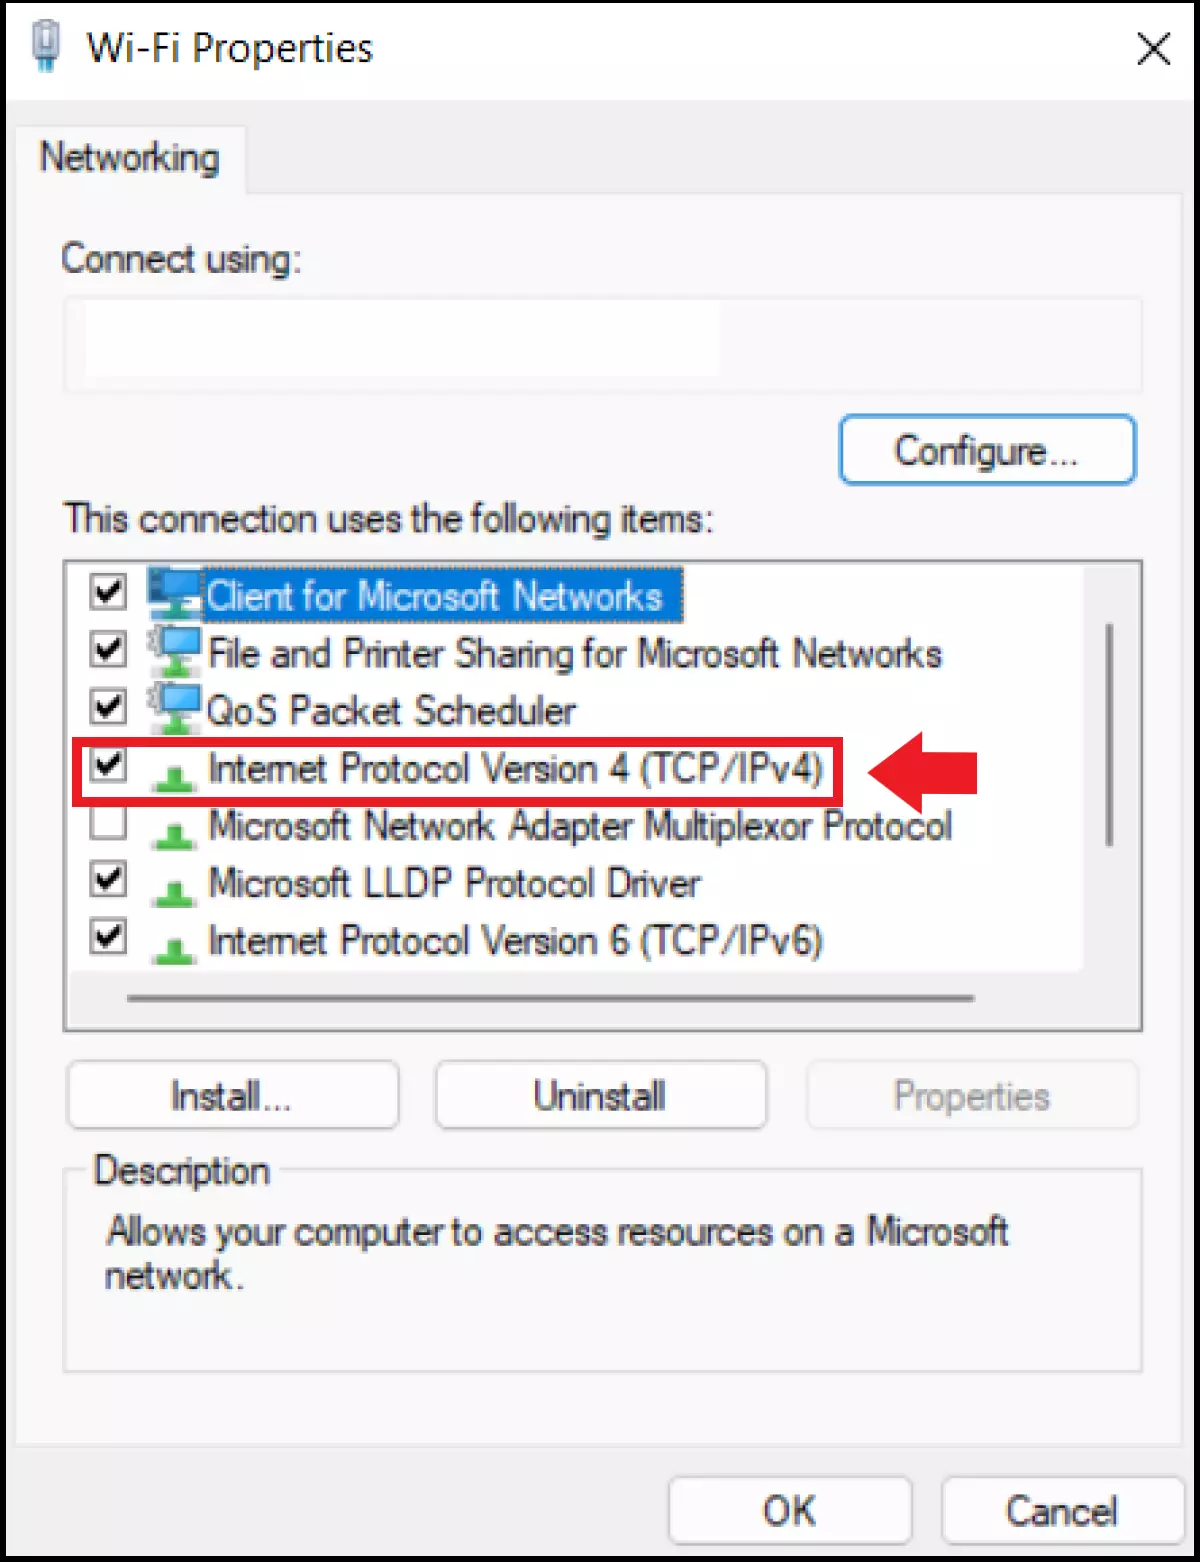
Step 2: Click “More network adapter options” to view your active internet connection. Double-click on the connection or network adapter and navigate to “Wi-Fi Properties” under “Activity”. You will need administrator rights to do this.
Step 3: You should now see a list of network elements under “This connection uses the following items”. Select “Internet Protocol Version 4 (TCP/IPv4)”. If you’re using an IPv6 connection, select “Internet Protocol Version 6 (TCP/IPv6)” instead. Then go to “Properties”.

Step 4: Click on “Use the following DNS server addresses” and enter the IP addresses for the primary and secondary DNS servers of your choice in “Preferred DNS server” and “Alternate DNS server”. Confirm your changes to connect via your preferred DNS server.
Method 3: Using the router
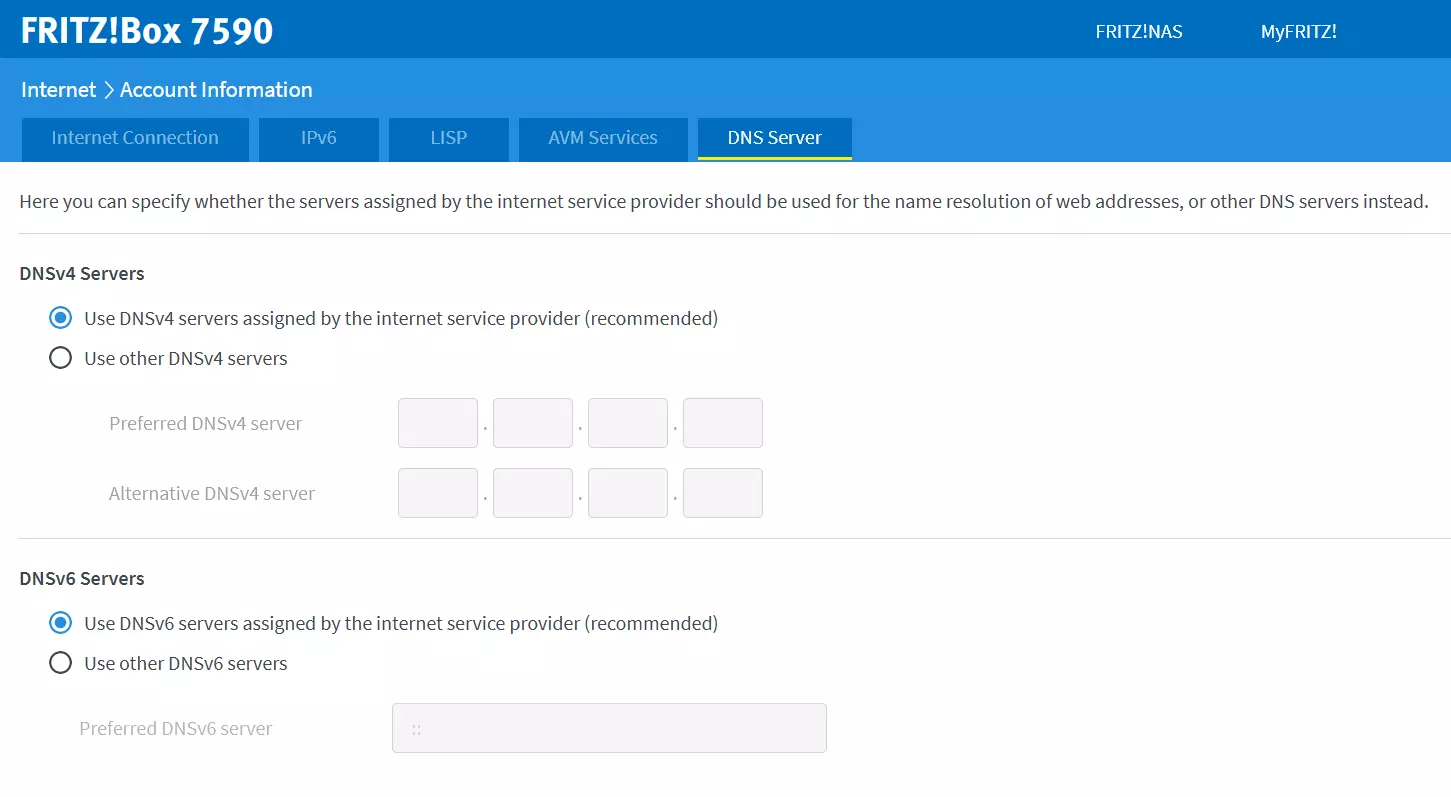
Step 1: To connect all your devices to the same network automatically, you can change the DNS settings in the router. The individual steps to modify router settings depend on the type of router you have. If you’re using a Fritz!Box, for example, access the user interface by going to ‘http://fritz.box’.
Step 2: After logging in, head to “Internet” and select “Account information”. Select “DNS Server”.
Step 3: Depending on whether you use IPv4 or IPv6, select “Use DNSv4 servers assigned by the internet service provider” or “Use other DNSv6 servers assigned by the internet service provider”. Enter the primary and secondary DNS IP addresses of your preferred servers and confirm with “Apply”.

When should I change DNS servers?
As a directory service for internet addresses, the Domain Name System (DNS) performs the task of translating IP addresses into more readable URLs, such as ‘https://www.ionos.com’. Automatic name resolution is performed by DNS servers. Occasionally, errors occur during this process. They include:
- Current DNS servers are slow and name resolution takes longer.
- Automatic name resolution may run on less secure servers.
- Due to connection issues, the DNS server isn’t responding.
- A provider prevents the resolution of a blocked URL in a specified DNS range via its own DNS filter list.
In these instances, it’s a good idea to modify the DNS server manually. The methods above will work for Windows 11.
To change DNS servers in other operating systems, check out the following articles:
- Change DNS servers on Windows 10
- Change DNS servers on Mac
- Change DNS servers on Ubuntu
- Change DNS servers on Debian
What should be considered when changing DNS servers?
After changing your DNS manually, visited websites may still be stored in the DNS cache under the old settings. It’s a good idea to clear the DNS cache to apply the new DNS changes to all pages. A DNS flush can be performed using the command line in Windows. Simply enter the command “ipconfig /flushdns” to clear the DNS cache.

