Basic Docker networking on a single host
Learn how to use basic and advanced networking tools to manage Docker containers. The networking feature allows users to define their own networks and connect containers to them.
You can create a network on a single host, or on a network that spans multiple hosts using the Docker network feature. This article will cover networking Docker containers on a single host. For information and instructions on networking Docker containers across multiple hosts, see our article on the subject.
Requirements
- IONOS Linux Cloud Server
- Docker installed and running on your system.
- 99.9% uptime
- PHP 8.3 with JIT compiler
- SSL, DDoS protection, and backups
Safely working with Docker without using Sudo
The Docker daemon runs as root, which means that users will need to use sudo to run Docker commands.
To avoid having to use sudo for every Docker command, simply add your user(s) to the docker group with the command:
For example, by adding the user jdoe to the Docker group, this user will no longer have to use sudo for every Docker command. To add the user to the group, use the command:
Docker's default networks
Each Docker installation automatically builds three default networks. You can list these networks with the command:
The output of this command will look something like this:
The bridge network is the default network. Unless otherwise specified, bridge is the network where Docker will launch any new container.
Docker Networking: Bridge vs Overlay
Docker natively supports two types of networks: bridge and overlay.
- A bridge network is limited to a single host (server).
- An overlay network can span multiple hosts (servers).
Because overlay networks are more complicated, we will cover them in another article.
Inspecting a network
Inspecting a Docker network will return information about that network, including which containers are attached to the network, and their IP addresses. This is a valuable testing tool, as well as an easy way to find your container's IP address.
You can inspect a network with the command:
For example, to inspect the bridge network, the command is:
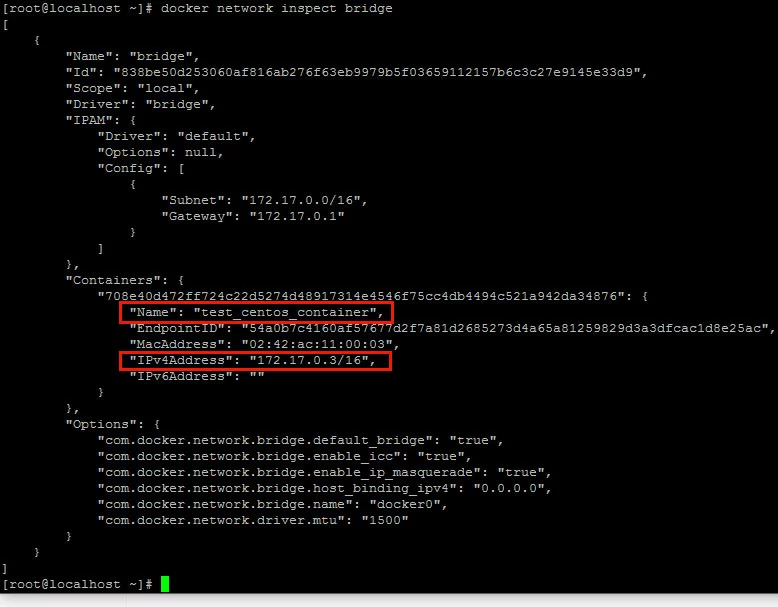
The output of this command will look something like this:
As you can see in the above screenshot, only one container is running on this bridge network. The container's name is test_centos_container and the IP address assigned to it is 172.17.0.3.
Containers can only communicate with each other when they are running on the same network. For example, if you had a web application in one container which needed to connect to a database in another container, both of those containers would need to be on the same network.
Creating a new bridge network
To create your own network, the command is:
The -d flag lets you specify the driver for the network. For a bridge network, use the bridge driver.
For example, to create a bridge network named new_test_network, use the command:
You can use sudo docker network ls to list the networks on your host and verify that your network has been created.
Starting a container and adding it to a network
If you do not specify a network when you start up a container, it will automatically be added to the default bridge network.
To start up a container and add it to a specific network, use the command:
For example, to start a container named test_python_container from the python image and add it to a network named new_test_network, the command would be:
Use CTRL-pCTRL-q to detach from the container.
You can use sudo docker network inspect [network name] to check the network and verify that the container is attached.
Adding a running container to a network
You can add a running container to a network with the command:
For example, to add a running container named test_centos_container to a network named another_test_network, the command would be:
You can use sudo docker network inspect [network name] to check the network and verify that the container is attached.
Docker allows you to add containers to multiple networks. There is no need to disconnect a container from one network before adding it to another.
Disconnecting a container from a network
To disconnect a container from a network, use the command:
For example to disconnect a container named test_centos_container from the new_test_network network, the command would be:
You can use the command sudo docker network inspect [network name] to inspect the network and verify that the container has been disconnected.
Docker allows you to add containers to multiple networks. There is no need to disconnect a container from one network before adding it to another.
Deleting a network
You cannot delete the default networks that Docker creates on start-up.
After all of the containers that have been added to a network have been stopped or disconnected, you can delete the network with the command:
For example, to remove the network new_test_network, the command would be:
You can verify that the network was removed with the sudo docker network ls command.
Example: Pinging between two containers on the same network
For this example we will create a custom bridge network, start up two containers on that network, attach to the ping_sender container, and ping the other container ping_receiver from there.
This example will use the official CentOS 7 image named centos which you can download from the Docker website with the command:
If you prefer to use Ubuntu, simply substitute an Ubuntu image instead.
First, create a bridge network named ping_test_network with the command:
Next, start a container named ping_receiver and attach it to the ping_test_network bridge network with the command:
Use CTRL-p CTRL-q to detach from the ping_receiver container.
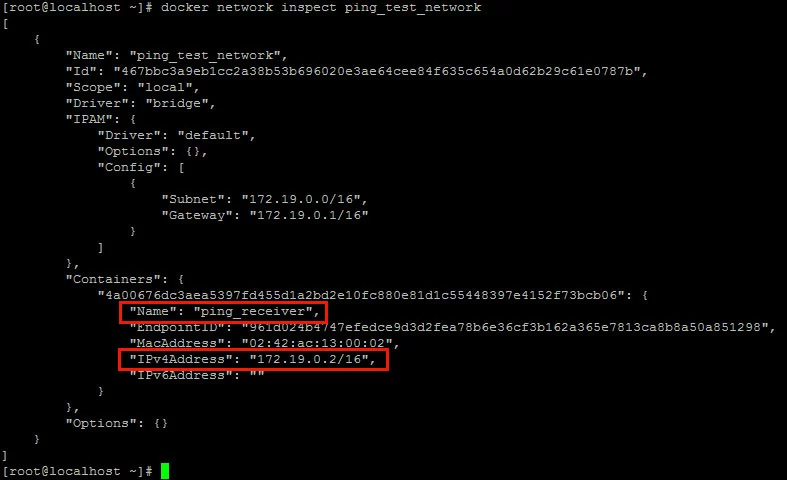
Inspect the ping_test_network to get the IP address of the ping_receiver container with the command:
Make a note of the container's IP address.
In this case, the IP address is 172.19.0.2.
Start a container named ping_sender and attach it to the ping_test_network bridge with the command:
Once you are attached to the container and have a command prompt, ping the other container with the command:
In this case we will ping the IP address 172.19.0.2. The results of a successful ping will look something like this:
Exit ping with CTRL-c, then use CTRL-pCTRL-q to exit the container.
- Unlimited traffic
- Fast SSD NVMe storage
- Free Plesk Web Host Edition


