How to create and host your own Sons of the Forest server
To enjoy the full freedom of the co-op mode of Sons of the Forest (SotF), a dedicated server is just what you need. For optimal performance, you should consider renting hardware from a hosting provider. Once you’ve decided on a hardware setup, follow the steps below to install the server application for the horror-survival game. The instructions use the SteamCMD command-line client on a IONOS server.
What are the requirements for a Sons of the Forest server?
You can host shared adventures in the world of Sons of the Forest on your own computer. However, there are some crucial benefits users enjoy when hosting with a professional provider. If you rent external resources, the server will run even if you turn off your device. You also won’t need to worry if your PC has enough power to run the game. What’s more, professional, external data centers usually provide a first-class broadband connection that’s far superior to household connections.
How powerful the rented resources for a SotF server need to be mainly depends on the number of players. The minimum requirements are:
-
Computing power (CPU): 2 players: min. 2.4 GHz (2 cores); 3+ players: min. 3.0 GHz (4 cores)
-
RAM: 2 players: min. 3 gigabytes; 3+ players: min. 4 gigabytes
-
Storage: min. 10 gigabytes
In addition to requirements for Sons of the Forest server software, there are alsorequirements for the selected operating system. The application runs on Windows or Linux distributions such as Ubuntu and Debian. If you decide on Windows Server 2022, for example, you should plan to include the following additional hardware resources:
- 1.4 GHz processor (64-bit)
- 512 MB or 2 GB RAM (without/with graphical user interface)
- 32 or 36 GB storage (without/with graphical user interface)
Rent a cloud server from IONOS today to host your Sons of the Forest server on powerful, secure hardware. You can install a tool for shared communication on the chosen server at the same time by creating a Mumble server or a TeamSpeak server.
Host a Sons of the Forest server with IONOS
Finding a suitable solution for hosting a gaming server is not all that easy. Various providers offer different types of servers at varying price points. IONOS, for example, offers the following three server models, which differ in price and performance:
- vServer: IONOS vServers are characterized by their fully virtualized hardware, with multiple virtual servers running on the same physical hardware. Service plans are available at a fixed monthly price.
- Cloud server: A cloud server from IONOS gives you access to fully virtualized server resources from various host systems. You’ll be charged for what you use (down to the minute), which means performance can be flexibly scaled at any time.
- Dedicated server: When hosting a dedicated server with IONOS, you’ll get access to the latest in modern hardware. Billing is based on minutes used.
IONOS tip for beginners
If Sons of the Forest is your first foray into the world of gaming servers and you’re unsure how often you’ll need the server or for how many players, a IONOS Cloud Server is the perfect model for you. Simply select one of the cheaper plans with a smaller hardware setup and only pay when you actually use the rented resources. Whenever you need better performance, simply upgrade the CPU, RAM and disk space.
The cheapest plan with suitable computing power: Cloud Server L.
3 possible SotF server scenarios and IONOS server plan
In the following table, you’ll find three different scenarios for hosting your own Sons of the Forest server. To help you choose a suitable hardware solution for hosting, we’ve assigned suitable IONOS server plans (vServer, Cloud Server and Dedicated Server) to each scenario.
| Sons of the Forest server scenario | Recommended IONOS server plan |
|---|---|
| 2 people; server permanently online | VPS M |
| 3-4 people; server permanently online | VPS L |
| Up to 8 people; server permanently online | Dedicated Server AR6-32 SSD |
Looking for a server that’s permanently online but want to keep an eye on your monthly costs? The vServer from IONOS is the perfect choice.
Step-by-step tutorial for creating a Sons of the Forest server
With the right hardware on hand, you can start creating your own SotF server. The following tutorial shows the individual steps involved. The tutorial is based on IONOS servers (vServer, Cloud Server or Dedicated Server). We use Windows Server 2022 as the underlying operating system.
Step 1: Connect to the server
To install the dedicated server software of Sons of the Forest, you need to establish a remote connection to your rented server. IONOS customers can find the necessary tools for setting up the required remote desktop connection in the web-based Customer Center. Carry out the following steps:
- Log in to your IONOS customer account using your account credentials. Go to Servers & Cloud.
- Select the server hardware you have rented to host your Sons of the Forest server.
- Scroll down to Login data. Here you will find not only the IP address and login details for your server, but also a link for setting up a remote desktop connection. Click on Download.
- Run the downloaded .rdp file by double-clicking on it.
- Press Connect.
- Confirm the security certificate of the server to establish the remote connection to the server.
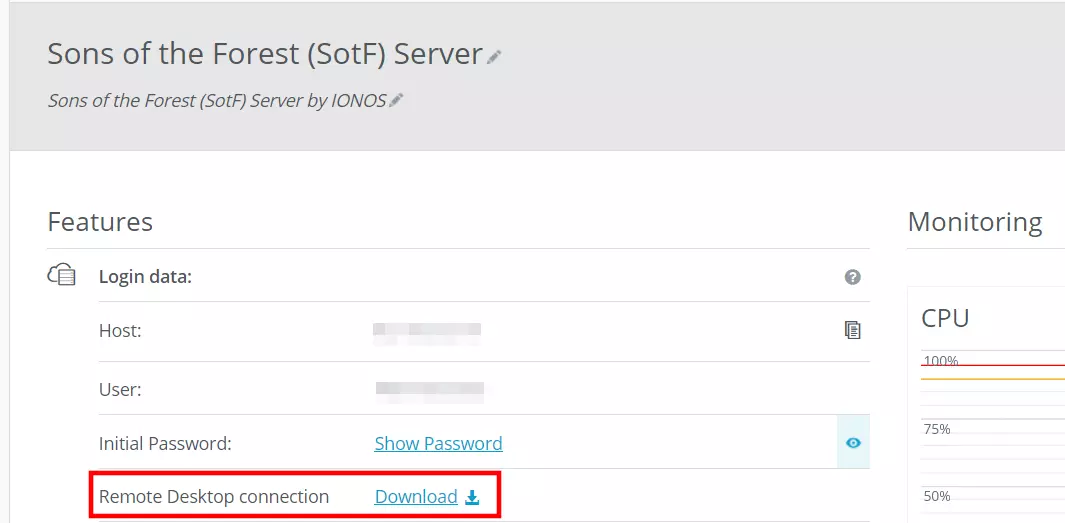
When establishing the connection for the first time, you need to enter the login data for the server (user and initial password) that is shown in the Customer Center.
Step 2: Install SteamCMD
The simplest way to set up the Sons of the Forest dedicated server application is to install it via SteamCMD. The tool is a command-line client that lets you connect to the Steam server and get data from it. Download the installation package of the client from SteamCMD installation page and unzip the files in any directory. Then run the SteamCMD.exe file to install the program.
Get detailed information about installing the command-line client on Windows or Linux in our article “SteamCMD: How to install the command-line client”.
Step 3: Download and install the SotF dedicated server via SteamCMD
Once you’ve set up the command-line client, you can install the server software. Start SteamCMD for this purpose and connect to the public Steam servers as an anonymous user:
Next, specify an individual installation directory for the Sons of the Forest server. For example, the following command will place the server files in the C:\sons-of-the-forest-server path:
Using the command app_update and the Steam app ID of the dedicated server software (2465200), install the SotF server:

Once the software is installed, log out of the Steam server using the quit command.
You can also install the dedicated server application for the predecessor game The Forest via SteamCMD. Find out how in our dedicated tutorial “How to set up a dedicated server for The Forest”.
Step 4: Configure your Sons of the Forest server
Next, you’ll configure your SotF server. The server’s configuration file can be generated automatically by launching the dedicated server for the first time. To do this, simply double-click the SonsOfTheForestDS.exe file in the server directory you created earlier. Once the server starts, you can close the command prompt window.
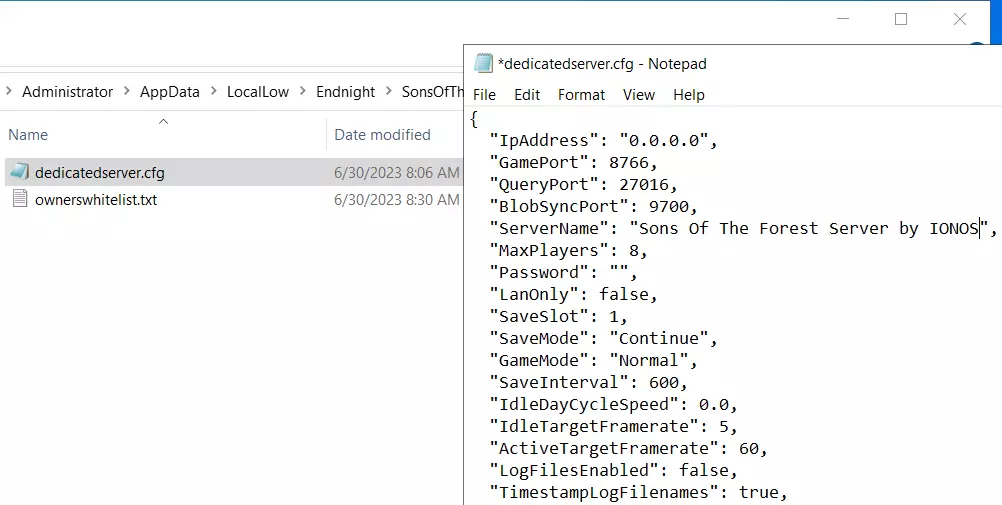
In the directory C:\Users\Administrator\AppData\LocalLow\Endnight\SonsOfTheForestDS, you will now find the two central files for the configuration of the Sons of the Forest server:
ownerswhitelist.txt
In the file ownerswhitelist.txt, you define all users who should be given the highest administrative rights. To enter a person, you need their Steam ID, which you can find in the account details of their Steam account. The following example shows what the file looks like with a single server owner entered:
# In order to be able to administrate your server from in game directly, you will need to set up server ownership.
# Add below the steam ids of every server owner, one steam id per line.
# To find your SteamID, open Steam and click on your name on the top right, then go to Account Details.
# You can use # to comment out a line. That can be helpful to keep track of SteamIDs, you can include their name in the line above or below, starting with a #.
# IONOS Sons of the Forest Server Owner
1234567891011dedicatedserver.cfg
In the dedicatedserver.cfg file, you can specify the general settings for your server, such as the maximum number of players, difficulty level or server name. For a comprehensive list of available parameters, you can refer to the SotF Server Settings entry in the Survival Servers Wiki.
Step 5: Open server ports
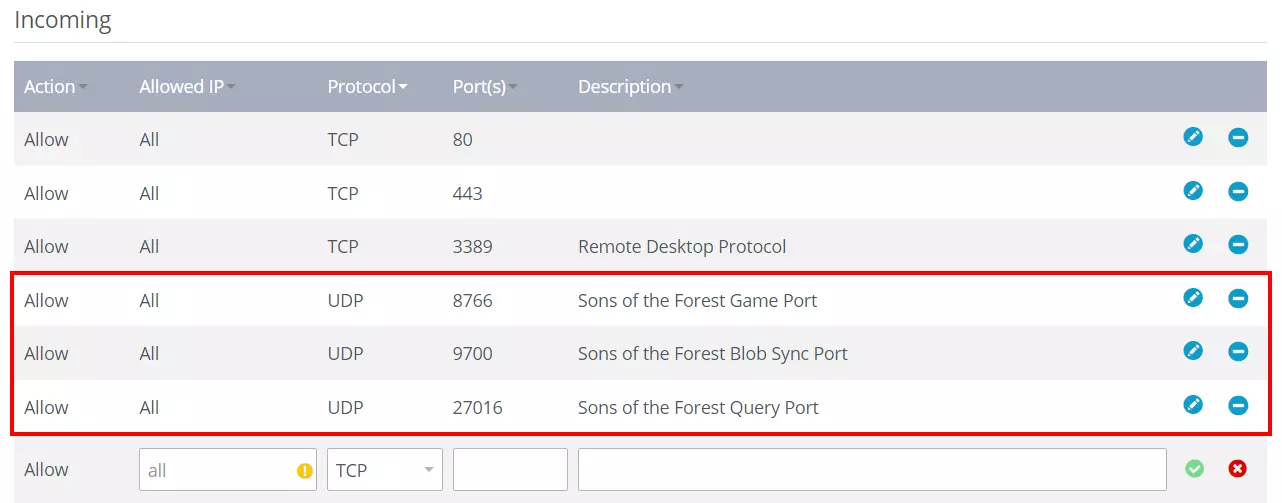
Following installation and configuration, you need to ensure that your Sons of the Forest server is available online. To do this, you need to open up the necessary ports so that the Steam servers can communicate with clients that are attempting to establish a connection. In the case of SotF, the following three UDP ports need to be open:
- 8766 (Game Port)
- 9700 (Blob Sync Port)
- 27016 (Query Port)
Once you’ve opened these ports in the firewall settings of your server, the hosted game will be available online for shared adventures. IONOS customers can configure ports in the Customer Center:
- Log in to your account via the IONOS customer login page.
- Navigate to the Servers & Cloud menu.
- Select the IONOS server that you’ve installed your SotF server on.
- Click Network and then click Firewall Policies in the left-hand menu.
- Under Inbound, you can create individual rules for the UDP ports 8766, 9700 and 27016. Ensure that UDP is selected as the protocol.
Step 6: Start SotF server
You can now launch your Sons of the Forest server any time. Head to the C:\sons-of-the-forest-server directory (this is the directory that was defined in step 3) and run the SonsOfTheForestDS.exe startup file. With the configuration files in place, the server will now start up fully during this second execution of the file. This process may take a few minutes to complete.
Step 7: Connect to your Sons of the Forest server
To join the server, start the game as you normally would and follow these steps:
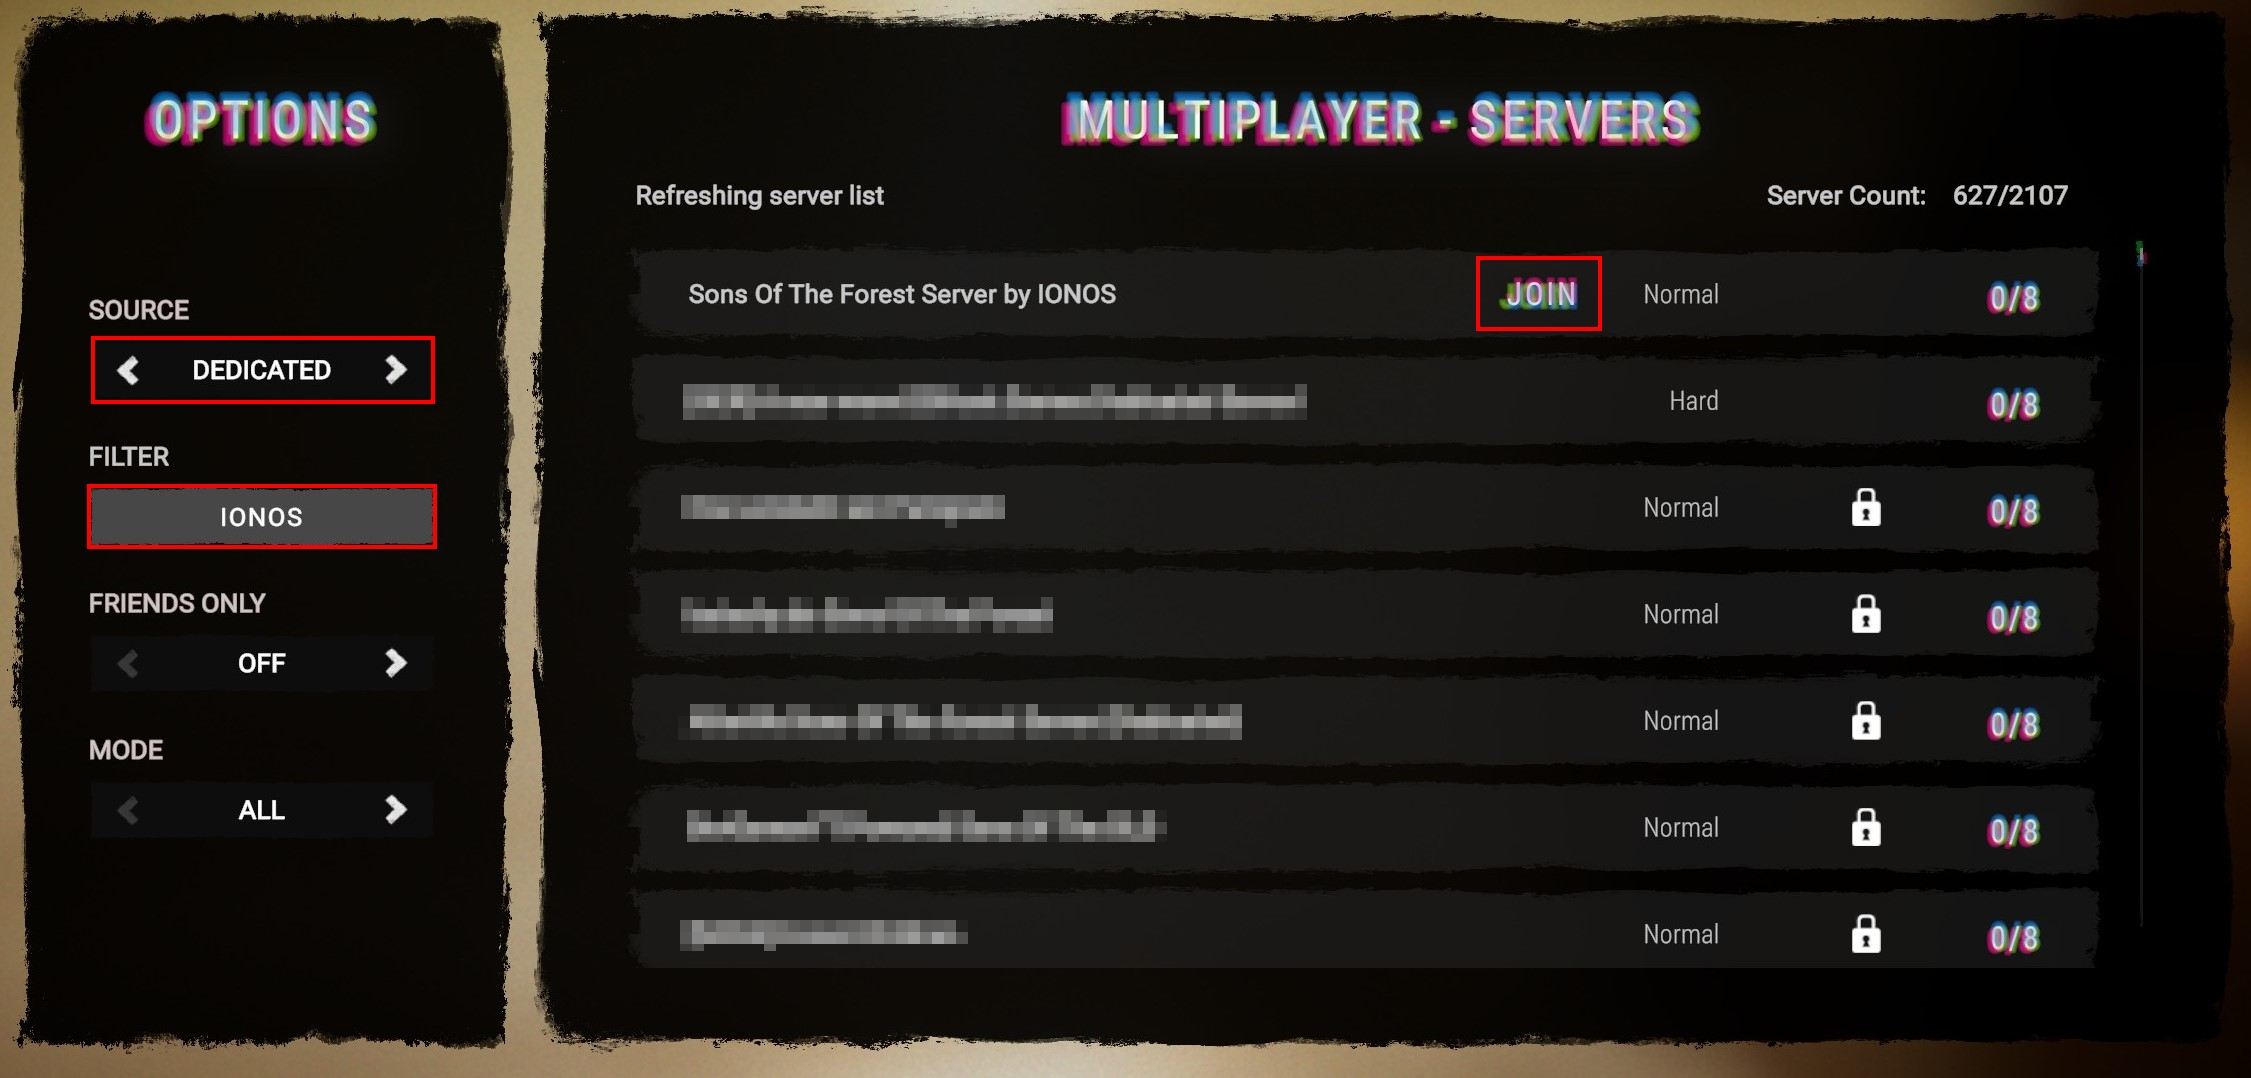
- Select Multiplayer and then Join from the main menu.
- Under Source, switch to Dedicated.
- Use the filter to find your server.
- Click the Join button when the search result for your server is shown.
