Set up a Mumble server – a how to for mumble server hosting
Anyone who spends a lot of time in multiplayer games knows the problem. In-game voice chat rarely has the quality you need for successful team communication. Also, for the coordination before, between, and after the games, you also need a solution to be able to talk. While Skype and TeamSpeak were the undisputed top dogs of voice chat software for many years, there are now more and more interesting products that challenge them.
Mumble is an open-source solution that allows anyone to create their own server - whether private or professional.
Thanks to free starting credit, you can test the IONOS cloud server for 1 month free of charge (or until the credit is used up) and experience the perfect combination of performance and security!
What is Mumble?
A community of developers has been working on the voice-chat software Mumble since 2005. With this, many people can talk to each other at the same time online. The software can be downloaded for free from the official Mumble website and is available for Windows, Ubuntu and macOS. In addition, you can also download mobile apps for Android and iOS, although the iPhone version has been discontinued for several years.
Mumble offers many features that go beyond the possibilities of a normal online phone call, such as:
- Encrypted communication: The transmission between server and client is encrypted via OCB-AES128 and thus cannot be overheard by third parties.
- In-game overlay: You can control the Mumble client, in a smaller window, even if another program is running in full screen mode.
- Allocation of rights: As an administrator of a Mumble server you can define which user gets which rights.
- Positional audio: To simulate a room sound in games, Mumble can detect the position of the players in some games and adjust the sound accordingly.
- Noise reduction: Mumble uses filters to remove noise in the background of the speaker and to transmit the voice more clearly.
What are the advantages of Mumble over TeamSpeak?
TeamSpeak has long been the go-to software when it comes to voice chat, especially in the gaming world. Even though the program is still a good contender, there are now competitors on the market that are appealing due to certain advantages - including Mumble. The biggest difference between Mumble and TeamSpeak is the license. While TeamSpeak is proprietary software, i.e. owned and developed by a company, Mumble is open-source.
So, many different programs are available for Mumble, which all have their advantages and disadvantages. You can use “skins” to adapt the appearance of the client, or Bots, which do tasks on the server – both of which can be found online. The highly-motivated developer community plays in Mumble’s favor.
A major advantage of Mumble over TeamSpeak is that the open-source solution is particularly resource efficient. This is particularly important in the gaming world because if you want to play a modern, high-resolution game, the voice chat software shouldn’t put additional strain on the computer. That is why Mumble is programmed to be particularly slim on the client side.
TeamSpeak is popular mainly because it is very easy to use. So, before you decide to use Mumble, it may be worthwhile to look at the competition. It is also possible to create your own TeamSpeak server.
System requirements for a Mumble Server
The client requires few system resources and runs on practically any computer. You only need a microphone to participate in the conversations. When creating a Mumble server, on the other hand (officially called Murmur), you have to keep a few points in mind so that everyone can communicate with each other without problems.
Murmur is quite open as far as the operating system is concerned. The only requirement is that the system can compile Qt. Qt is a framework for developing programs and is supported by Windows, macOS, and many Unix derivatives. So, in terms of the OS of the server, you have relatively free rein.
Processor (CPU)
Mumble doesn’t require much processing power on the server side. The CPU is almost only affected by the encryption. This means that even with lots of users on the server, CPU should never be a problem. The developers themselves run a test server with 3.4 GHz, which only has to use 1% of the CPU power with 4 users at the same time.
Storage: RAM & Hard drive
The RAM is also hardly used in a Mumble server. The RAM is mainly used for buffering the voice streams. For example, 512 MB is recommended for a server with 50 users at the same time.
Murmur is a very small program and therefore requires hardly any hard disk space. The installation file measures just over 10 MB.
Bandwidth requirements
Mumble requires sufficient network bandwidth to ensure that communication happens without disruptions. This depends on how many people are using the server at the same time. Want to determine the exact bandwidth required for your project? You can use this formula:
63 kbit/s X number of total users X number of speakers.
The 63 kbit/s is a recommendation. A maximum of 134 kbit/s can be planned per user, although this amount is not necessary. Also consider that no more than two people can speak at the same time anyway and the third factor of the calculation (number of speakers) should therefore be 2.
Choosing a IONOS server for Mumble servers
Renting the server from a professional hosting provider like IONOS is recommended. In principle, you can also create a Mumble server on a local computer at home, but this often fails on account of two reasons. First, as a home user, you usually don’t have a static IP address. Your Internet provider assigns you a new IP address at regular intervals, after which the users of your server would also have to reconnect. With a real data center, you wouldn’t have any problems with this. Secondly, bandwidth can be a problem. If you also want to play games over the same network connection, you may experience lag. With a professional server package, you can rely on the guaranteed bandwidth.
With IONOS, you have three different types of servers at your disposal:
What are the differences between the IONOS servers?
The three server models differ primarily in price and billing. The cloud server is billed per minute and only for the services you have booked. You can increase or decrease the capacities at any time via the Control Center, which has a direct impact on your costs. The vServer (a virtual server environment), on the other hand, can only be booked on a monthly basis - and the costs are independent of your actual usage.
With these models, you have no fixed hardware assigned to you. This is different with the dedicated server. With this model, you are assigned physical processors, hard disks and RAM that only you can access. However, this solution is also correspondingly expensive.
Even though you cannot book dedicated hardware with Cloud Server or vServer, it does not mean that other customers can access your data. Files and data transfer are still secure.
Mumble server rental with IONOS
Which server is suitable for you? In principle, you only need a small server package for Mumble, but you probably use the server not only for the voice chat software but run a multiplayer game at the same time. As an example, we present various scenarios that also include a Valheim server and a Minecraft server.
| Situation | Requirements | vServer | Dedicated Server | |
| Mumble for 10 users | RAM: 512 MBBandwidth: 1.26 Mbps | IONOS Virtual Server Cloud S | - | |
| Mumble for 50 users | RAM: 512 MBBandwidth: 6.3 Mbit/s | IONOS Virtual Server Cloud M | - | |
| Mumble + Minecraft for 10 users | CPU: 3.6 GHzRAM: 8 GBHard disk: 55 GBBandwidth: 48 Mbit/s | IONOS Virtual Server Cloud XL | IONOS Dedicated Server L-16 SSD | |
| Mumble + Valheim for 10 users | CPU: 3.4 GhzRAM: 16 GBHard disk: 60 GBBandwidth: 5 Mbit/s | IONOS Virtual Server Cloud RAM XL | IONOS Dedicated Server L-16 SSD |
Thanks to free starting credit, you can test the IONOS cloud server for 1 month free of charge (or until the credit is used up) and experience the perfect combination of performance and security!
Murmur runs on both Windows and Linux operating systems.
Mumble server setup: A step-by-step guide
The Mumble server Murmur is easy to install - it can be tricky for beginners, though. Our step-by-step guide takes you through the installation and shows the configuration options. We’ll install the software on a cloud server from IONOS with Windows as the operating system.
Step 1: Set up connection
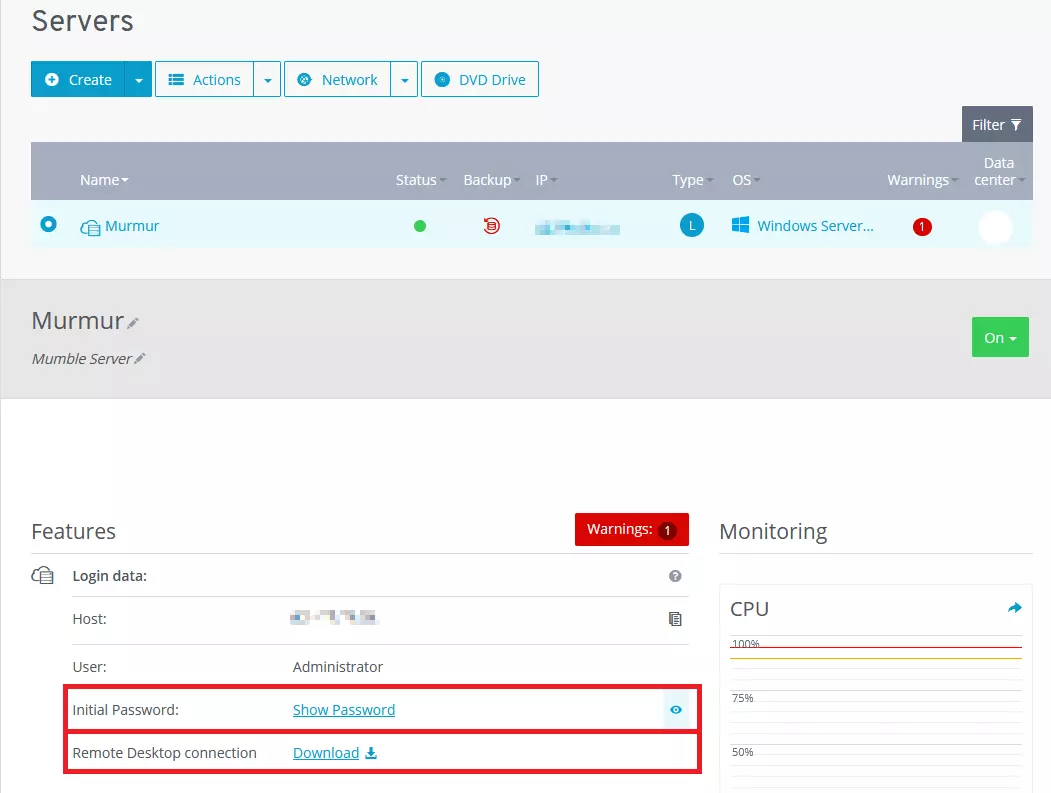
To begin the installation on the server, you must first establish a Remote-Desktop-Connection. This will then allow you to access the server from your home computer. To do this with IONOS, simply go to the Cloud Panel, select your server, and download the file needed for the connection. If you are working on a Windows computer, the software to run the file will already be installed.
The remote connection software will now ask you for a password. You can also find this in the Cloud Panel. After entering it, connect and see the operating system of your server in a new window. In principle, you’ll work here in exactly the same way as on your home computer.
Step 2: Install software
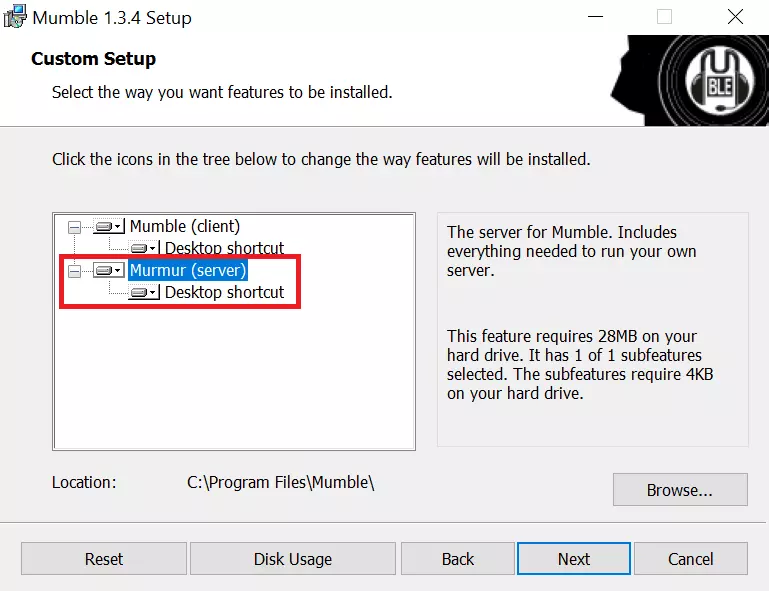
On the official download website of Mumble, select the version that matches your server’s operating system. To install the Mumble server, you still need to download the client version. You then specify that you also want to install the files for Mumble during the installation process. The installation usually takes only a few seconds.
Step 3: Allow ports
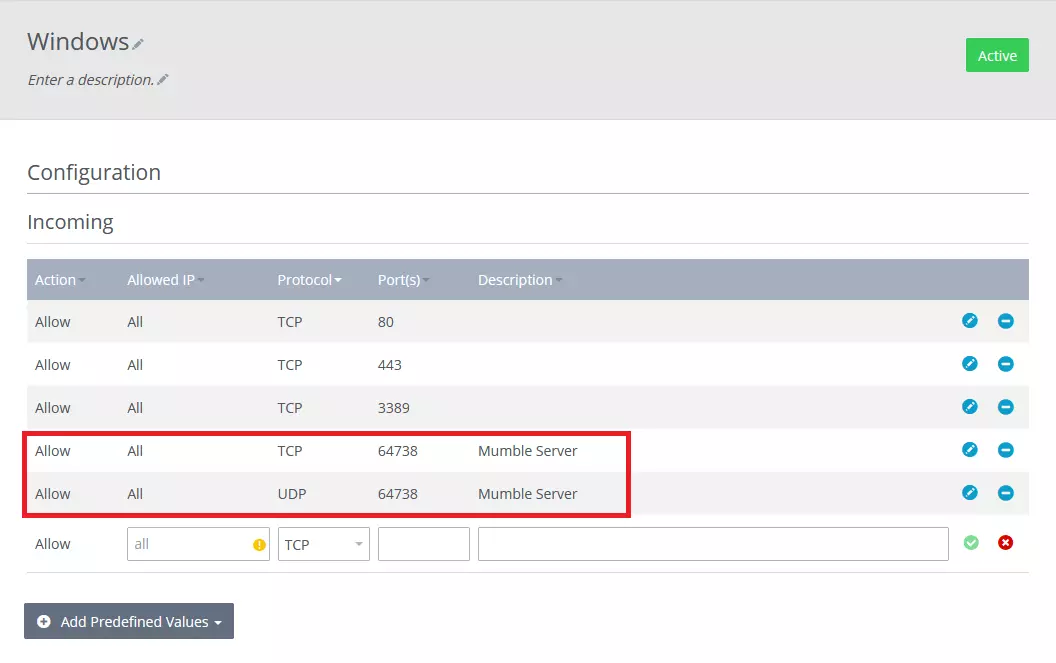
Your server is protected against external access by default. A firewall blocks all connection attempts. However, this also means that others cannot connect to your Mumble server. To make this possible, you must allow some ports. Therefore, in the Cloud Panel of IONOS, switch to the firewall options in the Network section and make two entries there - one for TCP and one for UDP. In both cases, allow port 64738.
Step 4: Configuring the Mumble server
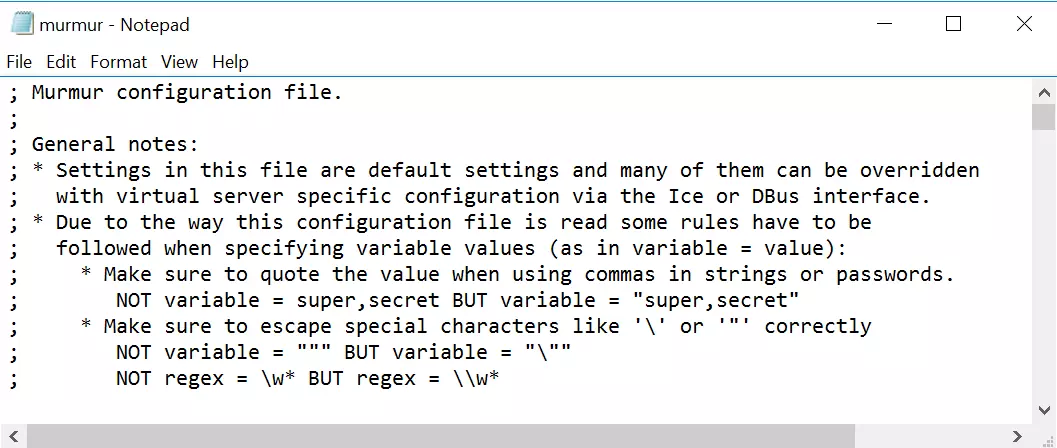
Unlike the client software, Murmur itself has no graphical interface to make settings. Instead, you work directly in the file murmur.ini. Find this in the folder where Mumble is also installed. Alternatively, you can use the search function of the operating system. Open the configuration file with an ordinary text editor, which every operating system will already have installed.
You can make the following changes:
- welcometext: If you want to welcome the participants of your server with an individualized message, you can customize it here. HTML tags are available for formatting.
- port: 64738 is already entered as the default port. You have allowed this port in the previous step.
- serverpassword: If you start your server without setting a password, every Mumble user can access it and listen to or participate in your conversations via the software. It is therefore recommended that you set a secure password.
- bandwidth: You can limit the maximum bandwidth per user. This is useful if you plan to have a particularly large number of users on the server and the default settings might exceed the hoster’s performance.
- users: If you don’t want your server to be visited by too many users at the same time, you can limit the maximum number.
- registerName: Give the main channel of your Mumble server a unique name so that users can better associate the channel.
To find the options, scroll down in the file or use the search function of the text editor. The entry is made directly after the equal sign - without a space in between. In most cases the configuration file is already filled in and you only have to change the entries.
Step 5: Launch Mumble server and establish connection
When you have configured everything, you can put the Mumble server into operation. For this you start the file murmur.exe. It is located in the same folder as the configuration file. The server runs in the background, no new window opens. In Windows you will only see a small icon in the system tray, which refers to the running server. Via the icon you can also open the log file of the session.
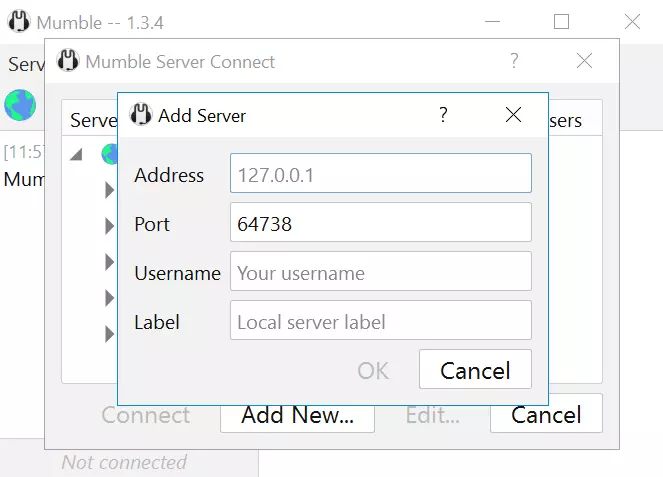
Other Mumble users - or you yourself - can now access the server via the client. To do this, click on the globe button in the program or select the “Connect” function under “Server”. After clicking on “Add New...” you get to an input mask. There users have to enter the IP address of their Mumble server. With IONOS, you can find the address via the Cloud Panel. The default port is already entered by Mumble. Users only have to select a different port if you have adapted the configuration file to this effect.
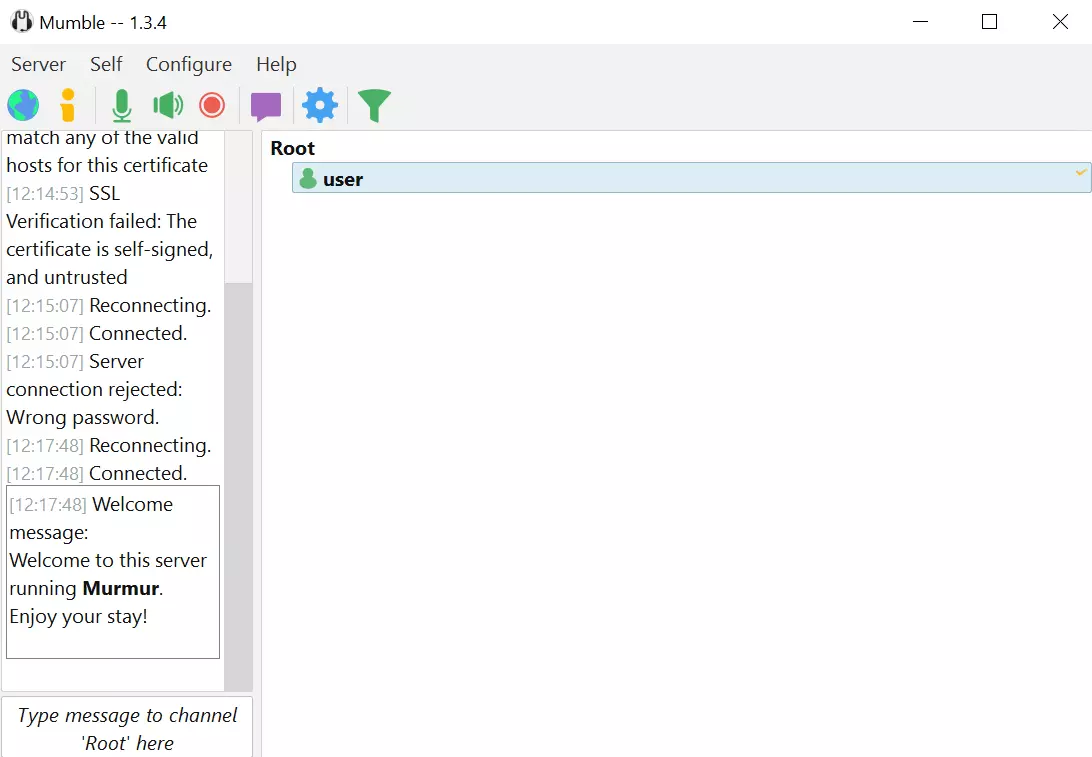
Then each user can enter a username. In addition, all users have the option to give the server an individual name to be able to find it better in the favorites list. Afterwards, users enter the server password they have set and can finally talk to others on the server!
Step 6: Become administrator
Especially if you plan to invite many users to your server, you should make yourself an administrator beforehand. To do this, first register your own username by logging in via the client as described. Then you will find the option “Register” under the menu item “Self”. Now you only have to confirm that you really want to register on the server with your chosen name.
You have now registered your own username on the server, but you still have to give it admin rights. Murmur has implemented the SuperUser for this purpose. This user has all rights - but cannot speak on a server. So, the role is only meant for an administrator. First you log out with your registered username. Then you set the password for the SuperUser. This is done from the command line of the server. On Windows, navigate to the Mumble directory and then enter the following line:
murmur.exe -supw YourPasswordUnder Linux, the process works quite similarly:
./murmur.x86 [-ini <path>] -supw YourPassword</path>You can choose the password. However, make sure it is secure and you can remember it. You don’t need to restart Mumble for this process.
Now log back into the Mumble client. Select your server, right click on the entry and then change the username to “SuperUser”. Additionally, enter the password you set earlier. If you have entered everything correctly, you’ll now be logged in as SuperUser on the Mumble server and have extensive rights.
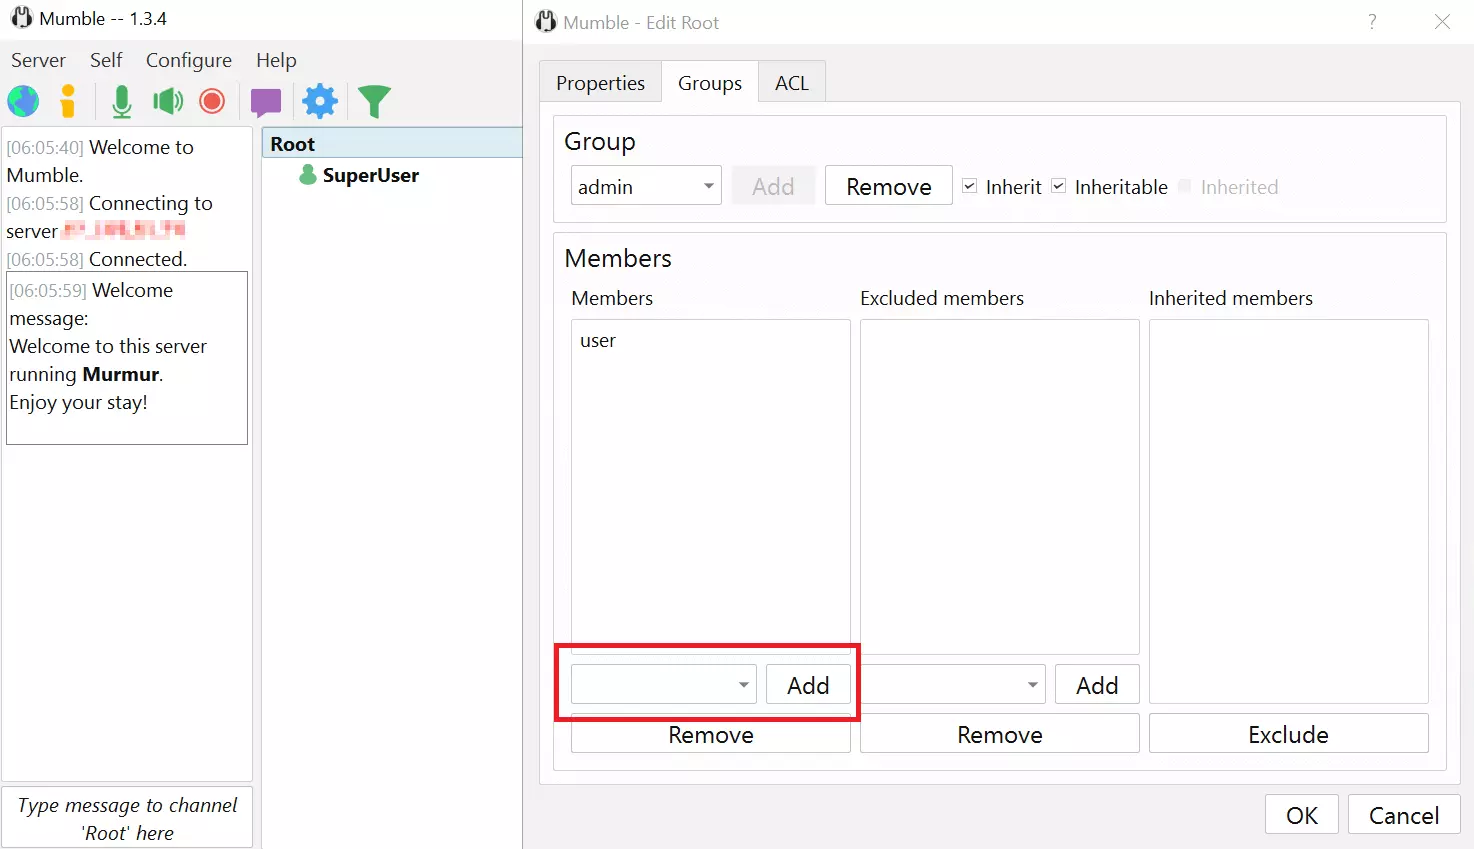
When you open the “Server” tab, you will now see the “Registered Users...” option. Below that, you will find a list of all the users who have registered on the server. So if you have just created the Mumble server, you should only see your own username. To give this administrator rights, right-click on your main channel in the main window. If you haven’t changed the name in the configuration file, the channel should be named “Root”. Then select “Edit...” from the context menu. The group “admin” is already created by default. You only have to add your own username via the mask at the bottom of the window.
After that, you log out of the server again and use your actual username when logging in again. This user now has admin rights and can therefore control other users on the server. You don’t need the SuperUser account for the time being.
Only a few steps are necessary to create your own Mumble server and share the voice chat software with your friends. As an administrator, you can determine which user gets which rights and you can also ban trolls from the server. You’ll have complete control over your own Mumble server!


