How to disable OneDrive
OneDrive is Microsoft’s cloud service and comes preinstalled on Windows. It’s very simple to disable or uninstall One Drive if you don’t need to use it.
How to turn off OneDrive in Windows 10: The OneDrive icon is a cloud and can be found in your taskbar. Double-click on it to begin the process.
- If you do not see the icon, it may be hidden. In this case, click on the arrow icon in the taskbar and then click the OneDrive icon.
- Click the gearwheel and select the Settings tab in the drop-down menu.
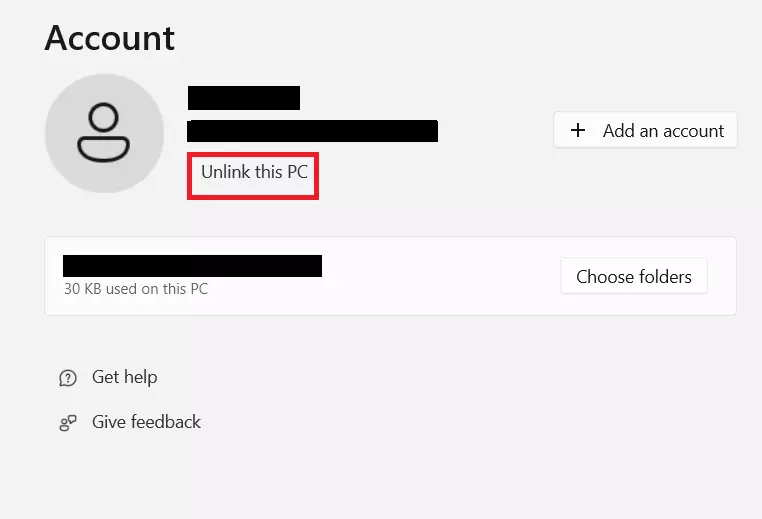
- Select the Account tab and click Unlink this PC.
There are a few different reasons why you might want to disable OneDrive. Turning off OneDrive’s automatic synchronization and auto-start means that you can decide which files are synchronized and when. If you would like to use a different cloud storage service to synchronize your data, it makes sense to disable Microsoft’s OneDrive.
If you are interested in using a different cloud service and are comparing the best cloud storage providers, HiDrive cloud storage from IONOS is worth considering.
How to disable OneDrive in Windows 10/11
There are several ways to disable OneDrive in Windows. For example, you can prevent your files from synchronizing with OneDrive by removing it from the startup programs. Unlinking OneDrive from your PC is the most common way to disable OneDrive. This can be done in just a few steps.
Step 1: Open OneDrive
Open OneDrive by clicking on OneDrive’s cloud icon in the taskbar. Alternatively, type “OneDrive” into the search bar to find the program.
Step 2: Go to Account Settings
After opening OneDrive, go to the Account Settings by clicking on the Settings tab. Then select the tab labelled Account in the sidebar.
Step 3: Disable OneDrive
Click on Unlink this PC to disable OneDrive.

Uninstall OneDrive on Windows 10/11
You can also uninstall OneDrive if you do not have plans to use the cloud service in the future. Don’t worry, any data previously stored in OneDrive will not be lost after uninstalling the program and you’ll still be able to access it online at any time. Uninstalling the program is simple and can be done in just a few steps.
Step 1: Access programs
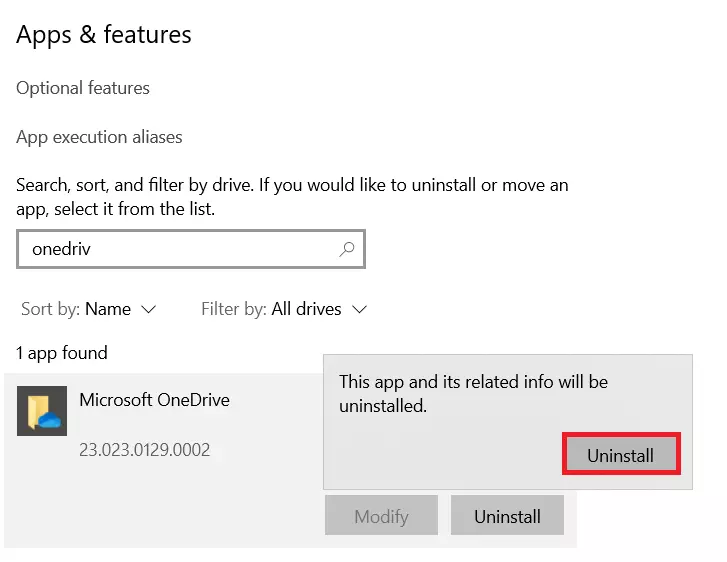
Type “programs” into the search bar and select Add or remove programs. This will take you directly to the Settings and the Apps and Features section. Alternatively, you can also find your way there manually.
Step 2: Search OneDrive
Search for OneDrive using the search bar in your Settings.
Step 3: Uninstall OneDrive
You can remove OneDrive from your computer by clicking on the program name and the Uninstall button. Confirm the changes in the final step.

Uninstall OneDrive on Android
OneDrive can also be used on smartphones. You can easily uninstall OneDrive on Android in your smartphone’s settings.
Go to the Storage section in Settings. Find OneDrive and press the Uninstall button to remove the app from your Android smartphone.

