How to set up a TeamSpeak domain
Connecting your TS3 server with your own domain makes connection so much simpler. The link is controlled by two DNS entries.
What do I need for a TeamSpeak domain?
There are only two requirements:
- Access to a TeamSpeak server
- Your own domain
A TeamSpeak server requires a rented server with the TeamSpeak software installed on it. This is quite simple and can be done in a few steps. However, if others want to connect to the server, they must enter a lengthy IP address.
Therefore, it makes more sense to have your own domain. You can rent a domain from a domain provider for at least one year. If you want to continue using the domain for your TeamSpeak server after one year, you must renew the contract or set up an auto-renewal.
You can be creative when it comes to choosing your domain name. It is usually best to choose something that relates to what you are using your TeamSpeak server for, such as something to do with gaming. Just make sure that the address is easy to remember. You should also think about the domain extension. It does not necessarily have to be a well-known domain extension. Alternatives to the .com domain or the .us extension may be more suitable.
IONOS makes buying your own domain easy. You can check if the domain you’re considering is still available, if so, you can buy it directly. If not, we can suggest suitable alternatives.
How to link a TS3 server with your own domain
If you have rented a domain from IONOS, connecting the domain and server is quite simple.
If you have registered your domain with another provider, you can connect the address to your TeamSpeak server. You should find settings on the provider website.
Step 1: Open the domain settings
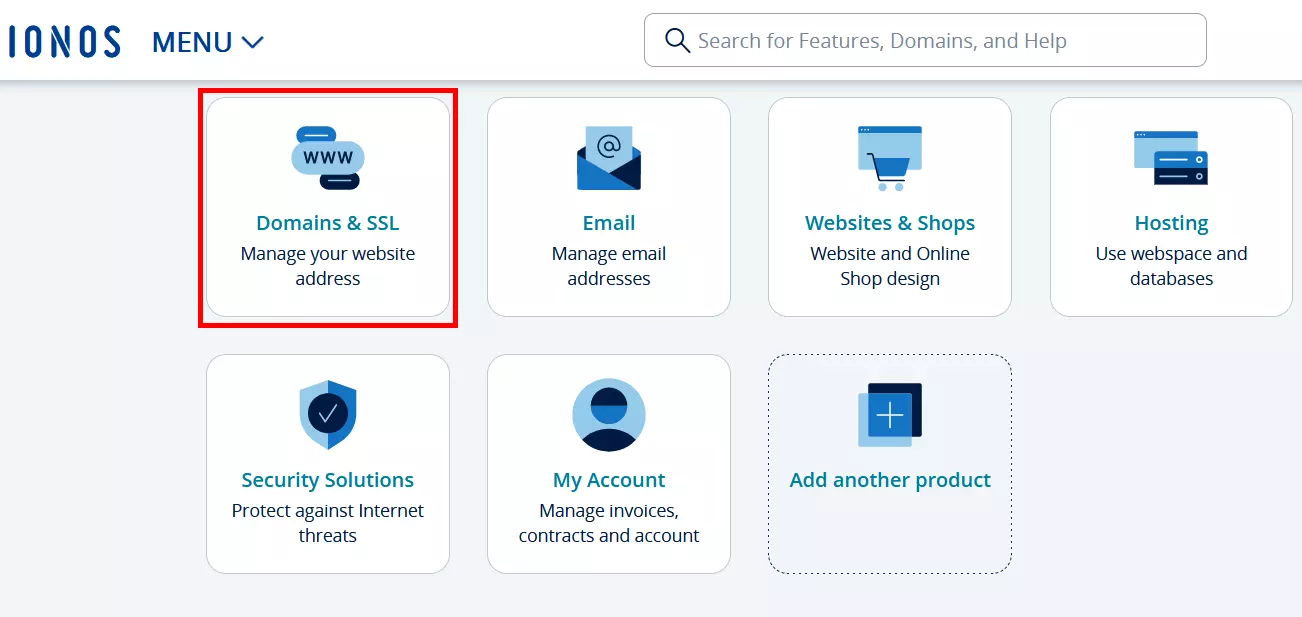
Log into the IONOS Control Center to access your account. Select “Domains & SSL” from the menu. Click on the domain that you want to connect your TeamSpeak server to.
You can use the main domain directly or create a separate subdomain for your TeamSpeak server. This could be called teamspeak.example.com, for example. This is useful if you want to use your domain for other purposes. You can create a subdomain using the corresponding tab in domain settings if you wish.
Have you rented a TeamSpeak server from IONOS, but your domain is registered with another provider? No problem! You can arrange a domain transfer to IONOS if you want to manage both in one place.

Step 2: Find out the IP address
The TeamSpeak server’s IP address is needed to link the domain. You can usually find the IP address in the server settings if you don’t know it. Go to the “Server & Cloud” section in the IONOS Control Center. Click on the corresponding contract to access the Cloud Panel. You will see your server’s IP address on the start page.
Step 3: Check the port
A port was enabled to allow connections when the TeamSpeak server was created. This number will be needed when configuring the domain. This should be the UDP port 9987. You can check in the server settings to be sure. IONOS customers can find this information in the Cloud Panel by clicking on “Network” and then “Firewall Policies”.
Step 4: Adjust the DNS records
Go back to the domain or subdomain settings once you know the server’s IP address. Open the DNS settings. You need two DNS records to establish the link. These text entries contain important information for name resolution and they are needed for establishing the link.
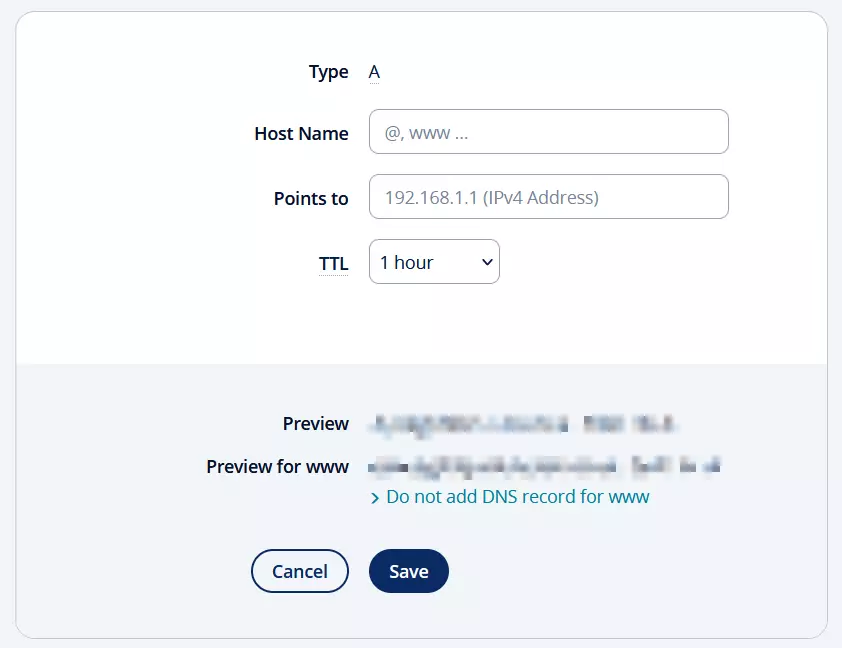
You need an A record and a SRV record to link the domain to a TS3 server. IONOS allows you to create these in DNS settings by clicking on “Add Record”. You will see a list of the different types of records with a description of the function next to them. Click on A.
An input mask for the A Record opens.
- Hostname: You can leave this item blank, or you can enter a suitable name. This field will be automatically filled if you have created a subdomain already.
- Points to: Enter the server’s IPv4 address here.
- TTL: This specifies how long the information is valid for before the system retrieves it again. You can keep the default value if you wish.

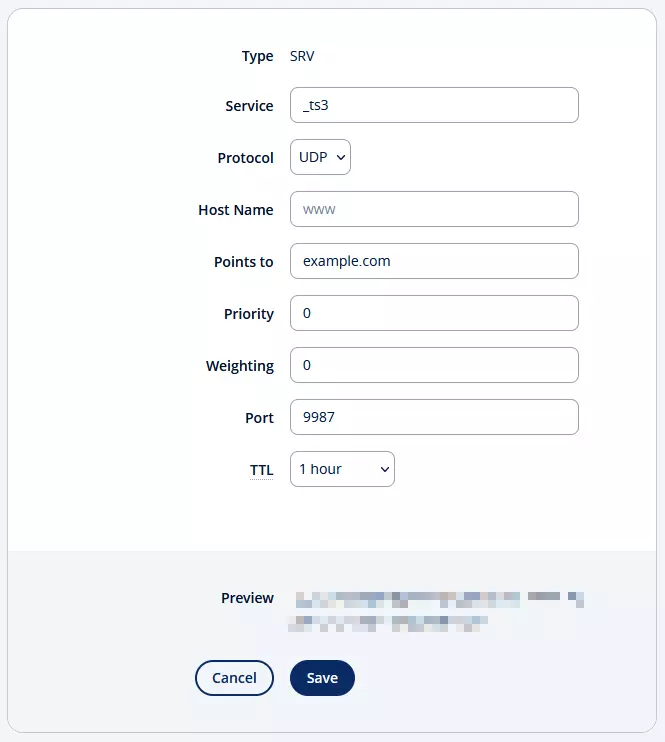
You can create the second entry afterwards. You should fill in the SRV record mask like this:
- Service: _ts3, this makes clear that the link is to a TS3 server.
- Protocol: UDP; TeamSpeak uses a UDP port for the connection.
- Host Name: Enter the name you chose in A record here; otherwise, leave the field blank if you did not specify a name.
- Points to: Enter your domain or subdomain in this field.
- Priority: 0; give the entry the highest priority.
- Weighting: The value can remain 0.
- Port: 9987; TeamSpeak usually uses this port in the server settings.

Step 5: Connect to the server
When the DNS records have been created, the domain links with the TeamSpeak server. You and others can now connect to the service using the domain instead of an IP address. Simply click on the “Connections” in the Client software menu and click on “Connect”. Enter the domain you have chosen and connect easily without an IP address.

