
How do you create and host a Satisfactory dedicated server?

If you’re looking for maximum flexibility and want to make your game world publicly accessible, running a dedicated Satisfactory server is the best option. This type of server is ideally hosted on externally rented hardware, which ensures reliable performance and availability. Installation and basic configuration are usually handled via the Steam or Epic Games client.
Should you host a Satisfactory server or play a private online game?
If you want to play Satisfactory online with friends, you generally have two options. You can either start a private session that runs on your own PC or host a game session on a dedicated Satisfactory server.
The main advantage of hosting the game on your own device is that no additional hardware is required. However, as soon as more players join a private game, additional system resources are needed, which puts a significantly higher load on your PC compared to single-player mode. The same is true for your internet connection.
The biggest disadvantage of a privately hosted game is that the game world is only accessible to other players when you are online and have the session running.
The more people you want to grant access to a Satisfactory game world that is available to join at any time, the more relevant an externally hosted Satisfactory server becomes. In this case, you not only have powerful server and broadband resources behind you, but also the option to make the Satisfactory server publicly accessible (via IP address).
Renting external server resources isn’t just appealing for flexibility and performance reasons. The hardware also enables you, for example, to set up your own Mumble server, so you don’t have to rely on in-game voice chats and can take team communication to the next level.
What are the requirements for creating a Satisfactory server?
The hardware requirements for a Satisfactory server primarily depend on the number of players who connect to the server at the same time. However, it should be noted that Satisfactory is designed and optimized for a maximum of four players in multiplayer mode. While it is possible to configure game worlds for more than four players, the Swedish development team Coffee Stain Studios does not guarantee performance in these cases.
Based on information from the official Satisfactory wiki and the requirements of the dedicated server tool available in the Epic Games Store, the following basic system requirements apply:
- CPU (processor): AMD or Intel (4 cores) at 3.4 gigahertz or higher; strong single-core performance preferred
- RAM (memory): 8 gigabytes of RAM for 1–4 players, 16 gigabytes or more for larger save files or more than 4 players
- Hard drive storage: 10–15 gigabytes for the Satisfactory server software; additional storage space for save game(s) or optional mods
In addition to the computing power for the Satisfactory dedicated server, you also need to factor the operating system’s workload into your planning. In principle, you can choose between common Linux distributions such as Ubuntu—but the developer-recommended option is a Windows Server operating system. For Windows Server 2025, for example, the following additional requirements would therefore need to be covered:
- 1.4 GHz processor (64-bit)
- at least 2 GB of RAM (with a graphical interface: 4 GB recommended)
- at least 32 GB of hard drive storage
- Free Wildcard SSL for safer data transfers
- Free Domain Connect for easy DNS setup
Which IONOS solutions are suitable for running a Satisfactory server?
You can rent hardware for your own gaming server from a wide range of providers. However, the wide range of packages and plans can quickly become overwhelming. After all, you want to avoid choosing too little or too much performance—and, above all, prevent unnecessary costs.
At IONOS, you can choose from the following three server types, each of which is also available in various plans:
- vServer: With a vServer (also known as a Virtual Private Server, VPS), you get access to virtualized resources that you share with other customers—without any loss of performance. The booked hardware is billed at a fixed monthly price.
- Cloud Server: IONOS Cloud Server plans also use virtualized resources. However, since this model is billed by the minute, you only pay for the performance you actually need.
- Dedicated Server: With an IONOS Dedicated Server, you get hardware that is reserved exclusively for you. This server type is also characterized by high single-core power, which is reflected in the price.
- Dedicated enterprise hardware
- Configurable hardware equipment
- ISO-certified data centers
Satisfactory server scenarios and suitable IONOS plans
In the table below, we’ve put together a few possible scenarios for your Satisfactory server and matched them with the appropriate IONOS server models and plans.
| Satisfactory server scenario | Recommended IONOS server |
|---|---|
| 2 players, always online | Windows VPS XL |
| 3–8 players, always online | Windows VPS XXL |
| > 8 players, always online | Dedicated Server AR6-32 SSD |
You want your own Cloud Server? IONOS offers Cloud Servers with the highest performance and highest level of security. Take advantage of the IONOS free Cloud Server trial now and test your Cloud Server for free for 30 days.
How to create a Satisfactory server step by step
Once you’ve chosen a hosting environment and have your login details ready, you can start setting up your Satisfactory server. The tutorial below walks you through the key steps, using IONOS servers (vServer, Cloud Server, and Dedicated Server) as examples. The server software itself is installed via Steam.
Step 1: Establish a remote connection to the server
You can access the hardware of your rented server via remote access. The first step is therefore to set up a suitable Remote Desktop connection. With IONOS, however, this connection can also be established conveniently through your browser using the customer account. To do so, simply log in via the following login page and have your individual customer details ready.
First, click “Server & Cloud” and select the server environment you rented for Satisfactory server hosting. Then click on the server itself. Under “Actions”, you will find the option “Open remote console.”
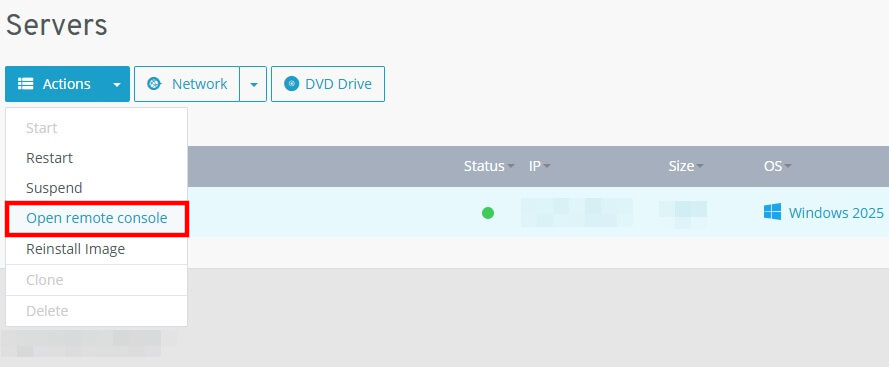
The automatically generated initial login details for your server can be found in the Cloud Panel on the server overview page, under “User” and “Initial password.” For security reasons, make sure to change the password before using it for future logins.
Step 2: Install the Satisfactory server application via the Steam client
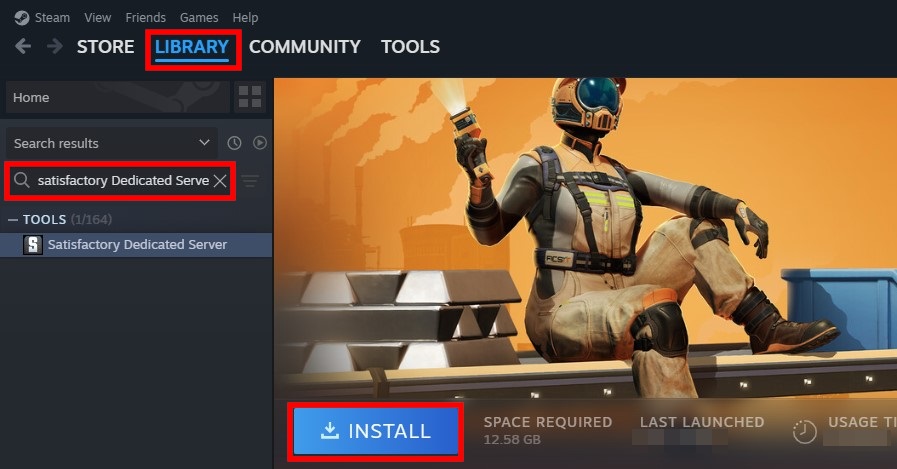
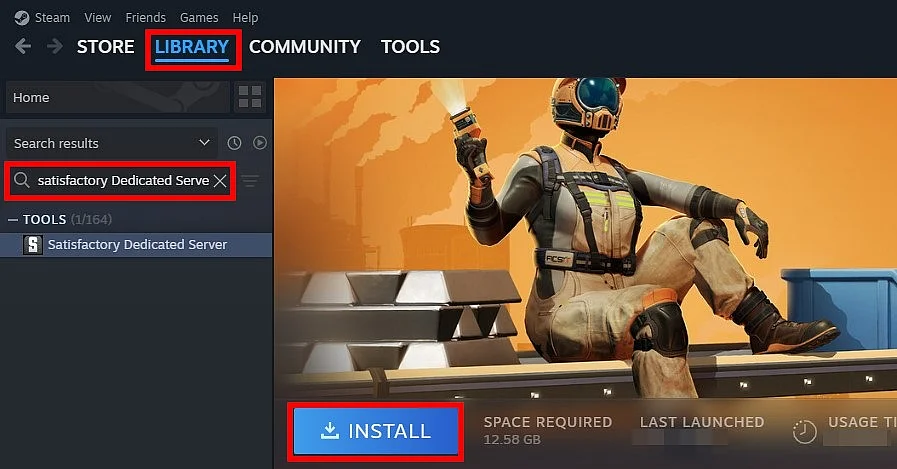
Once the connection has been successfully established, you can proceed to install the Satisfactory dedicated server software. If you purchased the game via Steam, the server application can be obtained directly through the platform. To do this, install the Steam client on the server and then follow these steps:
- Sign in with the Steam account you used to purchase Satisfactory.
- Open the “Library.”
- Use the drop-down function (down arrow) in the left-side menu.
- Check the box for “Tools.”
- Type “Satisfactory Dedicated Server” into the search bar.
- Select the appropriate search result.
- Click “Install” to create the Satisfactory server.
Step 3: Start the Satisfactory server
After installation, you can start the Satisfactory server from the same location in the Steam client. Simply click the “Start” button that is now displayed. Steam will then automatically check for available updates to the server software and verify that all required tools and runtime environments are installed. If any components are missing—such as the Microsoft Visual C++ runtime—the client will automatically prompt you to install the required components.
Step 4: Open server ports
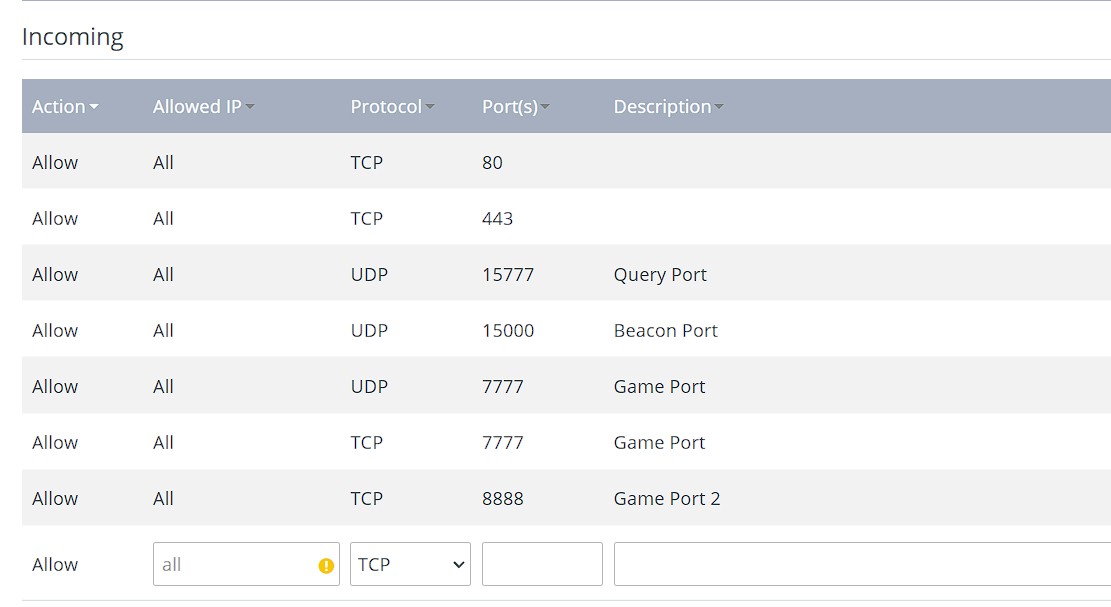
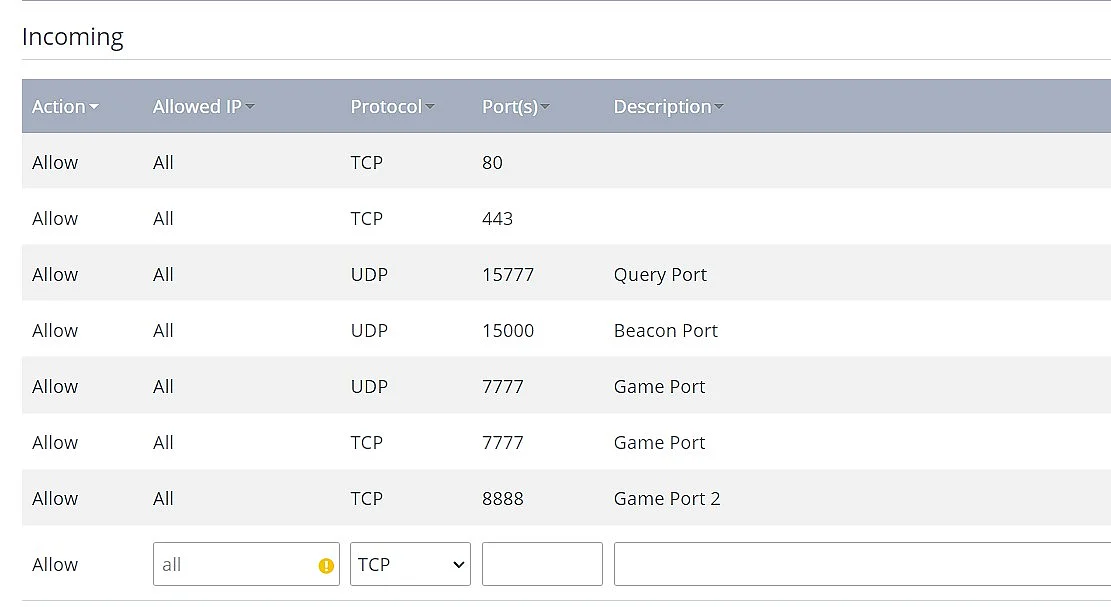
In the next step, you need to make sure that the ports relevant to Satisfactory are open on your server. In particular, this includes the following ports:
- UDP port 15777: This “query port” is used to handle queries to the Satisfactory server (player count, server name, etc.). This is the default port number, which can be changed if needed. (No longer required since Patch 1.0.)
- UDP port 15000: The “beacon port” 15000 is required if you want to run multiple server instances at the same time. (No longer required since Patch 1.0.)
- TCP and UDP port 7777: Players connect to the game world of your Satisfactory server via the “game port.” This is also the default port number, which can be changed if needed.
- TCP port 8888: Another “game port” that must be opened to ensure a smooth connection setup.
Opening a port requires you to set up a corresponding firewall rule. With IONOS servers, this can be done directly in the Cloud Panel:
- Log in to the Cloud Panel.
- Open the “Server & Cloud” section and then select your rented server hardware.
- In the left-side menu, click “Network”.
- Select the “Firewall Policies” menu item.
- Under “Inbound”, create the rules for the query and game port (optionally also for the beacon port).
Step 5: Enable the server
In the next step, you’ll enable the newly created Satisfactory server via the Server Manager in the game client.
If you sign in to the Satisfactory server using the same account that is currently running the server software, you will receive a corresponding notification. If you then click “Continue Start”, only the Steam session on the server will be closed, while the Satisfactory server itself will continue running in the background.
Launch Satisfactory and select “Server Manager” from the menu. Then click “Add Server” and enter the IP address of your server. For the port, enter the game port “7777”. Apply the details by clicking “Confirm”.
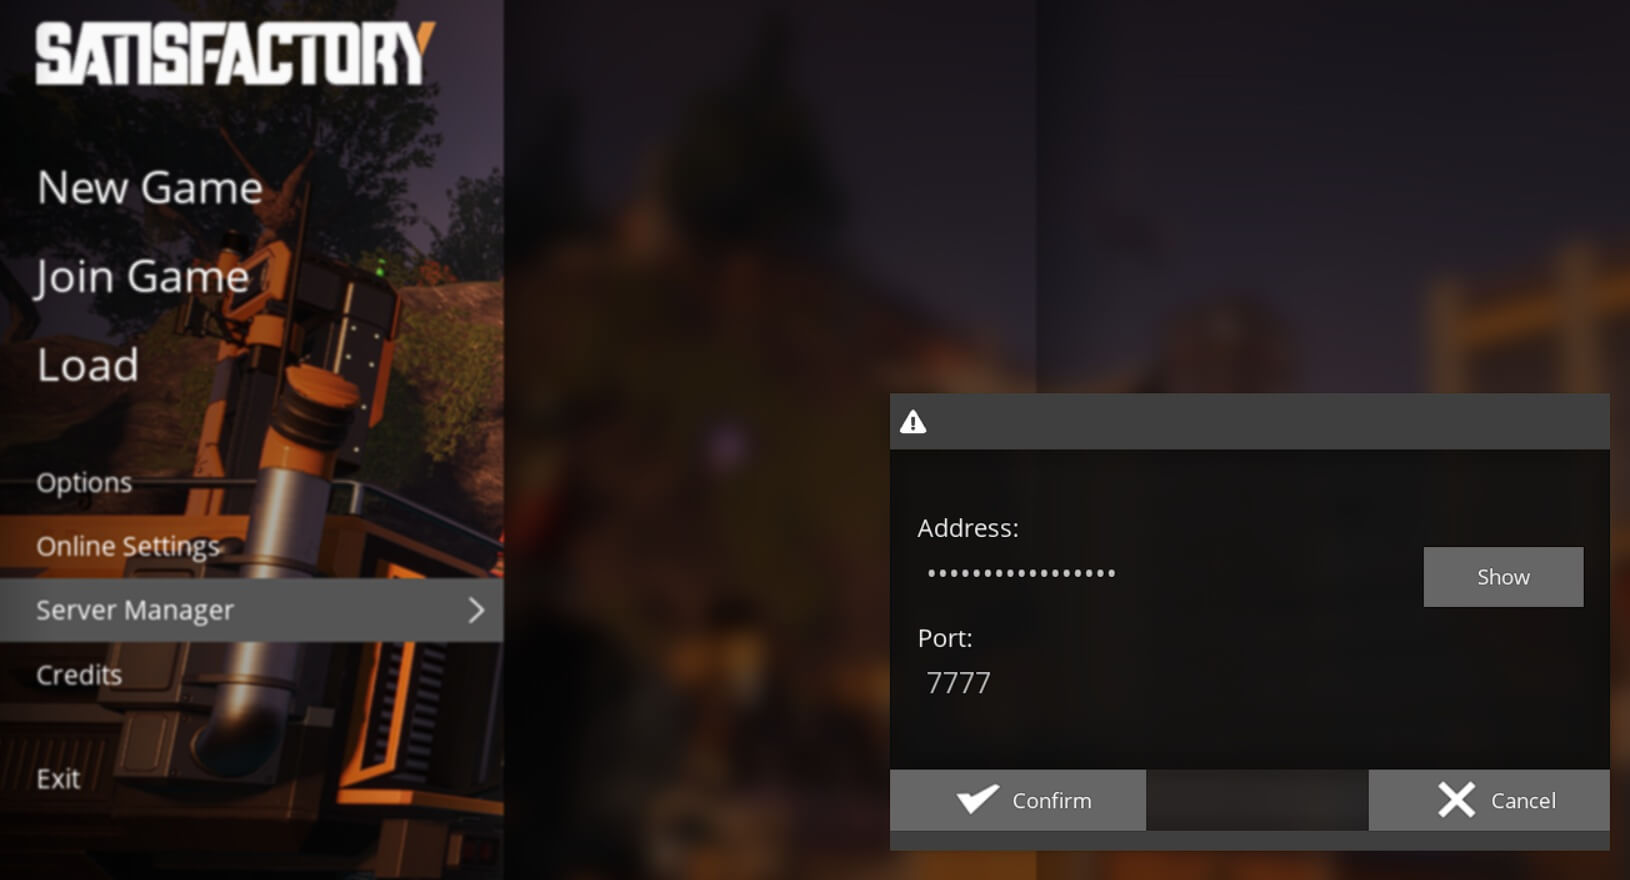
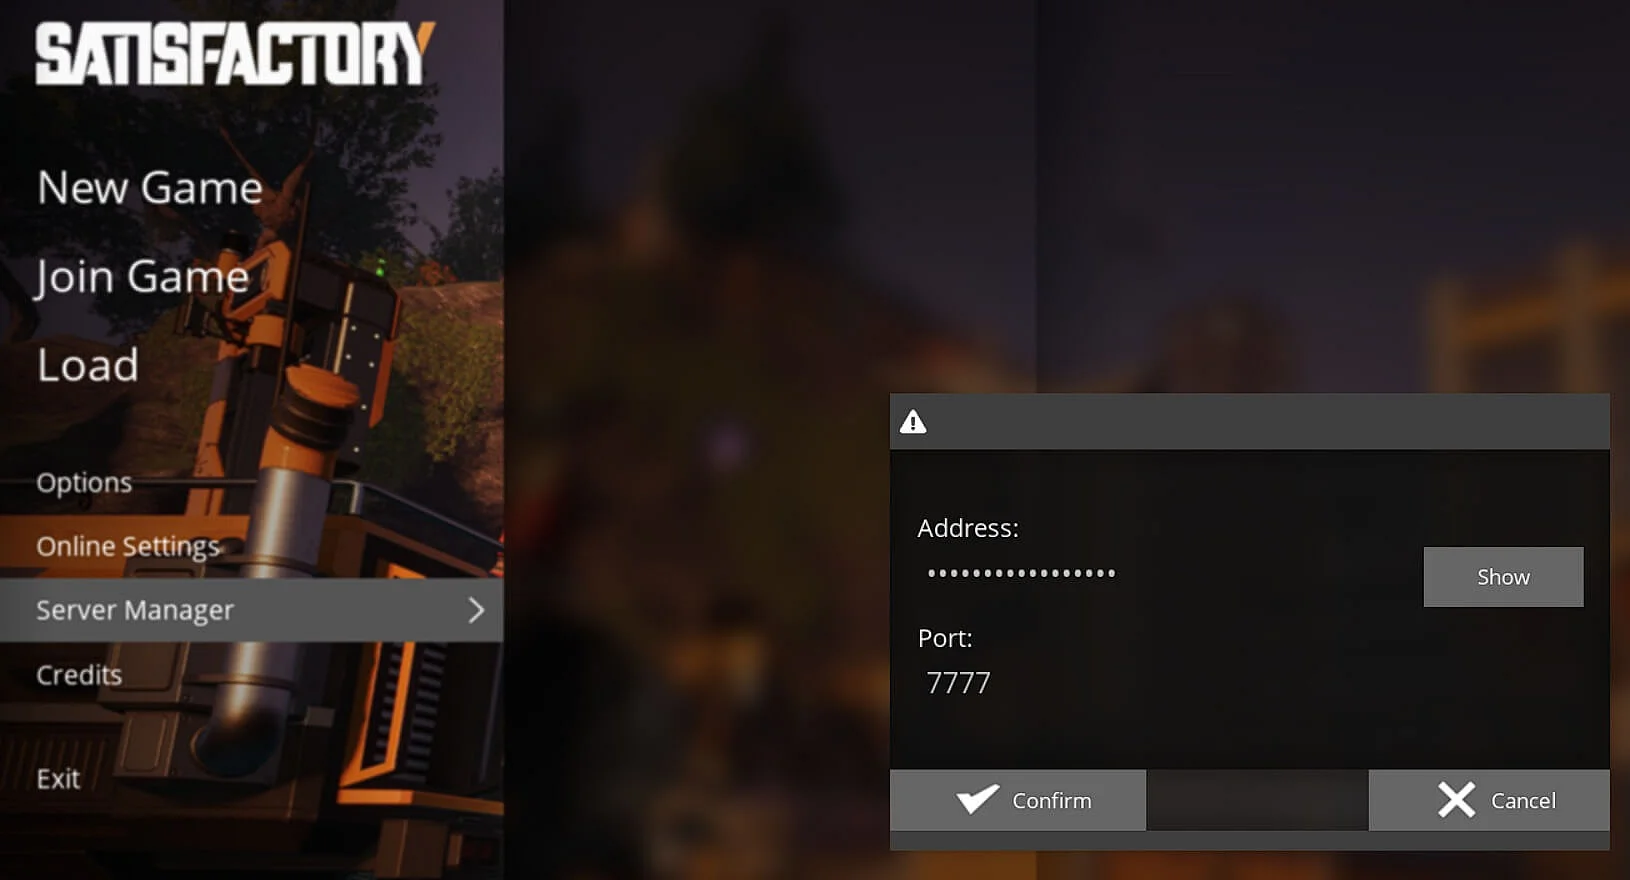
You’ll receive a message stating that the server is currently unclaimed and needs to be configured. First, enter a name in the provided field and click “Confirm”.
In the second step, set a server password, then enter it again. Apply the password by clicking “Confirm”.
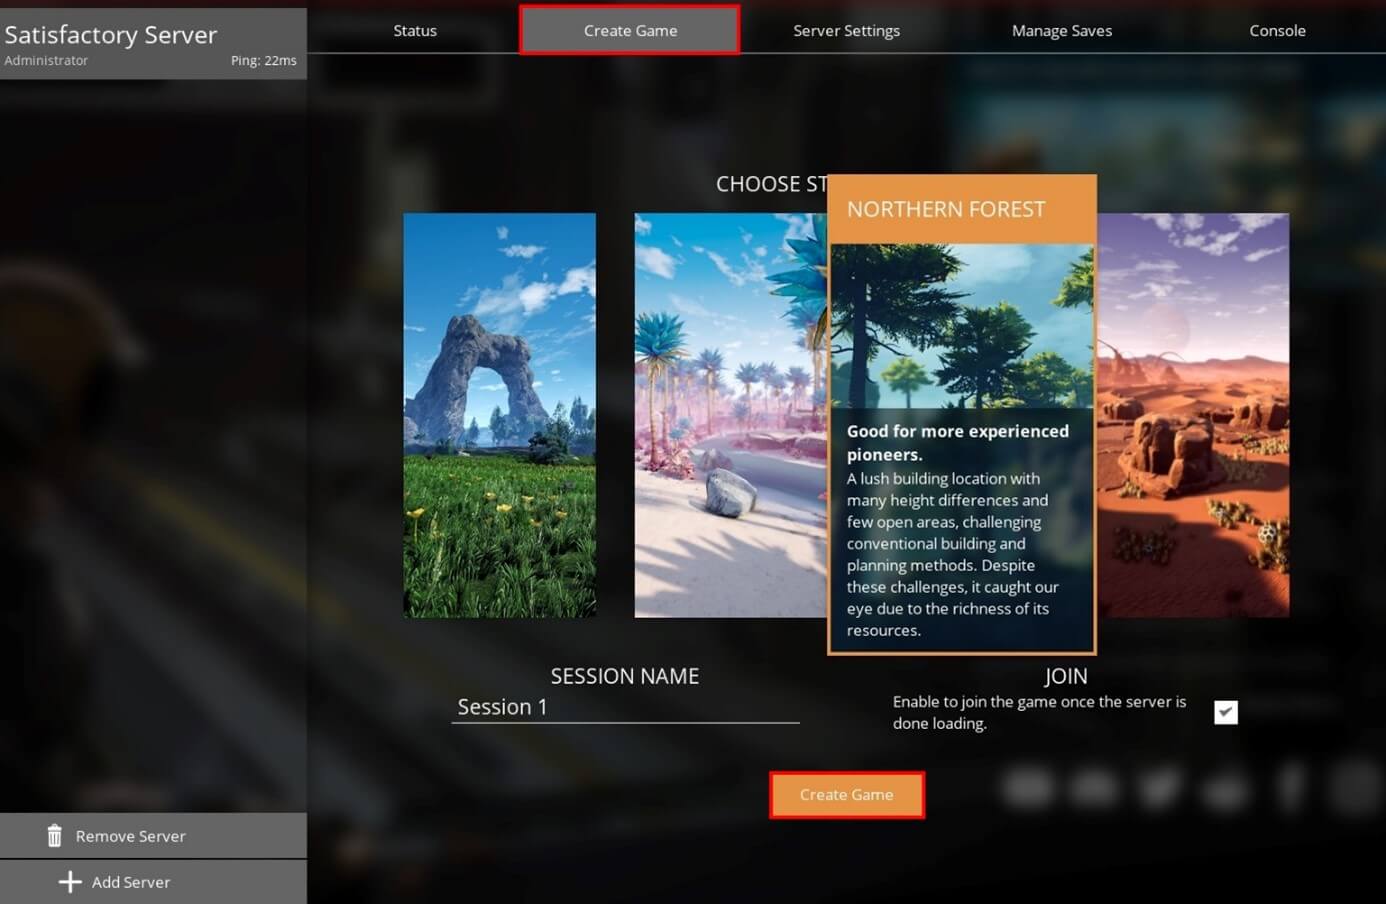
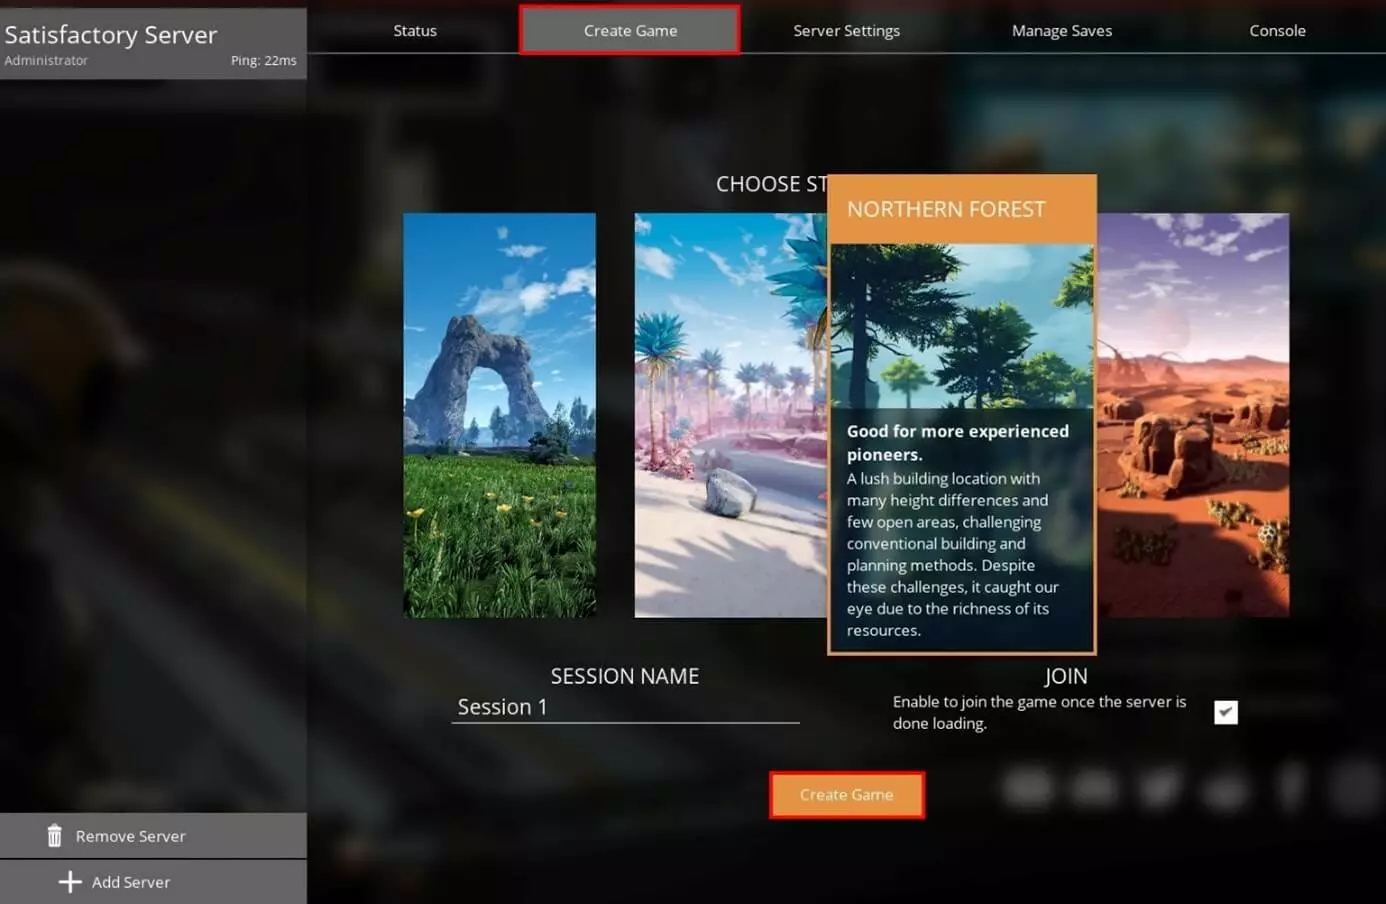
Finally, select a game world for your Satisfactory server. Switch to the “Create Game” tab and choose the desired starting area. Enter a custom session name and enable “Join” if you want to automatically connect to the Satisfactory dedicated server once the world has finished loading. To complete the process, click “Create Game” to generate the world.
Step 6: Join the server
If you selected the option to join automatically, your game will connect to the Satisfactory dedicated server as soon as the setup process is complete. For all other players, the following instructions explain how to join the Satisfactory server:
- Start the game
- Open “Server Manager”
- Click “Add Server”
- Enter the IP address and port, then click “Confirm”
- Enter the server password
- “Join Game”
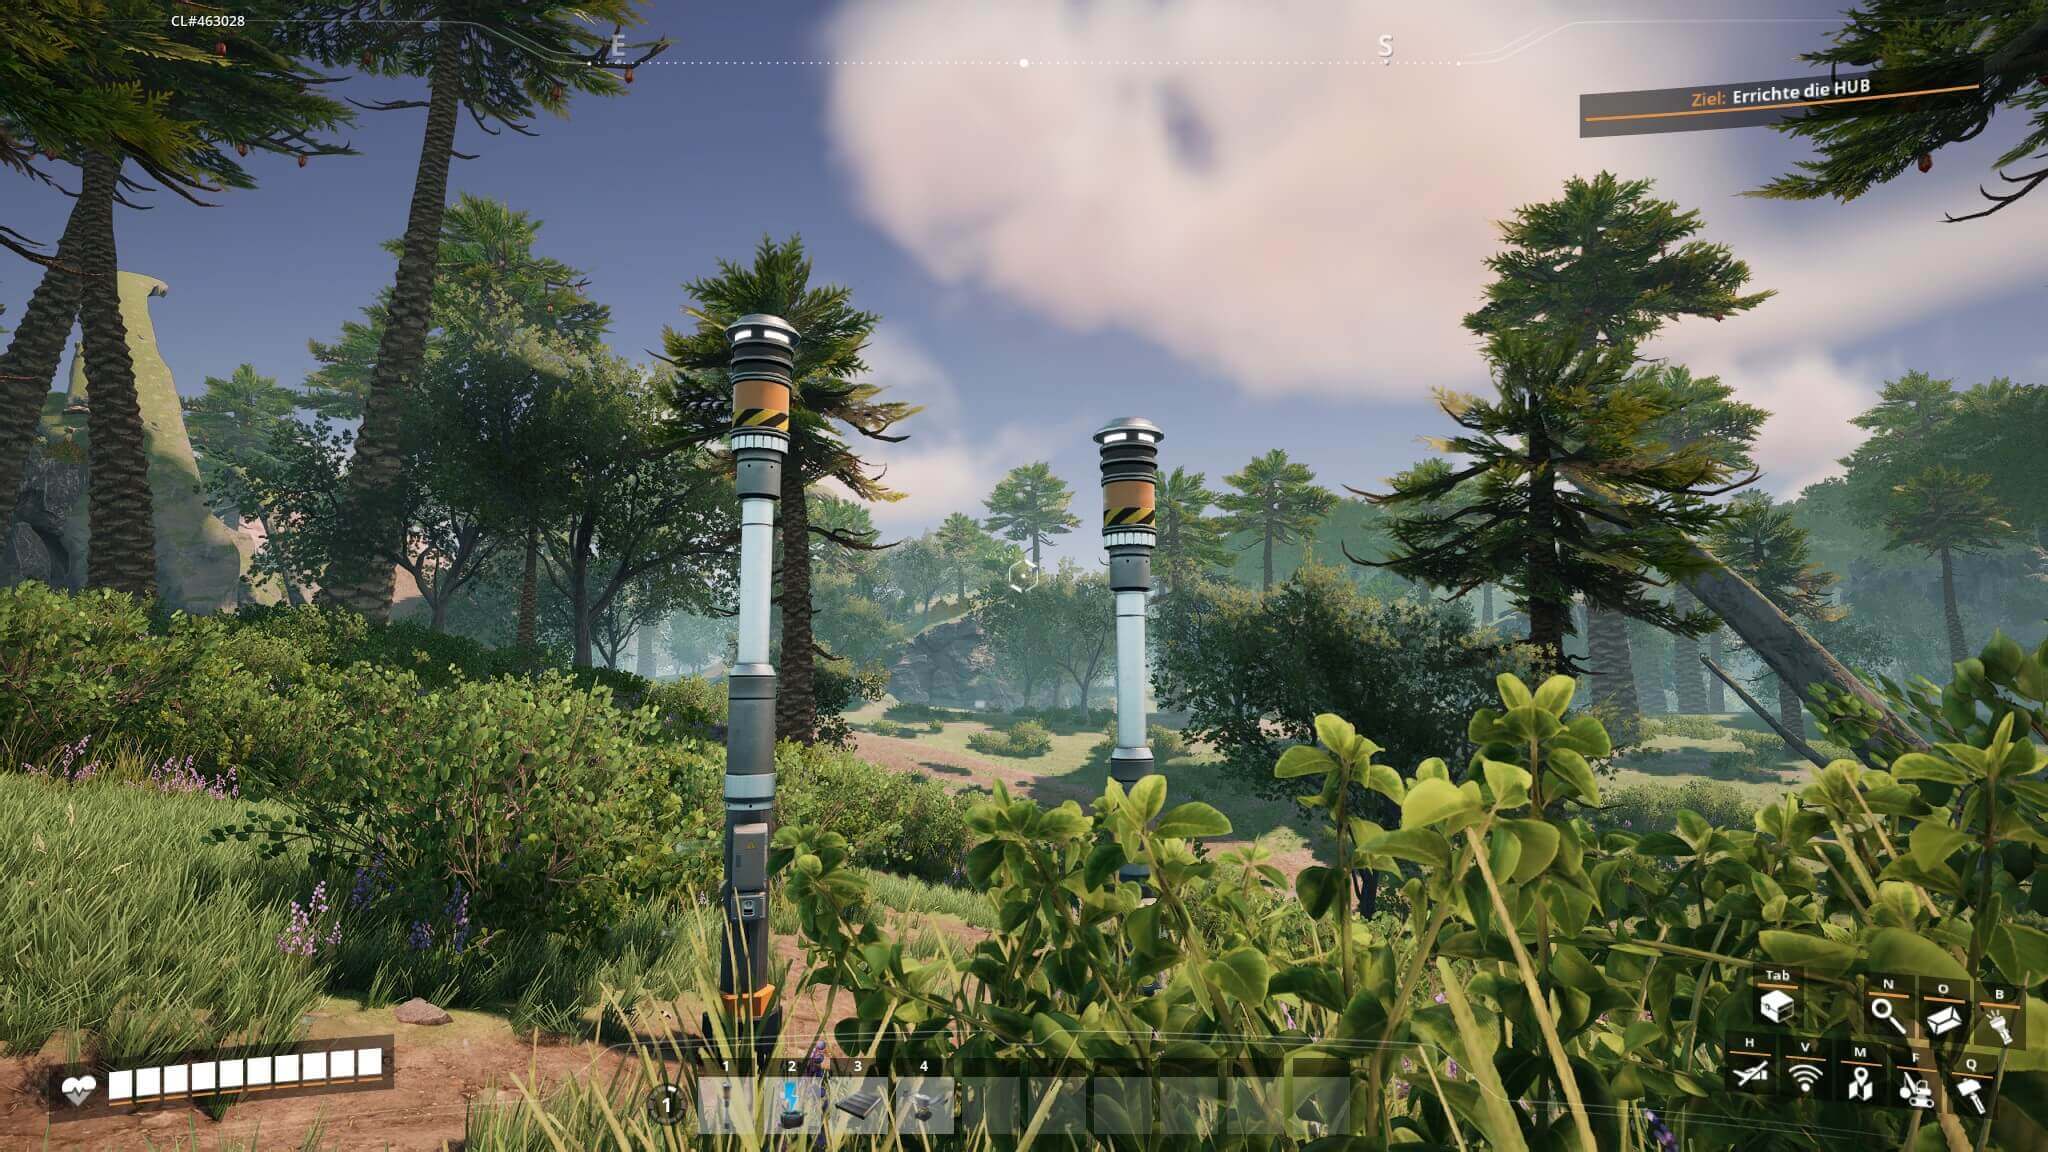
After a short loading time, you’ll be in the previously selected game world and can start your self-hosted Satisfactory adventure!
Are you looking for a communication platform for your Satisfactory server? You can create a TeamSpeak server and use it as a central platform for voice and text chats.
Step 7: Configure the Satisfactory server
After creating your Satisfactory server, you can further customize its settings. For example, it is possible to increase the default limit of four players. To do this, you need to edit the Game.ini configuration file. By default, this file is located in the following directory (replace “Username” with the appropriate user name):
C:/Users/Username/AppData/Local/FactoryGame/Saved/Config/WindowsOpen the file and add the following script at the end, replacing “X” with the desired number of players (a value of up to 127 is possible):
[/Script/Engine.GameSession]
MaxPlayers=XSave the file and restart your Satisfactory server to apply the changes.
More detailed information on configuring a Satisfactory dedicated server—such as adjusting the save interval or timeout settings—can be found in the Satisfactory Wiki on wiki.gg.
Make a statement with your own .gg domain and let the games begin.
Author

Christian Heldmaier
Christian Heldmaier is an experienced online marketing and SEO specialist from Karlsruhe. He has been working as an SEO Manager at IONOS since July 2020.