How do you open an OST file in Outlook?
Thanks to Outlook’s automatically created OST file, you can access all your information even without an internet connection. Your Outlook data is stored as a local backup in the OST file. Since OST files can’t be opened in Outlook, you first need to convert the file to a PST file to access the data. We explain how this works below.
These instructions are valid for the Microsoft 365 version of Outlook and for Outlook versions 2021, 2019 and 2016.
What is an OST file?
When you add a new email account to Outlook, a local backup of all your data is automatically saved on your computer. The local file is known as an Offline Storage Table, or OST file for short. It allows you to access your emails, contacts and calendar even if you don’t have an internet connection. Outlook will then automatically synchronize your data when you’re online again. For more information about OST files, check out the article in our Digital Guide on OST files.
- Write perfect emails with optional AI features
- Add credibility to your brand
- Includes domain, spam filter and email forwarding
How to open an OST file
The latest version of Outlook automatically creates an OST file for you, but it’s not always easy to find. To find it in Windows 11, open Windows Explorer and go to: <Drive>\User\<Username>\AppData\Local\Microsoft\Outlook.
You may not be able to see the AppData folder. This is because it is hidden for security reasons. If this is the case, go to the View tab and select Hidden items.
Outlook will automatically access this file if your internet connection cuts out. You cannot open the OST file directly. If you have several OST files, you can tell Outlook which file to use. To do this:
- Open the Control Panel.
- Go to User Accounts.
- Select Mail (Microsoft Outlook).
- Click on Email Accounts….
If you have more than one OST file, you can set one of them as the default file. Outlook will then use this file automatically the next time your computer disconnects from the internet. Multiple OST files are useful for creating Outlook backups. Also, if your email storage space is full, you can use an OST file to archive your data and save it to your computer.
You can back up your emails automatically using the email archiving solution from IONOS. This ensures that your emails are archived in secure data centers, in compliance with current legislation. Looking for a flexible and secure solution for storing sensitive data? Look no further. IONOS HiDrive cloud storage guarantees the highest level of protection and makes data loss virtually impossible.
How to convert an OST file to a PST file
An OST file is simply a local backup of your data and cannot be opened on another computer. If you want to access your data from another device, you have to convert the OST file into a PST file.
How to export an open OST file using Outlook
There are several ways to do this. One option is to download a special OST converter, which lets you select an OST file, convert it and save it. Alternatively, if you’d rather not download additional software, you can convert it in Outlook. Step-by-step instructions are provided below.
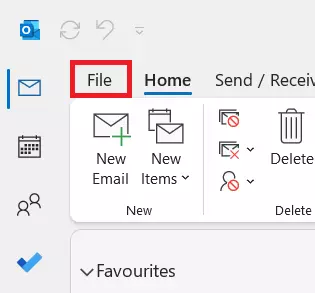
Step 1: Open Outlook. Sign in if you haven’t already, and then click on File at the top left of the ribbon.
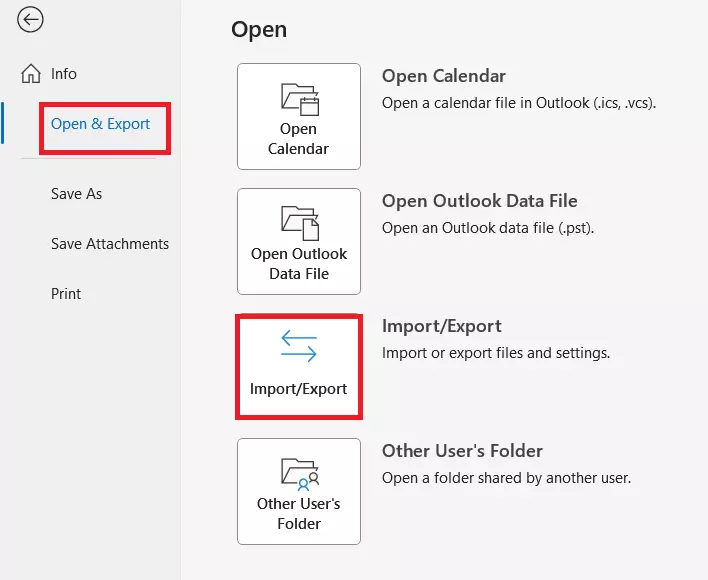
Step 2: In the menu bar on the left, click on Open & Export, then click on the Import/Export button. A pop-up window will appear.
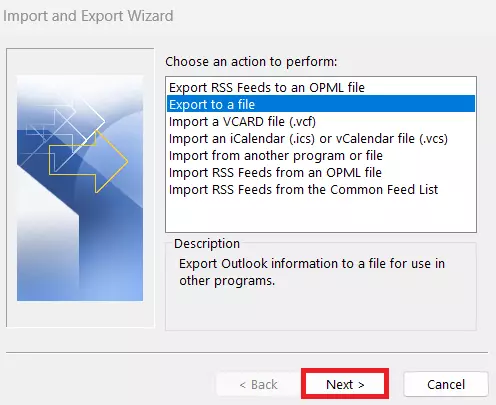
Step 3: In the pop-up window, select the third option, Export to a file, then click Next at the bottom right of the window.
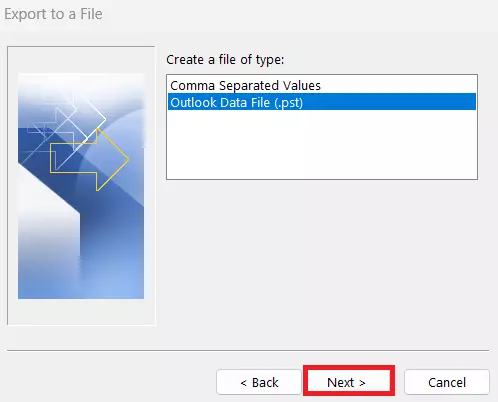
Step 4: In the next window, select the file type Outlook Data File (.pst). Click Next to continue.
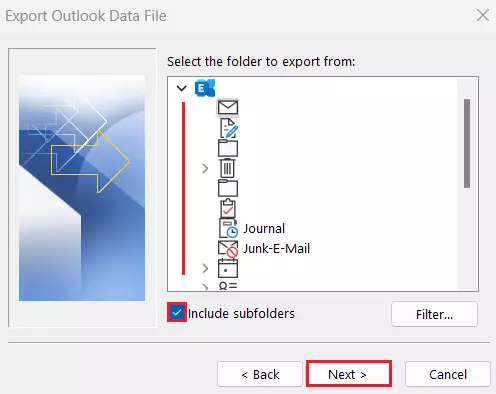
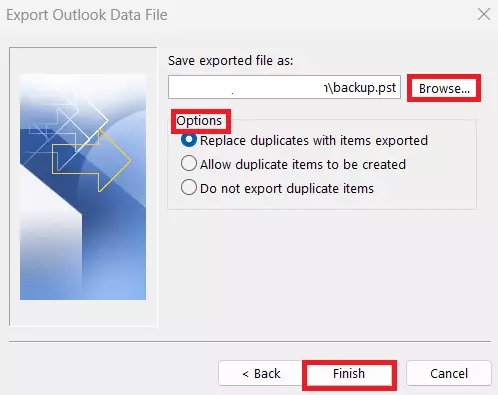
Step 5: Select the folder that you want to export by clicking on it. Make sure that the Include subfolders option is selected. This will ensure that all subfolders and their contents are exported too. Click on Next to confirm.
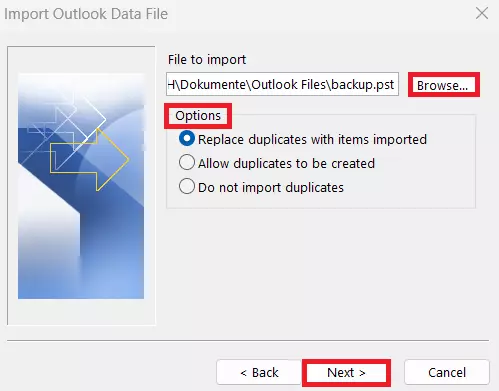
Step 6: Click on Browse… to specify where the PST file should be saved, or use the location suggested by Outlook. Either way, make sure that you know where the file will be saved. Decide whether or not you want to export duplicates, then click Next.
Outlook will now suggest that you create a password to protect your file. If you decide to set up a password, you will be prompted to enter it several times during the export/import process. If you prefer not to use a password, simply click on OK to run the export process. This may take a few moments.
Powerful Exchange email and the latest versions of your favorite Office apps on any device — get started with our free setup assistance.
How to open a PST file in Outlook
The export process is now complete, but to access your data while offline, you need to import the PST file. Similar to the export process, you want to first go to File > Open & Export > Import/Export to launch the Import and Export Wizard.
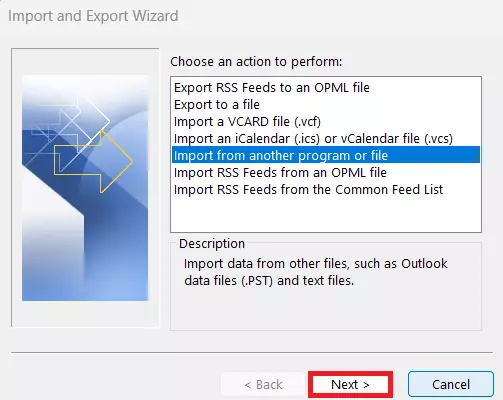
Step 1: This time, select Import from another program or file, and click on Next.
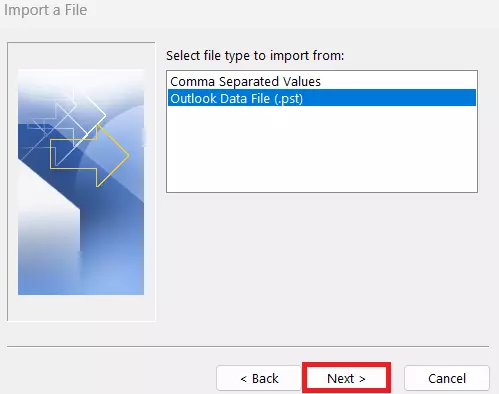
Step 2: Now, click on the file type that you want to import: Outlook Data File (.pst). Then click Next again.
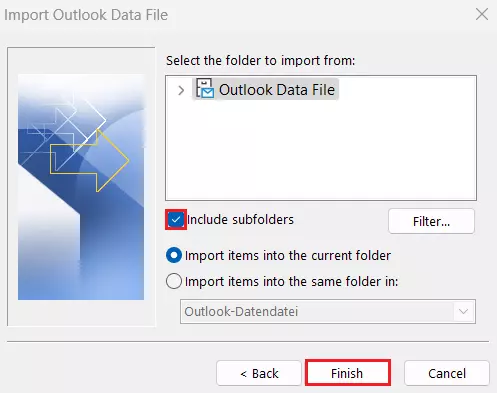
Step 3: Click on Browse… to find the PST file you created. Choose whether or not to import duplicates. Click on Finish to confirm your choice.
Step 4: Finally, select the folder that you want to import. You can use the browse feature for this. Remember to check the Include subfolders option. Finally, click on Finish. You can now access the OST file.
The Hosted Microsoft Exchange Service from IONOS helps organizations to collaborate and communicate more effectively.

